Finding ways to recover NTFS data can be very challenging, especially when you are a novice. Your files, folders, and entire partitions can be gone in a twinkle of an eye due to several reasons, such as a corrupted file system, improperly formatted partitions, hardware failure, and accidental deletion.
The good side to all these is that your data is not completely deleted. You can recover them, but only with the right techniques, which will be explained in this article. But, you must be careful about how you approach NTFS data recovery because your missing files are in a state where they could be lost forever.
Overview of the NTFS File System
Let’s get an understanding of what NTFS stands for, its meaning, and common Causes of Data Loss on NTFS Drives.
What is NTFS and How Does It Work?
NTFS, which stands for New Technology File System, was introduced by Microsoft in July 1993 as the file system for its Windows NT 3.1 operating system.
It is a technologically advanced file system designed to replace the File Allocation Table (FAT32) used in former Windows operating systems. It organizes and keeps files on the computer, with many additional features like file encryption, access control, and metadata support.
Furthermore, NTFS supports file compression and advanced security permissions, making it a standardized file system for all Windows users.
Common Causes of Data Loss on NTFS Drives
There are quite several reasons why you may need an NTFS fix. These are common reasons:
| Causes | Description |
|---|---|
| 📇 Corrupted NTFS File System | All hardware has a lifespan. This includes NTFS drives, especially since they have moving parts. Your NTFS drive tends to be unreliable and lose data at the end of its lifespan. |
| 🗃️ Formatting of NTFS Partitions | Formatting NTFS partitions results in losing all the data on your NTFS drive. The drive will be empty, requiring NTFS data recovery. |
| 💾 Hardware Failure | All hardware have a lifespan. This includes NTFS drives, especially since they have moving parts. Your NTFS drive tends to be unreliable and lose data at the end of its lifespan. |
| ⛔ Accidental Deletion | Oftentimes, users experience data loss on NTFS drives because of an accidental touch of a button or improper adjustments of volumes. |
How to Restore NTFS Partition on Windows PC
Here are 2 simple ways provided by Microsoft to restore the NTFS partition on a Windows PC:
Method 1. Assign the Drive Letter for NTFS Recovery
This involves assigning a drive letter to the NTFS partition. When you do this, you provide the system with a specific path to access and identify the NTFS partition. This enhances seamless interaction between the partition and the operating system, enabling smooth data retrieval.
However, you must make sure that the partition is in a healthy condition and not labeled as “Offline” in Disk Management.

Follow these steps to recover NTFS data by assigning a drive letter:
Step 1. Right-click on the Start menu.
Step 2. Choose Disk Management.
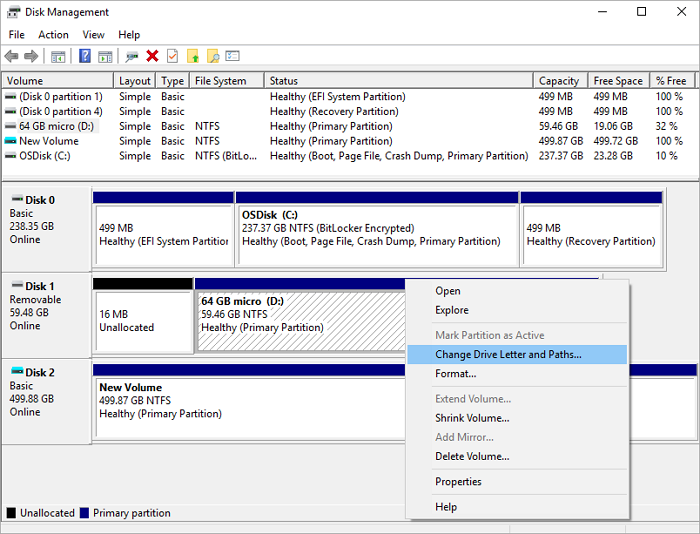
Step 3. Find the NTFS partition, right-click on it, and choose Change Drive Letter and Paths.
Step 4. Click Add and select a new drive letter. Then click OK.
Method 2. Unallocated Space to Restore NTFS Partition
This involves linking an unallocated space with the NTFS partition. This allows for the reconstruction of the NTFS partition structure. It can also be used to increase the partition size, allowing for the recovery of large data.
However, you must ensure that the file system of the unallocated space is compatible with NTFS files. Also, the space must be available for extension.

Follow these steps for NTFS recovery via the use of unallocated space:
Step 1. Right-click on the Start menu.
Step 2. Choose Disk Management.
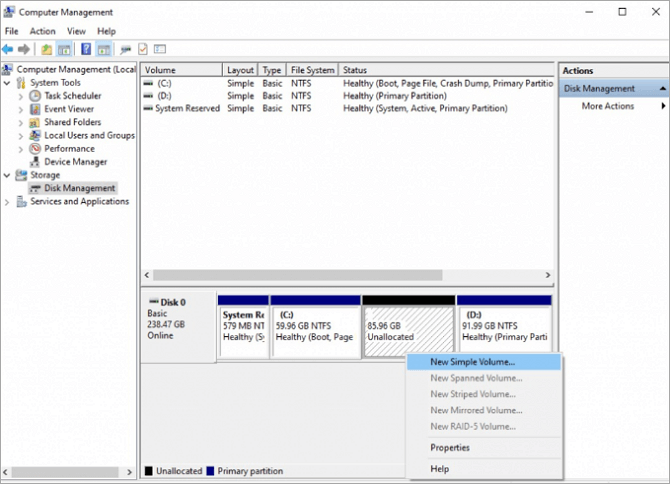
Step 3. Right-click the unallocated partition and choose New Simple Volume.
Step 4. Follow the Wizard, choosing your preferred volume size, drive letter, and format options.
Step 5. Click Finish.
If the 2 mentioned solutions are not suitable for your situation, this post will offer you other practical tools and tutorials to solve your problem: >> How to Recover Deleted Partition on Windows
How to Recover NTFS Data Using Software
Should you still be unable to restore your NTFS data, the most reliable solution is an NTFS file recovery software like ONERECOVERY. This software has repeatedly proven to be the best option to recover lost files, hence why many professionals worldwide popularly revere it.
In addition, this NTFS recovery software can be used for:
✅ Recovering over 1000 file formats, such as FAT, HFS+, exFAT, ext2/ext3/ext4, and APFS.
✅ All hard drive brands, including SanDisk, Toshiba, Sony, Transcend, etc.
✅ Data loss is caused by software crashes, malware attacks, and other 500 scenarios.

Follow these steps to recover NTFS data using ONERECOVERY:
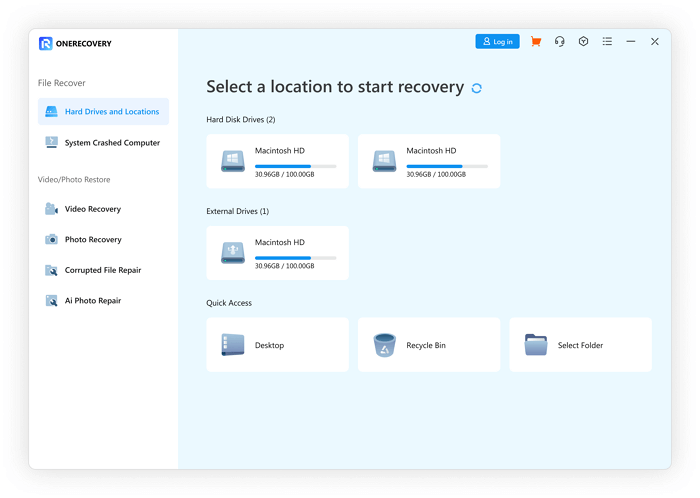
Step 1. Download and launch the application.
Step 2. Click the formatted NTFS drive and initiate the scan process. This process may take time depending on the amount of data you want to recover.
Step 3. Preview the files and choose the ones you want to restore.
Step 4. Click Recover to retrieve your files.
📥 Download now and enjoy a free trial:
In addition to ONERECOVERY, some other powerful recovery tools can help you get the NTFS partition and data back. Read the following post to learn more information:
Tips: How to Avoid NTFS Data Loss
According to the popular saying: “prevention is better than cure.” Here are some tips to consider if you value your data and want to prevent it from missing.
✨ Regular Data Backup: You should make a backup of the drive to easily retrieve the data in case it’s lost. You can do this via the Windows Backup and Restore feature on your computer or third-party backup solutions like storing every data on an external device.
✨ Avoid Unreliable Software: Be cautious of the types of software you install on your computer. Some contain malware and viruses that can disrupt the smooth functionality of your system even though you have antivirus.
✨ Monitor Disk Health: Be proactive with the monitoring of your disk health. Don’t ignore symptoms that indicate your drive is experiencing problems, such as strange noises or omission of files.
Conclusion
NTFS is the default file system for Windows, which is why NTFS data recovery solutions are important to solve the unexpected loss of files. With the 3 techniques highlighted in this article, you can easily restore your NTFS data.
NOTE: Once you notice that your NTFS data files are missing, stop using the drive until you are ready to carry out the recovery process. This is because when NTFS files are deleted on Windows, the logical ability to access the files is erased. However, the files are present on the drive until the storage space they occupy is overwritten by other data.
Learn More about NTFS Data Recovery
Below are answers to frequently asked questions that relate to the NTFS data recovery problem:
You can solve NTFS file system errors by running a System File Checker (SFC) Scan. These are the steps involved:
Step 1. Right-click the Start menu and open Command Prompt as Administrator.
Step 2. Type in: sfc /scannow. Press Enter to initiate the scan.
Step 3. Wait for the scan to be completed as it will check system files for errors and automatically attempt repairs.
Step 4. Review the scan results for any errors or repairs made.
Step 5. Restart your computer to effect the changes made.
These are the top 5 NTFS file recovery software you can rely on:
- ONERECOVERY
- Disk Drill
- Recuva
- TestDisk
- Wondershare Recoverit
You can easily recover a corrupted NTFS file by using the free data recovery software for Windows 11/10/8/7 – ONERECOVERY. These are the steps involved:
Step 1. Download and install the ONERECOVERY software.
Step 2. Launch it and conduct a deep scan of your system. The software will thoroughly scan for all corrupted files.
Step 3. Preview the files and select the ones you want to restore.
Step 4. Click Recover.


