“It’s a big day tomorrow at the office and I’ve just completed all the slides needed. Then, I decided to update my computer to Windows 11 to ensure it is running at its best. Now, I restarted my computer and everything is gone, including my recently created presentations. Please, what do I do?”
Just like the user above, many people are updating to Windows 11 because of its improved features. However, there are some unfortunate incidents that can happen as a result of the update, and the major one is losing files.

In this article, we will explain the reasons why this happens and the possible ways to recover lost files after Windows 11 update.
Why Files May Get Lost after Windows Update?
Does upgrade to Windows 11 delete files? No, but files may get deleted sometimes due to reasons like:
- 📂File Corruption: During the update process, your files can become corrupted because of incomplete installation, or power interruption. This can make it difficult to find your files, as some directory structures may be distorted.
- 👥Temporary Profile: Sometimes, Windows sign in with a temporary user profile if it encounters an issue when trying to sign in with your primary profile. When this happens, your files won’t show up because you’re logged into a completely different profile.
- 📍Different File Location: Your files may have been moved to another location. This happens mostly when the update requires significant system restructuring. Some files may be transferred to folders like Windows.old (created during the update).
How to Recover Lost Files after Windows 11 Update?
Explained below are the various solutions to recover lost files after Windows 11 update. Follow the steps involved for each solution to undelete files Windows 11.
Using Search to Find the Missing Files after Windows 11 Update
This solution is very effective if you’re trying to discover Windows update file location. It’s even more viable if you haven’t emptied the content in the Recycle Bin or Trash folder. The “search” will check all the parts of your computer to find the missing files. All you need is to remember the names of the files or their keywords.
👉Here’s how to recover lost files after Windows 11 update using “Search”:
- Right-click on the Start menu and go to File Explorer.
- Navigate to the left-hand side and tap This PC.
- Go to the top-right corner of the screen and click on the Search This PC box.
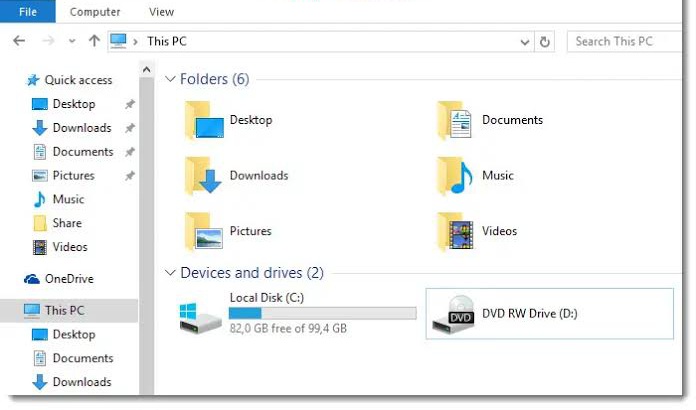
- Type the name or keyword of the missing file. Scroll through the search results to find the particular file you’re looking for.
Check Whether You’re Signed In with a Temporary Profile
As mentioned earlier, if Windows experiences difficulty in signing in with your usual profile during the updating, it will automatically create a temporary profile to sign in with. So, while you’re asking the question: does upgrading to Windows 11 delete everything? The reason why your system data and your files are not available is that you’re signed in with a temporary profile.
👉Follow these steps to make your files available:
- Click on Start and go to Settings.
- Select Accounts and tap Sync your settings. If you see an information that says: You are logged on with a temporary profile. Roaming options are currently unavailable, it means you’re signed in with a temporary profile, which is why your files are missing.
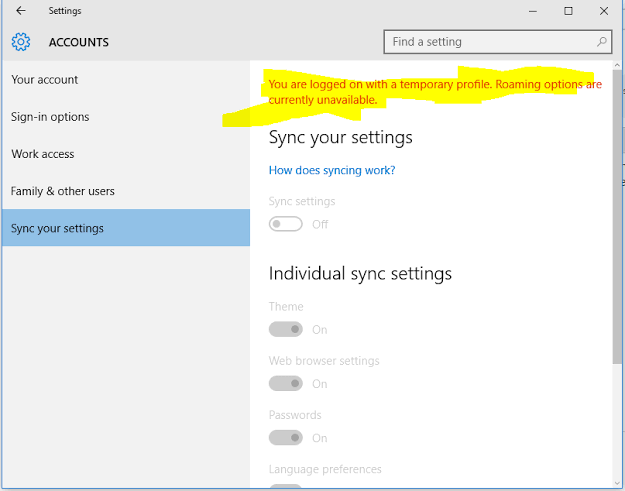
- Restart your computer and sign in again. This will remove the temporary account.
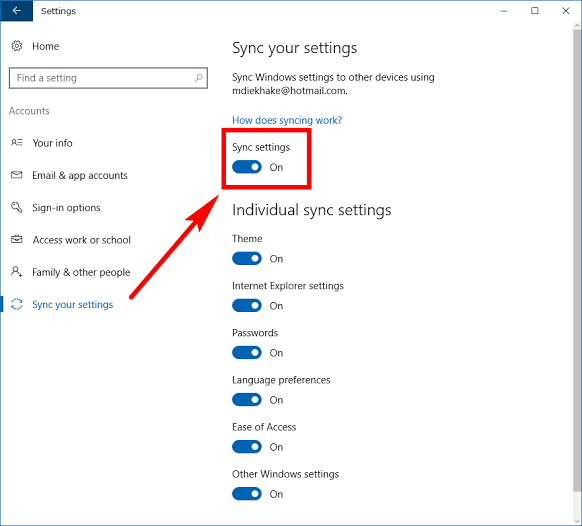
- Repeat the process. Select Start > Settings > Accounts > Sync your settings. Toggle on the Sync settings button.
Enable Administrator Account to Recover Lost Files after Windows 11 Update
While updating to Windows 11, your Administrator account may be deleted. Thus, all the files stored on it won’t be available. To get your files back, you need to enable the administrator account and sign in again.
👉Here are the steps involved:
- Go to the search box and type Computer management. Choose Computer Management (Desktop app) from the search results.
- Navigate to the left-hand side and click Local Users and Groups > Users > Administrator.
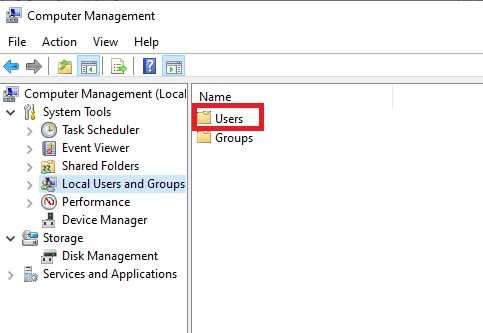
- Untick the Account is disabled box. Then, click Apply and OK to confirm the changes.
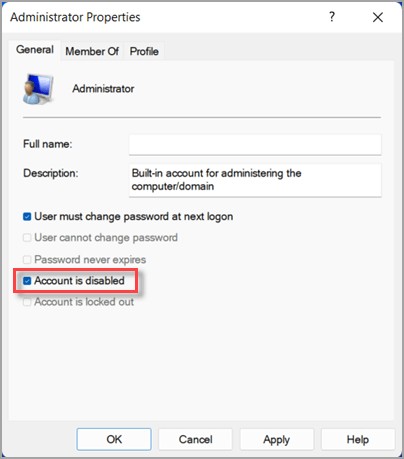
- Restart your computer and sign in using the Administrator account
Recover Files after Windows 11 Upgrade with Backup
If before upgrading to Windows 11, you backed up your files to an external storage device using the File History feature or Backup and Restore feature, you can easily restore lost files.
👉Follow this process to recover lost files after Windows 11 update using File History:
- Connect the external storage device where the backup is stored.
- Go to the search box and type File History. Open Restore your files with File History from the search results.
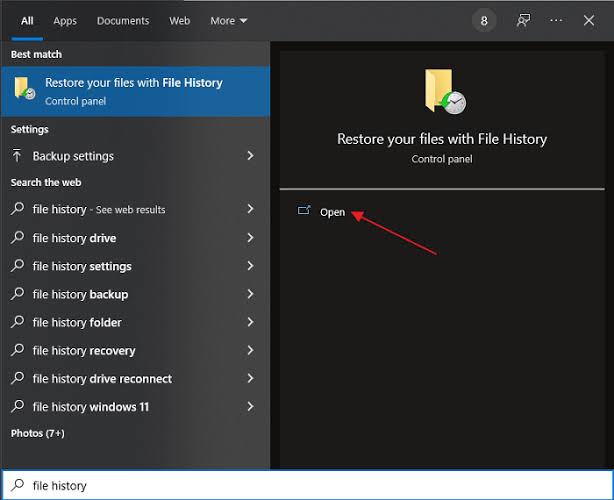
- Find and select the missing files you want to recover.
- Click the green button below. It stands for Restore. The files will be restored to their original location.
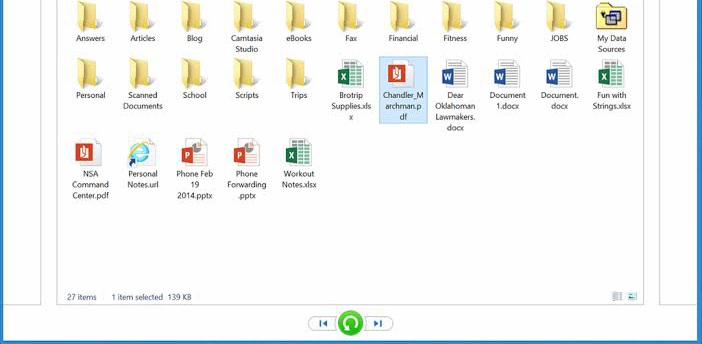
- To recover the files to a different location, right-click the Restore button, select Restore to, and choose your preferred destination.
👉Follow this process to restore lost files after Windows 11 update using Backup and Restore:
- Connect the external storage device you used for the backup to your computer.
- Go to the search box and type Control Panel. Choose the corresponding result.
- Click on Backup and Restore (Windows 7).
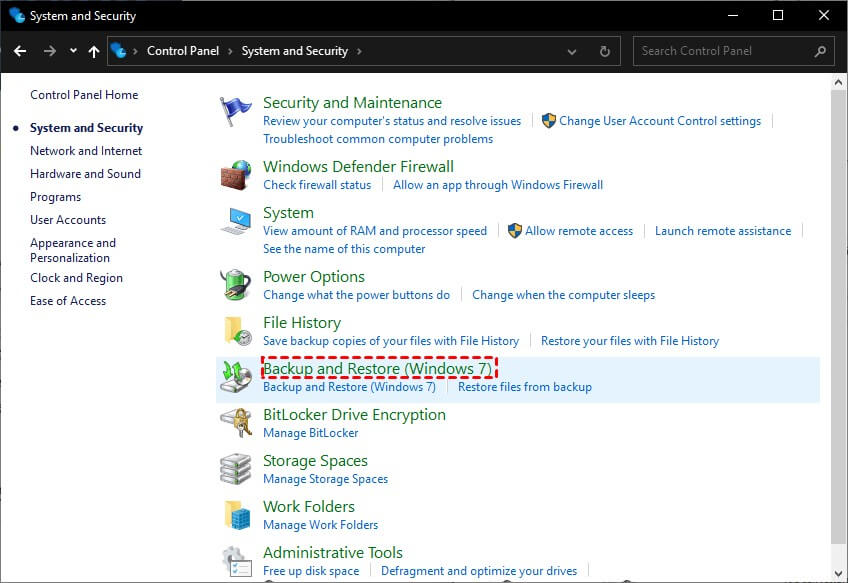
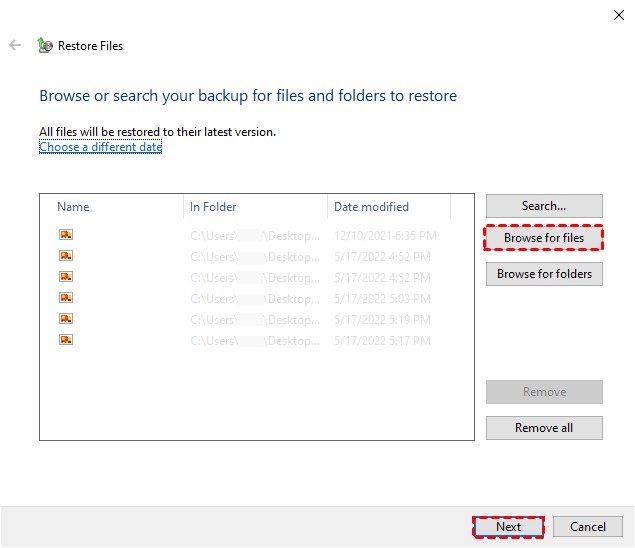
- Select Restore my files and click on Browse for files to select the files you want to restore. Click Next to continue.
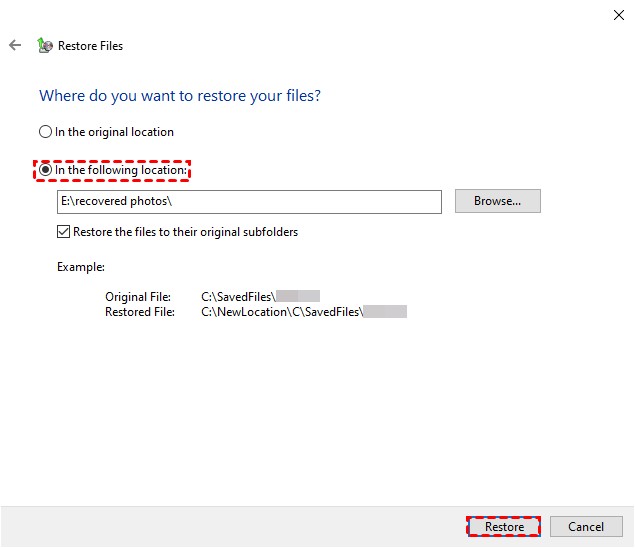
- Choose where to save the files. Finalize the process by clicking Restore.
Recover Lost File after Windows Update without Backup
This solution is your last resort if you’ve tried the solutions above and they failed, and you don’t also have a backup to restore your lost files. It involves using third-party software, of which we recommend ONERECOVERY.

ONERECOVERY is built with advanced scanning and recovery technologies that restore lost files after a Windows update in 3 simple steps. If you’re wondering where do deleted files go on Windows, this software will get your file and where they are located just by a simple scan. It has a user-friendly interface, which makes it easy to use for computer beginners, intermediate users, and experts.
With ONERECOVERY, how to restore files on Windows 10/11 is made easy, as it features a dual-scan mode – Quick Scan and Deep Scan that efficiently find your files whether they were accidentally or intentionally deleted.
👉Follow these steps to recover lost files after Windows 11 update using ONERECOVERY:
- Download and install ONERECOVERY app on your computer.
- Launch the ONERECOVERY app and select the storage where the files were stored before they got lost.

- Immediately, ONERECOVERY begins to scan the storage for all lost files.
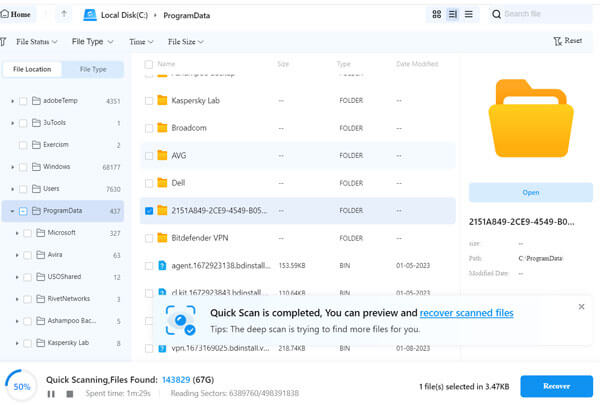
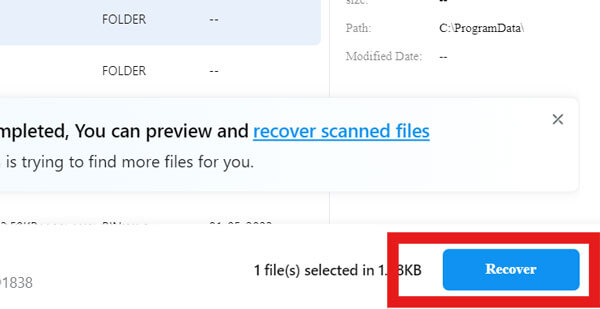
- Preview the scan result, select the files you want to restore, and click Recover.
Conclusion
Don’t be scared if your files go missing after updating to Windows 11 – they are still recoverable. In this article, we’ve explained the various ways to recover lost files after Windows 11 update. Explore each of them according to how they are arranged to get back your files without any hassle.
FAQs on Windows Deleted Files Recovery
Do you still have other questions about Windows 11 update file deletion, such as: does upgrading to Windows 11 delete files? Read on to get more understanding.
1️⃣How to Restore Permanently Deleted Files in Windows 10?
There are several ways to restore permanently deleted files in Windows 11, but the most reliable is using ONERECOVERY.
👉Here are the procedures involved:
- Download and install ONERECOVERY on your PC.
- Open the ONERECOVERY app and select the location where the files were stored before deletion.
- Automatically, ONERECOVERY begins to search for all deleted files, including those that were mistakenly or intentionally deleted.
- Open and check through the search results to select the files you want to retrieve. Then, click Recover.
2️⃣Will My Files Disappear If I Update to Windows 11?
Will upgrading to Windows 11 delete my files? No, your files won’t delete or disappear if you update to Windows 11 except you make a wrong decision during the update process. During the Windows setup, ensure you select Keep personal files and apps. Doing this will keep your files secure.
3️⃣How to Upgrade to Windows 11?
👉Follow this process to upgrade to Windows 11 correctly:
- Begin by checking if your computer meets the minimum system requirements for Windows 11.
- As a precautionary measure, it’s advisable to back up your system data and files to an external storage device.
- Download Windows 11 from Microsoft. After downloading, double-click the Setup.exe file to begin the installation process. Follow the on-screen instructions to complete the installation process, which will automatically upgrade your computer to Windows 11.


