Have you lost your favorite tunes? Even though most music today is streamed and listened to online, some of us still download and store our favorite grooves on our computers or phones.
An accidental deletion of a batch of files or a hardware failure is the most likely cause of the loss, but you do not have to worry about how to recover music files anymore.
We will teach you about some of the best audio recovery tools and methods for Windows, Mac, iPhone, and Android.
How to Prepare for the Audio Recovery
As you prepare to restore lost audio files, a few things need to be considered to ensure smooth operation.
📌 Prevent Data Overwrite: When a file is deleted from a device, its space is marked available to store new data. If you continue to use the device, new data will be written over that space. In this case, you can only use professional tools to recover the overwritten files.
📌 Identify the Cause: Understanding the cause of data loss can help you make a recovery more effective. For example, if you accidentally deleted the file, a data recovery program would be sufficient.
📌 Check for Backups: If you recently made a backup of the folder or music file that was lost, recovery is straightforward. Checking for backups beforehand might save you a lot of time.
📌 Set Up an External Drive: It is better to save the recovered file on an external device as you proceed with the data recovery. Saving the recovered file in its original location might expose it to the risk of data loss again.
How to Recover Lost Music Files on Windows and Mac
We will provide three tested methods to recover music files with a step-by-step guide. With these tools, you will be equipped to face any emergency related to data loss.
Recover Lost Music Files with ONERECOVERY (on Windows/Mac)
Have you ever encountered a scene like this: you lost an important audio recording, and now you cannot recover it; or you tried methods like restoring from the recycle bin and using file backups, which did not help? In such a situation, specialized data recovery tools like ONERECOVERY can help.
ONERECOVERY software can recover multiple audio file types. It is capable of handling file formats such as MP3, AA3, WAV, FLAC, and more. The platform is easy to use with its simple user interface and intuitive operations. The platform is easy to use, with a simple user interface and intuitive operations.
Another notable advantage of this software is its excellent compatibility. To be more specific, ONERECOVERY can be used as music recovery software for Macs and Windows PCs. No matter what storage device the lost audio files were stored on, including SD cards and external drives, this software can always be helpful for data recovery.
💡 Follow the steps below to restore lost music files:
Step 1. Go to the TinyFrom ONERECOVERY Site to download and install this software. Then, launch it on your device.
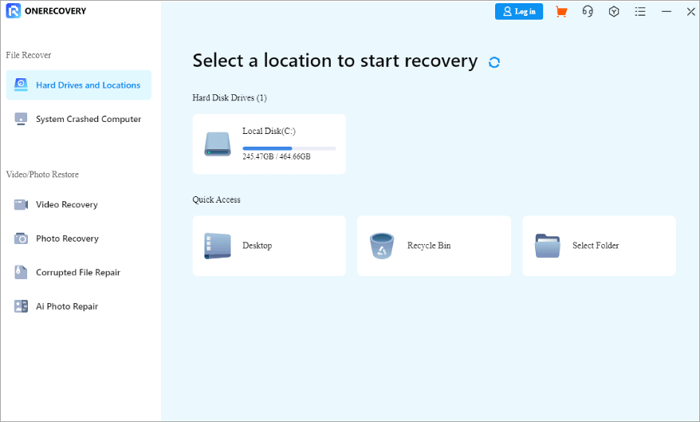
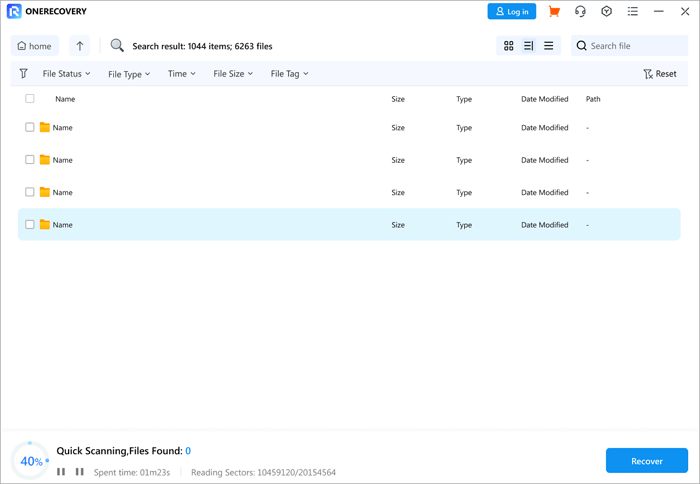
Step 2. Select the location of the lost music file and start the scan process. ONERECOVERY will deep scan the drive and show you a list of deleted files after a few minutes.
Step 3. Select the file you want from the list and click the “Recover” button. You can opt to preview the selected file before proceeding to the next step.
Step 4. The lost file will be restored to the destination you selected.
📥 Download it to give it a free try.

Restore Lost Audio Files from File History (on Windows)
File history, a built-in feature in Windows, allows users to back up and recover lost music files. Once enabled, file history regularly backs up versions of your audio files in the background.
However, to benefit from Windows’ file history feature:
➤ Make sure that file history is scheduled to run regularly to capture changes made to files.
➤ Use an external drive to save file history backups to protect against a hardware failure.
💡 Now, you can follow these steps to get back your music files through File History:
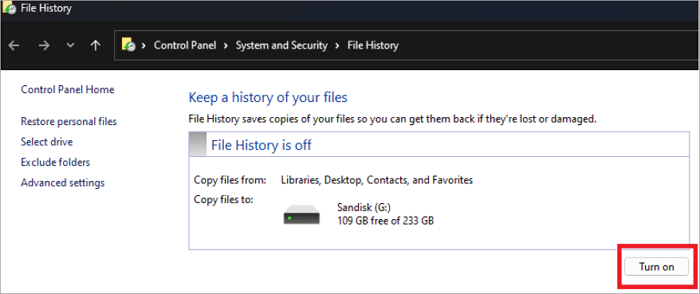
Step 1. In the search box, type “File history.” You will be taken to the control panel, and if you have not enabled the file history, turn it on.
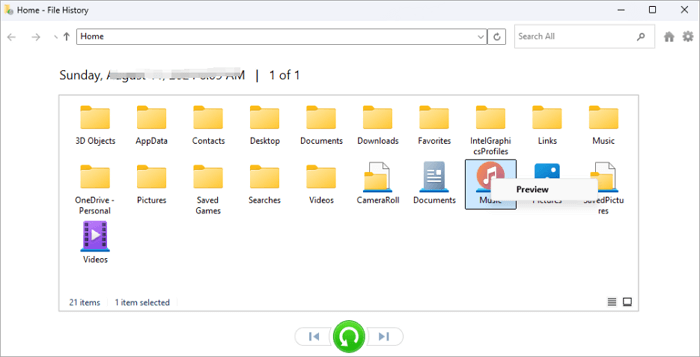
Step 2. If you have already enabled File History on your computer, type “File History” in the search bar and select “Restore your files from File History” from the search results.

Step 3. Choose the deleted music file you were looking for and preview it.
Step 4. Click the green restore button. Then, your deleted file will be restored.
Recover Lost Audio Files Using a Time Machine (on Mac)
The Time Machine is a feature of Mac computers, that is invaluable for anyone who wants to recover lost audio files. However, you need to back up your music files in Time Machine to benefit from this tool.
If your USB drive is included in the Time machine configuration, a deleted audio file in the USB drive can be recovered using the same method.
💡 The following step-by-step tutorial will guide you through the restoration of music files using Time Machine:
Step 1. Click the “Time Machine” icon from the menu bar at the top of the screen, and then select “Enter Time Machine” from the drop-down list.
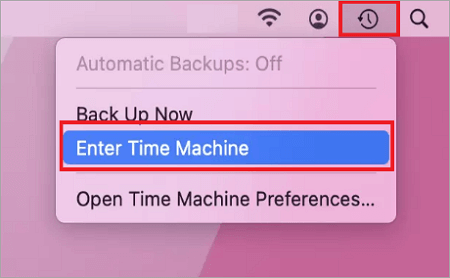
Step 2. The Time Machine will display your backed-up files. Using the up/down arrows, you can browse the files to find the deleted music file.
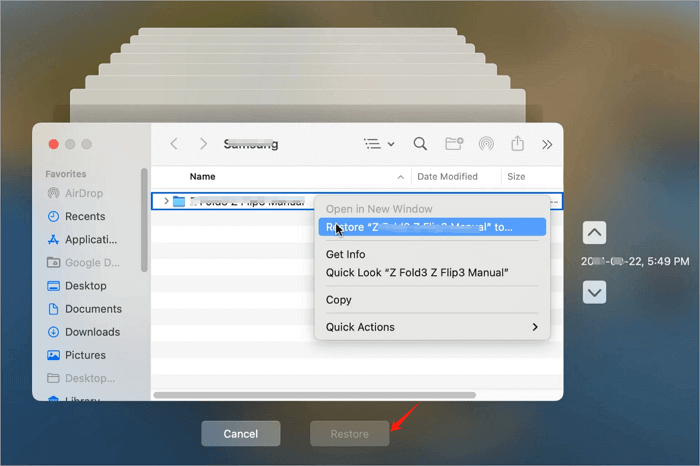
Step 3. Once you find the deleted file you were looking for, click on it to select it. Then, click the “Restore” button to recover your music file.
Step 4. Your lost audio file will be restored to its original location.
✨ More Detailed Tutorial: >> How to Restore from Time Machine
How to Recover Audio Files on Android and iPhone
If you saved an important recording on your Android or iPhone and it suddenly disappeared, don’t worry—it’s not gone forever. Below is the perfect solution.
Audio Recovery Solution for Android Phones
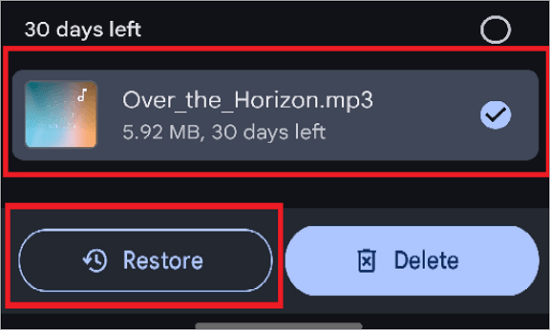
Google Files or Files by Google is an app developed by Google to organize files in Android systems. Your deleted audio file will be retained in the trash folder of the files app for 30 days, which will make recovery easy. If the Files app is not already available on your phone, go to the Play Store to download and install it.
💡 Then, we can start retrieving the music files on Android according to the following steps:
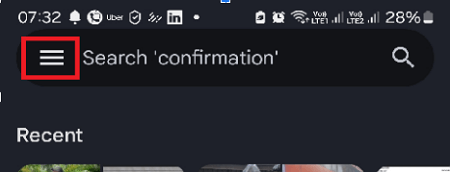
Step 1. Open the files app. Tap on the three horizontal lines on the top left corner of the app to open the menu.
Step 2. Open the bin from the menu, and you will see a list of files available for recovery. Select your lost audio file from the list.
Step 3. Click restore at the bottom of the pane. The app will need you to confirm the recovery and then restore your lost audio file to its original location.
What should you do if you can’t find the music files you want to recover in the Recycle Bin? The following blog will teach you how to restore the lost files that are not in the Recycle Bin.
Audio Recovery Solution for iPhones
If you accidentally deleted a music track downloaded from iTunes from your iPhone, there’s still hope. The fastest recovery method is to check your iTunes library, as the song might still be there.
However, you should be mindful of overwriting existing tracks on your phone when syncing with iTunes. iTunes features may vary depending on the country or region.
💡 Now, let’s dive into the detailed steps for recovering audio files on iOS devices.
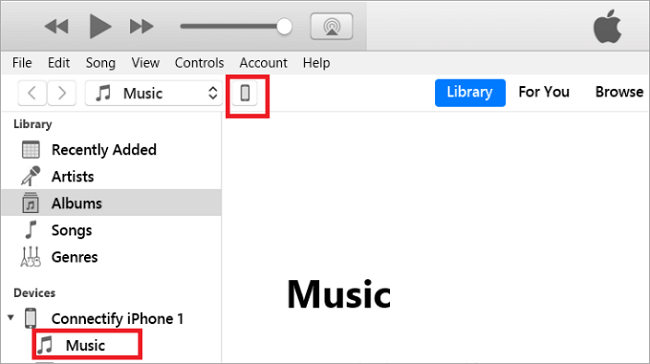
Step 1. Connect your iPhone to your computer using a USB cable. Then, open iTunes on your iPhone.
Step 2. Click on the phone logo. It’s in the upper left corner of the window.
Step 3. Select Music from the left side of the window panel. You can opt to sync the entire music library or select the track you are looking for.
Step 4. If syncing does not start automatically after clicking the apply button, press sync to start the process.
It is advisable to back up our iPhone before attempting to sync to avoid accidental overwriting of files.
Conclusion
Losing access to your favorite music track can be stressful, and knowing which tool to use can make all the difference.
The solution can be a specialized data recovery tool like ONERECOVERY or as simple as recovering from the Trash folder. In many cases, you can recover audio files from the Trash folder for up to 30 days.