Have you ever taken a photo, only to find it washed out with too much light?
An overexposed picture can ruin important details and make the image appear excessively bright or white. This issue often fills your irreplaceable moments with frustration.
In this post, we will guide you through how to fix overexposed photos using multiple tools like ONERECOVERY, Lightroom, and Photoshop. Whether using a PC, laptop, or MacBook, this step-by-step guide will help you repair your high-exposure photos and return the missing details. Let’s dig in!
Overview of High-Exposure Photos
Before diving into the technical side of overexposure, let’s ensure we are all on the same page. Now, what exactly is happening in these high-exposure shots? Let’s break it down.
What is an Overexposed Photo?
Ever taken a photo that looked way too bright, almost blinding, and you could barely make out any details? Frustrating, right? That is what we call an overexposed photo.
An overexposed image occurs when a camera’s sensor receives too much light, resulting in an image that looks overly bright or washed out. In overexposed photos, details in bright areas may be lost and it becomes difficult to distinguish between different parts of the image.
What Causes Overexposure in Photos?
Several factors contribute to overexposure in photography. Common causes include using a high ISO setting in bright conditions, a slow shutter speed that allows too much light to enter, or an aperture that is too wide.
In situations where lighting changes, such as outdoors or in direct sunlight rapidly, exposure settings may not be adjusted fast enough which leads to high-exposure photos.
How to Fix Overexposed Photos with ONERECOVERY
As a versatile repairing tool, ONERECOVERY can help fix images on Windows, Mac, and online. Although the steps to utilize the desktop software and the online tool are different, both of them are intelligent and intuitive. Now, let’s learn how to use them respectively.
Repair Overexposed Pictures on the Desktop
One of the most effective ways to fix overexposed photos is by using ONERECOVERY’s AI photo repair tool. It is a powerful tool for restoring damaged files, photos, and videos. ONERECOVERY is enhanced with AI technology and is the #1 solution to fix too much white in a photo or blurry images.
If you are dealing with any other picture issues like underexposed, old damaged, grainy, or pixelated photos, this tool is all you need!
Using the desktop version of ONERECOVERY allows you to correct overexposed pictures in just a few steps mentioned below:
Step 1. First of all, download and install ONERECOVERY from the official website.
Step 2. Now, launch the software and select the AI Photo Repair option.
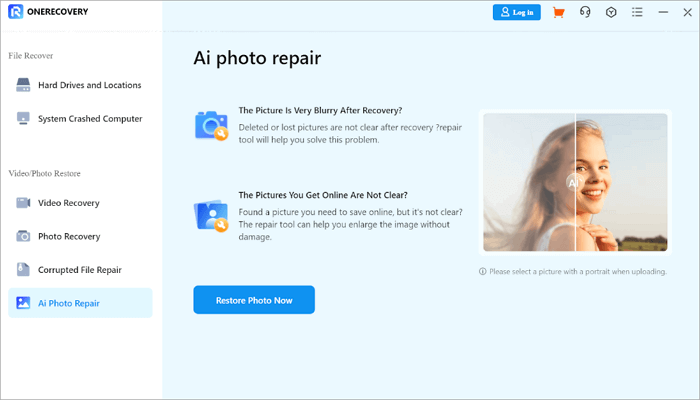
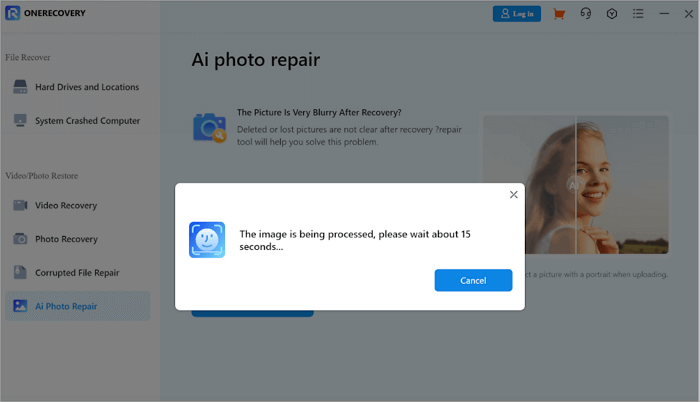
Step 3. Upload the Overexposed Image by clicking on the Restore Photo Now button.
Step 4. Wait for the restoration to complete. It uses AI-based enhancement tools to reduce the exposure and restore lost details of the pictures.
Step 5. Once the process is complete, save the restored image to your device.
The desktop version of ONERECOVERY by TinyFrom offers more robust editing options, including advanced filters and adjustments, and is ideal for larger projects or for those who require precise control over their photo edits.
Even if you accidentally delete important pictures for some reason, this software can help you get deleted images back.
📥 Download it now and try it out for free.

Fix Too Much White in a Photo Online for Free
Don’t want to go through the hassle of downloading any external software? We have got you! Use the ONERECOVERY online photo restoration tool.
It offers a simple three-step solution to edit overexposed photos online. Although this photo restoration tool is free to use, its functionality is not inferior to its desktop version.
ONERECOVERY supports enhancing photos in almost all the common picture formats, such as repairing JPG/JPEG, PNG, TIFF, RAW, CR2, NEF, NRW, etc.
Moreover, it can restore photos regardless of the device used, including those taken by mobile phones, DSLRs, action cameras, webcams, and even CCTVs.
Follow these steps to fix an overexposed photo using the ONERECOVERY online tool:
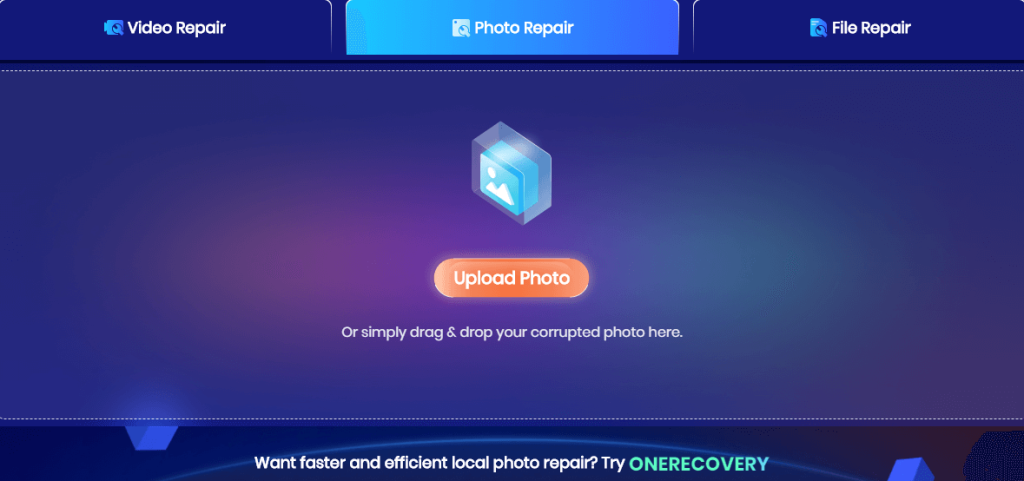
Step 1. Go to the ONERECOVERY Online Tool page.
Step 2. Click on the Upload Photo button and select the image you want to fix.
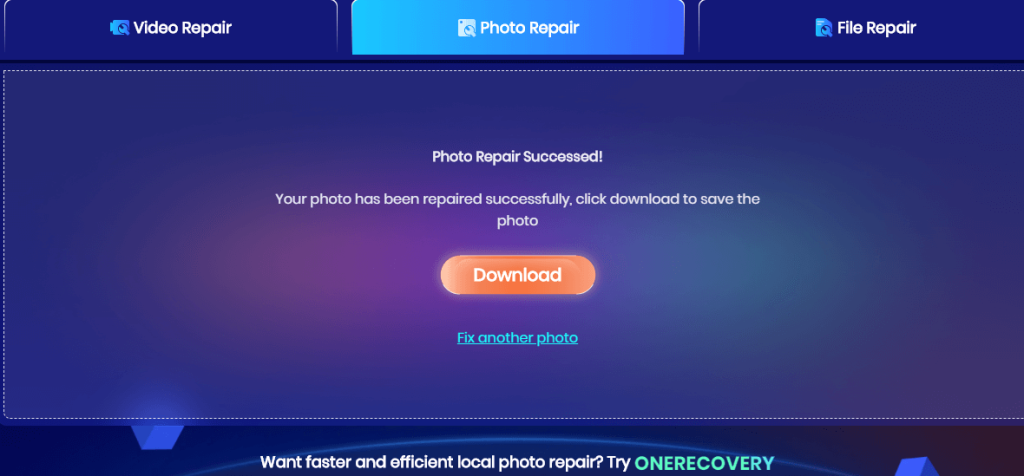
Step 3. After uploading the file, wait for the tool to fix the exposure.
Step 4. Once satisfied, download the fixed photo without any need for software installation.
The online version of ONERECOVERY is perfect for users who want to correct overexposed images without committing to a full desktop program. It is also entirely free to use for small, quick edits.
How to Fix an Overexposed Photo in Lightroom
Another popular tool for fixing overexposed pictures is Adobe Lightroom. Lightroom offers precise exposure adjustments with user-friendly sliders and filters and is a favorite among photographers.
Repair Overexposed Pictures with Adjustment Sliders
Lightroom’s adjustment sliders provide a quick and effective way to fix overexposed photos. This method works best for moderately overexposed images. The sliders offer fine control and allow you to make precise adjustments to fix high-exposure photos without overcompensating.
Here are the steps to use Lightroom:
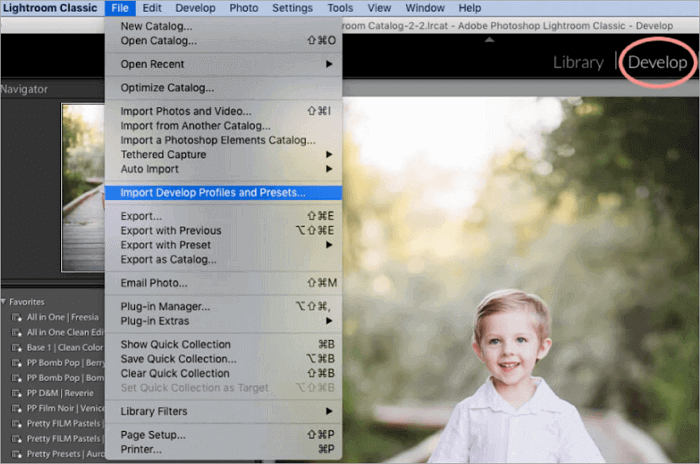
Step 1. Open Lightroom on your device and import the overexposed image.
Step 2. Now, navigate to the Develop module.
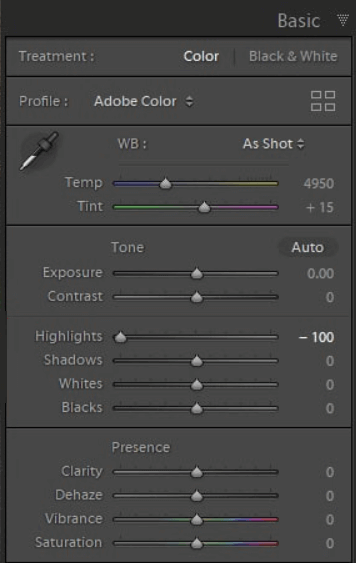
Step 3. Here adjust the Exposure slider to reduce the brightness of the image.
Step 4. You can fine-tune the Highlights slider to recover details in the bright areas.
Step 5. Also, use the Shadows slider to bring out darker areas of the photo.
Fix Overexposed Images by Adding a Filter
Sometimes, applying a filter can balance an overexposed image, especially if you want to add a creative touch. Here is how you can do it in Lightroom:
Step 1. In the Develop module, go to the Presets panel.
Step 2. Choose a preset filter that suits the overall tone of your photo.
Step 3. Apply the filter and adjust the exposure sliders to balance the image.
Using filters is a quick and artistic solution for overexposed photography. However, for more precision, manual adjustments with the sliders are often recommended.
How to Repair High-Exposure Photos in Photoshop
Who isn’t aware of the excellent features provided by Adobe Photoshop? It offers more advanced editing capabilities for users who need to fix overexposed photos. With a wide array of tools, Photoshop allows for intricate corrections that go beyond simple slider adjustments.
Fix Too Much White in a Photo with Blend Mode
One method to correct overexposed images in Photoshop is by using the blend mode:
Step 1. Open the overexposed image in Photoshop.
Step 2. Duplicate the image layer.
Step 3. Change the blend mode of the duplicate layer to Multiply.
Step 4. Adjust the opacity of the layer to reduce the effect and achieve the desired balance.
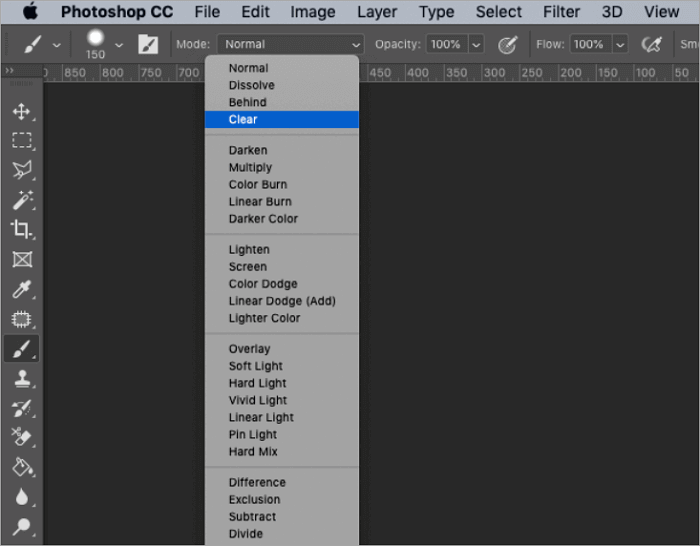
The Multiply Blend mode darkens the image by combining it with itself, making it an effective way to fix too much white in a photo.
Repair Overexposed Images Using Levels Adjustment
Another effective method in Photoshop is the Levels Adjustment tool, which allows you to manipulate the brightness and contrast of an image:
Step 1. Open your image in Photoshop.
Step 2. Go to Image, next click Adjustments, and then choose the Levels option.
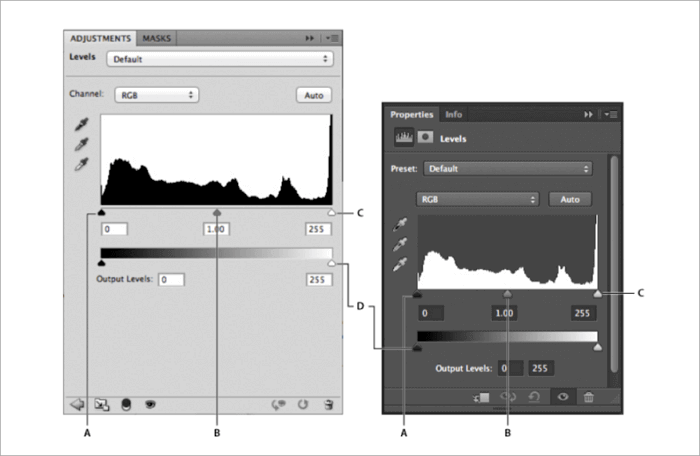
Step 3. Adjust the sliders to reduce the highlights and recover lost details.
Step 4. Finally, fine-tune the midtones and shadows to balance the overall image.
The Levels Adjustment tool offers detailed control over the brightness and contrast, making it a preferred choice for more complex corrections in overexposed photography.
Tips for Avoiding Overexposed Photos
True that, “Prevention is always better than cure”. So here are a few tips to avoid overexposure when taking photos:
- Shoot in RAW: RAW format retains more image data, giving you greater flexibility when editing overexposed images.
- Lower the ISO: Reducing the ISO will limit the camera’s sensitivity to light, preventing overexposure in bright conditions.
- Use Exposure Compensation: Many cameras offer exposure compensation settings, which help control the amount of light entering the lens.
- Check the Histogram: A histogram can show you if an image is overexposed by displaying the light distribution. Adjust accordingly before taking the shot.
Conclusion
Overexposure can ruin an otherwise perfect photo, but with the right tools and techniques, it is easy to fix. Whether you are using ONERECOVERY, Lightroom, or Photoshop, each tool offers a unique approach to fixing overexposed photography.
By following the tips in this guide, you can fix overexposed photos and restore their original glory to prevent overexposure in future photography sessions.
Learn More About Overexposure in Photography
If you want to learn more about fixing overexposed or too high-exposure photos, this part will help you. The following FAQs address questions related to this topic and provide additional tips to enhance your photos even further.
Can Overexposed Photos Be Fixed?
Yes, overexposed photos can be fixed using tools like ONERECOVERY, Lightroom, and Photoshop. Each of these tools offers methods to reduce exposure and recover lost details in high-exposure images.
How to Fix Overexposed Photos on an iPhone?
Follow these simple steps to fix overexposed photos on an iPhone:
- First, open the Photos app and select your overexposed image.
- Tap the Edit button and adjust the Exposure slider to reduce the brightness.
- Here you can also fine-tune with the Highlights and Shadows sliders to restore details.
How to Fix a Picture That is Too Bright?
Fixing a too-bright picture doesn’t have to be a headache, follow these quick steps to smoothly handle it:
- You can use any software of your choice like Lightroom or Photoshop.
- Adjust the Exposure and Highlights sliders there to reduce the brightness.
- Apply filters or blend modes to further balance the image if necessary.
You can also opt for tools like ONERECOVERY to handle all the image damage in a few clicks.