As scary as it can be to even imagine losing years of family photos, crucial work documents, or cherished memories, it sometimes happens to the best of us. This might be due to an accidental hard drive format or even a system glitch.
But should the lost files be forgotten just like that because of a little mistake? Well, the answer is no. That’s why in this blog, we will guide you through the process of how to recover files from a formatted hard drive for free on Windows 11.
How to Prepare Before Recover Formatted HDD
If you just realized that you’ve accidentally formatted your hard drive, panic starts to set in as you think about the important files that may be lost forever. Before diving into the process of recovering data from a formatted hard disk, there are crucial steps you need to take to maximize your chances of a successful recovery.
💡 Prevent data overwriting: If possible, disconnect this drive from your computer in order not to mistakenly write any information into it. If new data replace the files you want to recover, more complex operations are required to recover overwritten files.
💡 Backup existing data: If there are still accessible files on your drive, make sure to create backups on another storage device. This way, any things that can be recouped will be kept safely aside while reducing further data disappearance during recovery.
💡 Prepare necessary software: Equip yourself with powerful file recovery software for Windows. These tools are designed to scan your hard drive for recoverable data and restore it efficiently.
How to Recover Formatted Hard Drive with Software
Giving you another solid method, just as promised in this blog, we introduce ONERECOVERY, This tool is as powerful as any other method discussed because it supports different file systems such as NTFS, FAT32, exFAT, and many more with hundreds of file formats. Additionally, it provides deep scanning so that it can properly recover data from formatted or corrupted drives.
You can use this versatile to retrieve nearly 1000 formats of files from hard drives. For instance, you can recover PDF files and many other documents, pictures, videos, audio, and so on. Besides the recovery of deleted or overwritten files, ONERECOVERY can also fix damaged files on your hard drives. It will help you fix Zip archives, Word and Excel documents, and other files in simple clicks.
Begin by downloading and installing ONERECOVERY on another drive so that you do not overwrite your recovery files. Once the installation is complete, open the program and follow these steps:
1️⃣ Select the Drive: On the main interface, you will see a list of drives. Select the formatted hard drive from which you need to recover data.
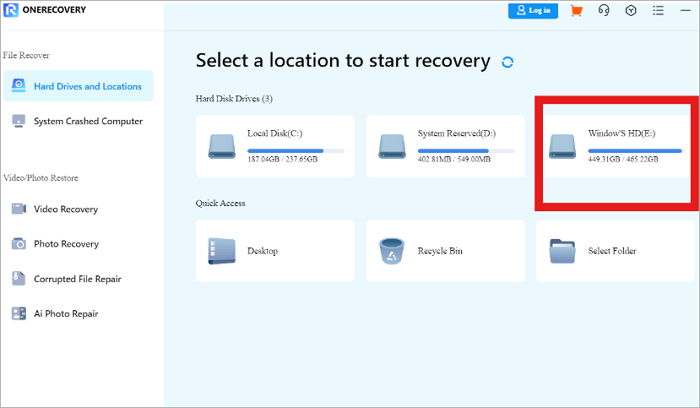
2️⃣ Scan the Drive: Click on the “Scan” button. The chosen drive will then be scanned by ONERECOVERY for recoverable files. This might vary depending on how big your drive is.
3️⃣ Preview and Select Files: After scanning, ONERECOVERY shall present to you all the files that can be recovered in a list format that you can view.
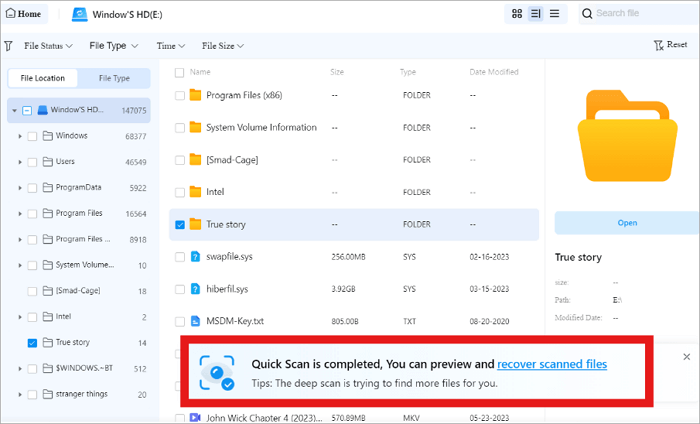
4️⃣ Recover Files: Now you can click any file in the scanning result to preview it and choose the ones you want to restore. Then, press the “Recover” button to start the data recovery process.
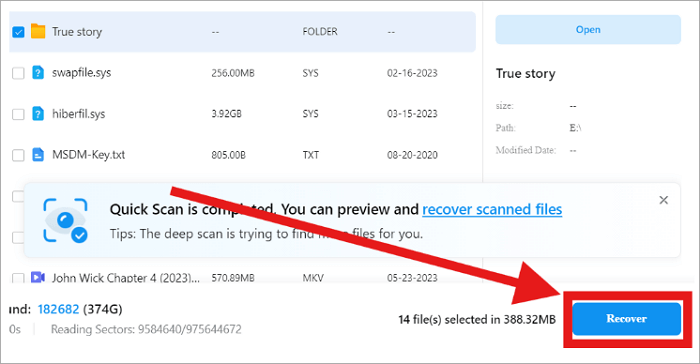
This software is workable for both internal and external hard drives. The following post will guide you through the recovery of files on the external hard drives:
📥 Download now to experience it for free.
How to Recover Hard Drive Formatted Using CMD
At the point where you might need to use a more advanced method to recover formatted hard drive files, using Command Prompt (CMD) becomes essential. This technique can be powerful but has its pros and cons.
| Pros | – CMD comes with Windows so there is no need for other programs.- It can perform deep scans, potentially recovering more data. |
| Cons | – It’s less user-friendly and requires some technical knowledge.- Incorrect commands may result in further data loss. |
| Applicable Scenarios | – Best suited for those with some technical background.- Useful in situations where third-party software is unavailable. |
| Suitable Users | – IT professionals and computer literate individuals. |
All that being said, let’s cut to the chase and discuss how to restore data from a formatted drive using CMD. Follow these steps:
1️⃣ Open Command Prompt: Press Win + R, type cmd, and press Enter.
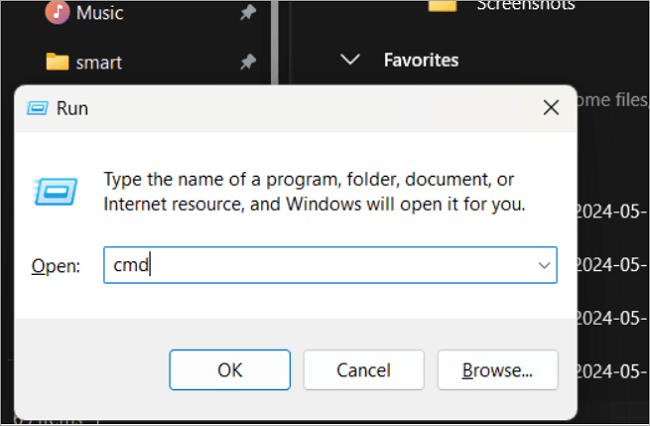
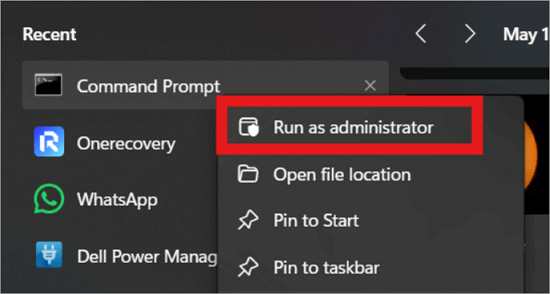
2️⃣ Run as Administrator: Right-click the Command Prompt icon and select “Run as administrator”.
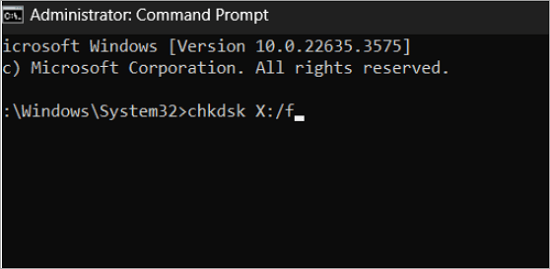
3️⃣ Use CHKDSK Command: Type chkdsk X: /f (replace X with the drive letter) and press Enter. This command checks for disk errors and attempts to fix them.
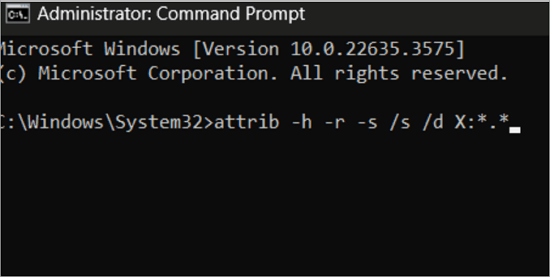
4️⃣ Use ATTRIB Command: Type attrib -h -r -s /s /d X:*.* (replace X with the drive letter) and press Enter. This command helps in recovering hidden files.
Related Post: >> Recover Permanently Deleted Files on Windows 11 Using CMD
How to Recover Formatted Hard Disk with Previous Backups
If you find it a little difficult to find your way around with Command Prompt (CMD), we have another method that might fit perfectly to easily recover a formatted hard disk: using previous backups. It is one of the most reliable ways to restore data from a formatted drive.
| Pros: | – It is a direct and often fastest technique to recover lost files.- Ensures you get the exact data you had backed up without the risk of overwriting. |
| Cons: | – Only effective if one has recent and consistent backups.- Data added after the last backup will be lost. |
| Applicable Scenarios: | – Ideal when you have a habit of regular backups.- Useful in both personal and professional settings where data integrity is critical. |
| Suitable Users: | – People who regularly back up their computers’ data.- Both individual users as well as companies. |
Now, you can see for yourself that the other methods mentioned above don’t come as easily as this. Here are the steps to follow to restore data from a formatted drive using previous backups:
Step 1. Identify your backup source (HDD, network, or cloud).
Step 2. Launch your backup tool (Windows Backup, third-party software, or cloud service).
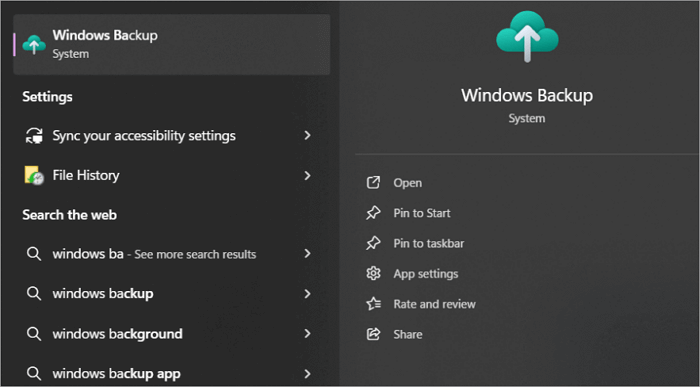
Step 3. Select the latest backup containing the files you need.
Step 4. Follow instructions to restore files to their original or new folders to avoid overwriting.
For Mac users, if you ahve enabled Time Machine, the built-in backup tool, on your device, you can easily restore from Time Machine when you need to retrieve the lost data.
How to Restore Data from Formatted Drives via Professional Service
However, the situation may be, if you’re unable to recover formatted hard drive files yourself after trying all the methods mentioned above, it would be advisable to seek professional services to avoid overwriting the intended file you want to recover or encountering any complications.
| Pros: | Skills: Experts possess sophisticated equipment and information.Performance Index: They are likely to recover lost data. |
| Cons: | Cost: A lot of money is spent on professional support.Integrity of Information: Your data will be in the hands of third parties. |
| Suitable Users | Persons with crucial and irreplaceable vital documents.Businesses that require assurances of recovery. |
Using a professional service can effectively restore data from formatted drives, especially when the data is of high importance or previous attempts have failed.
Conclusion
No need to rethink that file recovery issue again. This guide provides you with key steps, including preventing data overwriting, backing up existing data, and using reliable recovery software like ONERECOVERY. Advanced methods involve using Command Prompt (CMD) for deep scans. Whether you want to recover data from SSD or HDD, these solutions are both available.
If you have backups, you can easily restore data from those. For the most valuable data, professional recovery services offer the best chance of success, despite higher costs and privacy concerns. Follow these methods to efficiently recover a formatted hard drive.


