“I got an iPhone 14 months ago and I’ve noticed that whenever I take a photo during FaceTime calls, it doesn’t save. I’ve checked every part of my phone, yet I couldn’t find any of the photos. Please, why are my FaceTime photos not saving, and how do I fix it?”
FaceTime is Apple’s unique video and audio calling feature that allows you to stay connected with family and friends, even when you’re worlds apart. During FaceTime calls, you can capture memorable moments and live expressions.
Sadly, some users complain of FaceTime photos not saving, particularly after they’ve tried severally and attempted all the fixes they know. In this article, we will explain why your FaceTime photos are not saving and offer you proven solutions to try.
Also Read: >> How to Retrieve Deleted Calls on iPhone With/Without Backup

Why Aren’t My FaceTime Photos Saving?
It can be very perplexing when you fail to find the FaceTime photos. There are many reasons why you’re experiencing FaceTime photos not saved. They include:
FaceTime Settings Issues
Apple is conscious of privacy protection, thus they don’t support taking photos during FaceTime unless the parties involved enable it in their phone’s settings. So, if you or the person(s) you are on FaceTime with disabled FaceTime Photos in settings, the pictures won’t save.
Storage Space is Not Enough
Just like every data stored on your device, FaceTime pictures consume some storage space. If you don’t have enough space, the screenshots you take during FaceTime will not be saved.
Outdated iOS Version
FaceTime Live Photos requires iOS 11 or later to function properly. If your iPhone is running on an older iOS version, the Live Photos feature might not be available, or could experience bugs preventing FaceTime photos from saving.
Problems with iCloud Settings
FaceTime photos rely on iCloud Photos for syncing and storage across devices. If iCloud syncing is disabled or experiencing errors, the FaceTime Live Photos you take might not appear or save properly across your devices.
Where Do FaceTime Photos Go?
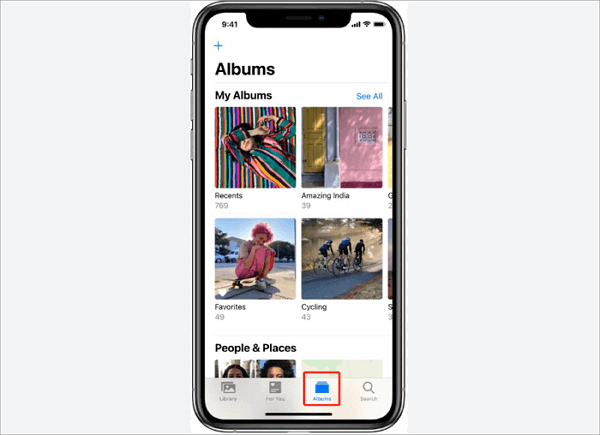
If you’ve successfully captured some FaceTime photos, you can find them within the Photos app, just like every other picture you take with your device.
- Open the Photos app and select Albums.
- Click on “Recent” to view all the FaceTime photos you saved.
- If the photos are taken with the FaceTime Live Photo feature, you can also see them in a folder called FaceTime Photos.
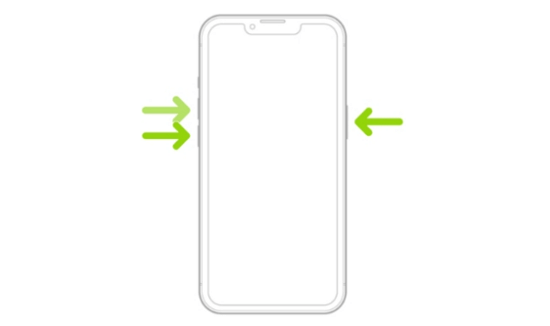
- If the photos are captured manually using the screenshot function (pressing the Side button and Volume Up button simultaneously), they will be stored in the Screenshots folder.
Don’t save any new pictures to your phone if you happen to delete important FaceTime photos from your album. With some reliable tools, you may be able to retrieve them even if you need to recover photos deleted from Recently Deleted folders.
How to Fix FaceTime Photos Not Saving
The possible ways to solve the issue of FaceTime screenshots not saving are explained below.
You can try these solutions to have a better FaceTime experience.
Fix 1. Restart FaceTime and iPhone
Sometimes, all you need to fix iPhone app issues is just a simple restart.
Step 1. Try ending your FaceTime and initiating it again. Then, take some photos to see if the issue is solved.
Step 2. If you’re still unable to save your FaceTime photos, restart your iPhone. Press and hold the side or volume button until the power-off slider comes up. Push the slider to the right to power off your iPhone.
Step 3. Wait for 30 seconds, then press and hold the side button to power on your iPhone. Keep holding until the Apple logo appears.
Step 4. After your iPhone has finished booting, initiate another FaceTime call, and try to capture some photos.
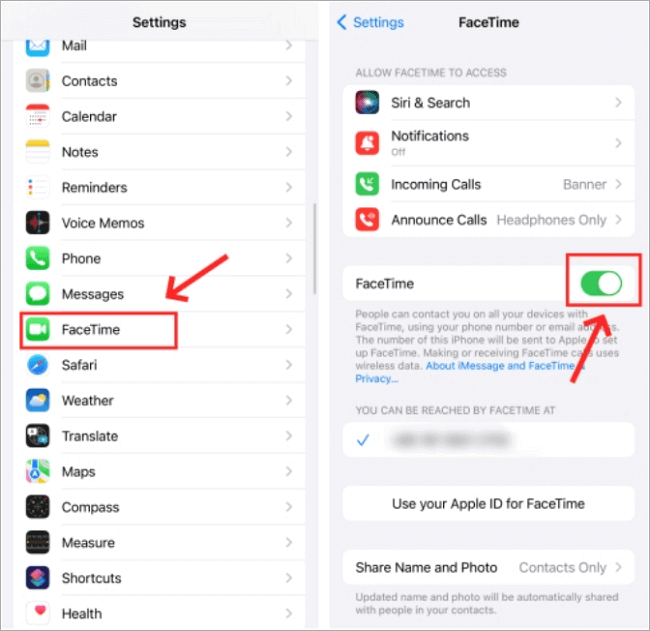
An alternative solution is to disable and re-enable FaceTime. Follow these steps:
- Go to Settings and select FaceTime.
- Turn off the toggle next to FaceTime and wait for about 30 seconds before turning it on.
Fix 2. Enable FaceTime Live Photos
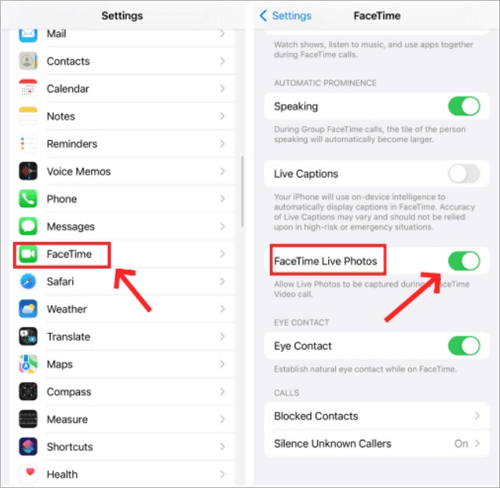
Before getting overwhelmed with the FaceTime pics not saving issue, you need to confirm whether you’ve enabled FaceTime Live Photos on your device. Remember that all the parties on the FaceTime call must enable this feature before you can take photos.
📌 NOTE: This feature is only available to iPhone 11 OS or later versions and iPad 13 OS or later versions.
Follow these steps to check and enable FaceTime Live Photos:
- Open Settings and click FaceTime.
- Go to FaceTime Live Photos and toggle it on.
Fix 3. Check iCloud Settings
You may not be seeing FaceTime pictures in your Photos app because of an issue in iCloud settings. It could be that iCloud Photos has been disabled, thereby affecting the sync process.
Here’s how to get FaceTime photos that didn’t save by fixing iCloud settings:
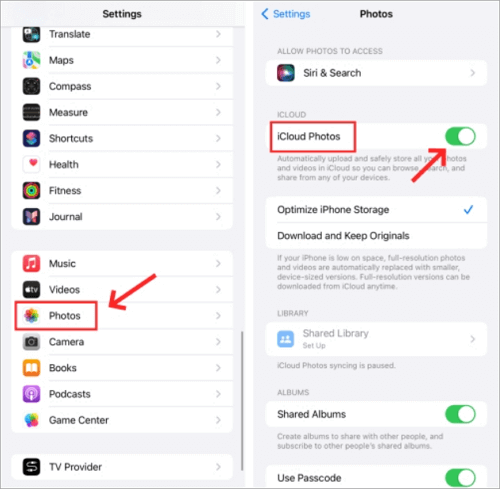
- Go to Settings and click on Photos.
- Find iCloud Photos and enable it if it’s off. If iCloud Photos was on, disable it and wait for about 30 seconds before switching it on.
Fix 4. Adjust FaceTime Settings
Normally, FaceTime settings are enabled by default. But there might be some restrictions in the FaceTime settings. Follow the steps below to check and fix any restriction in FaceTime Settings causing the FaceTime pictures not saving issue.
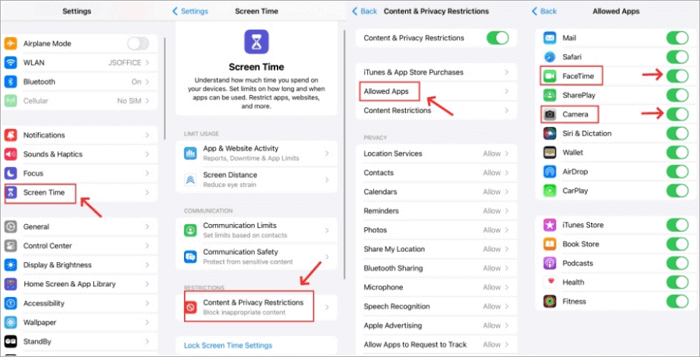
- Go to Settings, and click on Screen Time.
- On the Screen Time page, select Content & Privacy Restrictions.
- Click Allowed Apps and switch on FaceTime and Camera.
Fix 5. Free Up Storage Space
Insufficient storage space prevents the storage of new data. This also applies to saving FaceTime photos. While you may be able to successfully capture memorable moments during FaceTime, you will discover after the call that none of the photos are saved on your device. Thus, you need to free up some space to accommodate FaceTime photos.
Here’s how to free up storage space:
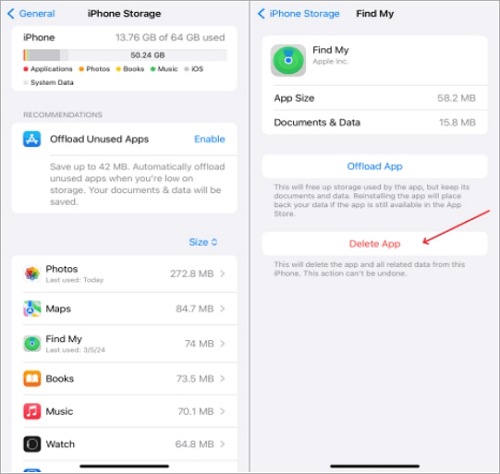
Step 1. Go to Settings, click General, and choose iPhone Storage.
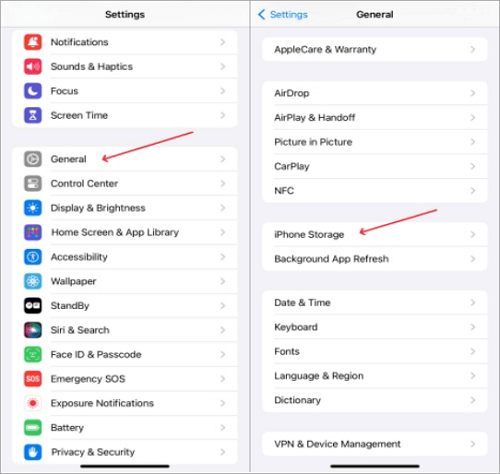
Step 2. Check through to select some unused apps to remove. Then, click Delete App.
Fix 6. Update the iOS Version and FaceTime
Updated OS and apps often include enhanced systems that make operations faster and fix bugs. To remedy FaceTime photos not saving, ensure your iOS version and FaceTime app are updated.
Follow these steps to update the iOS version:
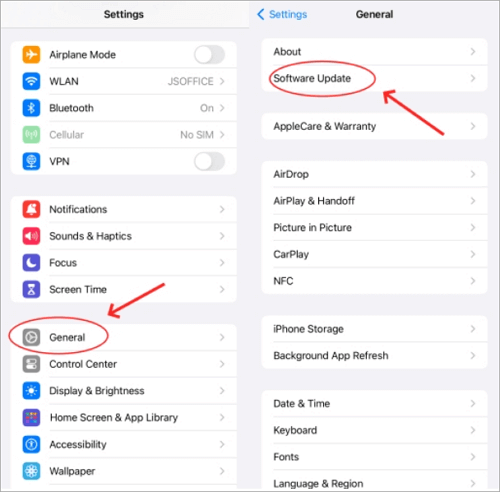
- Go to Settings on your iPhone or iPad, select General, and on the next page, click Software Update.
- Check if there’s a newer iOS version and click Update Now.
Follow these steps to update the FaceTime app:
- Open the App Store and click Search.
- Type FaceTime in the search bar to find the app.
- If there’s a newer version, it will show Update. Click it.
Fix 7. Factory Reset iPhone [Data Loss]
If you’ve tried all the solutions above and none has solved the FaceTime photos not saved problem, you can factory reset your iPhone. This will restore your iPhone’s default settings, thereby fixing any issue causing FaceTime photos not to save.
📌 NOTE: All your device data will be lost. You should transfer your iPhone’s data to another storage device for easy recovery after the factory reset.
Follow this process to factory reset your iPhone:
Step 1. First, you need to go to Settings, click on General, select Transfer or Reset iPhone, and scroll down to choose the “Erase All Content and Settings” option.
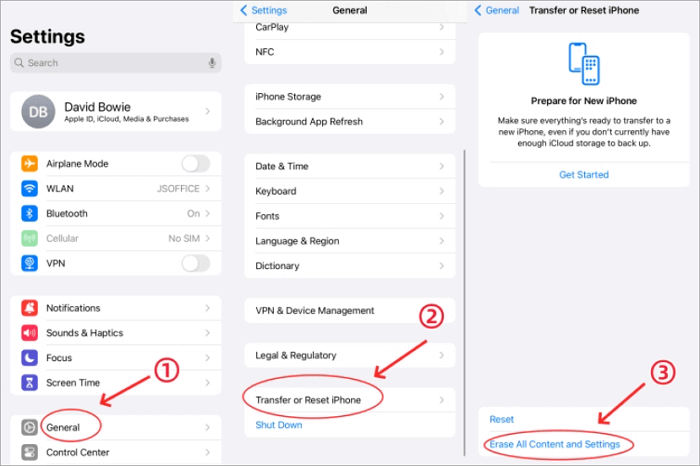
Step 2. Follow the on-screen instructions to confirm you want to erase all the data on your iPhone.
Step 3. Sign in with your Apple ID and password, and wait for the factory reset to be completed.
If you forget to backup the important files before the factory reset, find a powerful data recovery tool to get back the necessary data. For instance, click here to know how to retrieve your voicemails: >> How to Retrieve Deleted Voicemail on iPhone.
Fix 8. Verify Date and Time Settings
When your iPhone’s date and time settings are wrong, certain system functionalities, such as saving FaceTime photos can be disrupted. This happens because the operating system relies on accurate timestamps to organize and save files. So, if the date and time are not in sync, there can be errors causing FaceTime photos not to save.
Follow these steps to fix date and time settings:
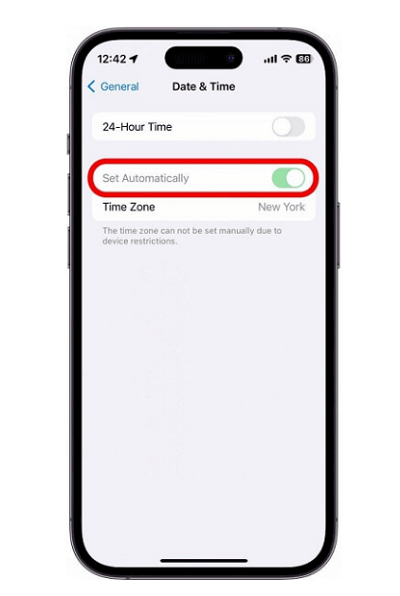
Step 1. Open Settings, click General and select Date & Time.
Step 2. Switch on the Set Automatically option to sync your iPhone’s date and time with your network provider’s settings.
Step 3. After changing the date and time settings, restart your device to ensure the changes take effect.
Fix 9. Check Network Connection
Aside from that a poor or unstable internet connection can affect your FaceTime performance and clarity, which can be the cause of FaceTime photos not saving. So, ensure your network connection is not weak and doesn’t drop during the process because the photo might not save.
Here’s how to check and fix the network connection:
Step 1. Go to Settings and click Cellular or Wi-Fi to check the strength of your network connection.
Step 2. If the network is very bad, you would have to reset it. To do that, open Settings, choose General, go downwards to select Transfer or Reset iPhone, and click Reset.
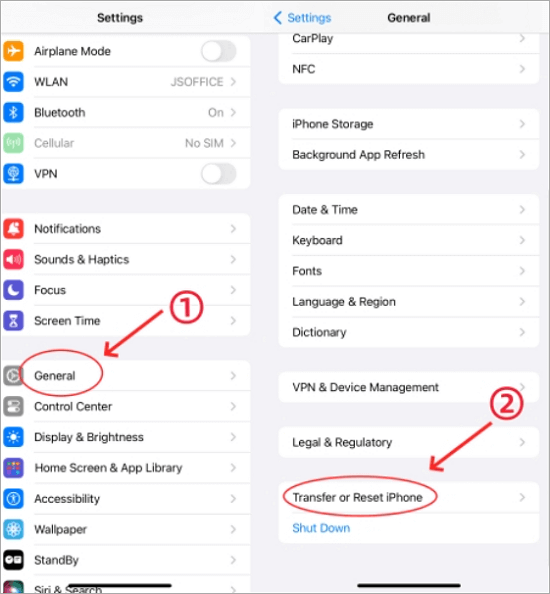
Step 3. Now, choose Reset Network Settings to fix the bad network.

Step 4. Enter your passcode and confirm. This will reset Wi-Fi passwords, VPN, and cellular settings. Reconnect to your network afterward.
Conclusion
There are several causes behind FaceTime photos not saving, such as iCloud settings, insufficient storage space, FaceTime settings issues, and an outdated iOS version. But by restarting FaceTime & iPhone, enabling FaceTime Live Photos, adjusting iCloud settings, and following all the solutions we’ve discussed above, you can capture and save your FaceTime photos with ease, ensuring that cherished moments are stored.