Losing photos that were difficult to capture often results in a person becoming frustrated, anxious, and disappointed, especially if the pictures have sentimental value. Yes! Sometimes people accidentally delete their photos, encounter drive failures, or lose them during software updates, etc.
If you are facing the same problem, don’t sweat it! In this article, we are going to provide you with a complete detailed guide on photo recovery for Mac via different working methods. So, keep learning!
“Time Machine is a complimentary data backup application that allows you to store data in an external hard drive, so that you may recover your data in case of any malware attack, human error, hardware failures or any other accident.”
Time Machine can be set up to back up files, and media ( photos, videos), so if you have set it up already before deleting your photos, then you can easily restore them to the original position via Time Machine.
Moreover, it is free and easy to use, but one limitation is that you can’t restore data on multiple spaces, all stored data will go on the same disc.
Well, now let’s discuss how to make use of Time Machine for photo recovery for Mac.
Step 1. First, attach the external storage device that you use for Time Machine backup.
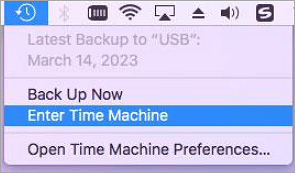
Step 2. On the top right side of the screen, click on the Time Machine icon and choose Enter Time Machine.
Step 3. Here, you will see a list of folders, choose the one that has your deleted photos.
Step 4. Navigate your photos, select the backup version from the timeline, and choose restore.
We all know that it first goes to the trash whenever we delete something from any smart device. Although using a Trash bin to recover your Mac photos is easy and fast, there is a danger that the photos could be permanently deleted if the Trash bin is emptied.
Besides, you can retrieve your images from the Trash bin within 30 days after deleting them. Otherwise, they disappear forever.
If you want to know how to recover deleted pictures from Mac then take a look at the following steps.
Step 1. Open the Trash icon on your Mac.
Step 2. Find or search for deleted pictures in the Trash.
Step 3. Alright! Now right-click (or Control-click) on one of these pictures and choose “Put Back” to restore them to their original locations. Alternatively, you can drag them out of the Trash into another folder.
If the Trash bin is emptied, you can use Time Machine backups or Data Recovery Software for retrieval of deleted photos.
With over 30 M+ downloads and a 30-day money-back guarantee, ONEREOVERY is one of the best and simplest ways to recover your deleted pictures, even if you have overwritten them with some other data. It can restore all types of formats like JPEG, PNG, JPEG, IMG, and GIF.
In addition to getting back photos stored on a Mac hard drive, this all-in-one photo recovery software can also retrieve photos saved on a variety of other storage devices. To be more specific, ONERECOVERY supports the recovery of data on SD cards, USB flash drives, external hard drives, etc.
That’s not all, with their AI photo repair option, you can repair incomplete photos, which is a common issue during the recovery process.
So now let’s see how to get deleted pictures back with this recovery software for Mac.
Step 1. Install ONERECOVERY on your Mac and launch it.
Step 2. Now, choose a drive where deleted pictures were initially saved.
Step 3. ONERECOVERY will scan the selected drive for deleted photos.
Step 4. After completion of the scanning process, view the list of files and select the pictures you would like to get back.
Step 5. Click “Recover” and choose a destination folder to save the restored photos. Make sure it is different from the original location so as not to overwrite them.
Please wait a while for the recovery process to complete, and your deleted pictures will be saved in the chosen folder.
As mentioned above, ONERECOVERY can retrieve the lost photos that are stored on all brands of SD cards. The following post will offer you a detailed tutorial to guide you through the operations:
📥 Download now and enjoy a free trial.
Deleting pictures from your Mac will automatically delete them from iCloud too. However, if you have turned off Photo syncing on Mac then your data will remain as such in iCloud even after deletion from Mac, so you can restore deleted photos from iCloud whenever you want. But there is a catch, if you switch off syncing, your new photos will not be saved to iCloud.
So, if you are going to delete some data, you can switch off backup so you can recover lost photos later. Also, if you want to backup new data on iCloud, first go to iCloud, and download all important pictures to your local storage to avoid them from being overwritten.
Let’s see how to recover deleted photos on Mac from iCloud.
Step 1. Go to icloud.com using an Apple ID.
Step 2. Open the Photos app icon at iCloud.com.
Step 3. Good! check on ‘Recently Deleted’ (sidebar).
Step 4. Tap on the “Recently Deleted” folder and click on those photos that you want to recover.
Step 5. Now, press the “Recover” button. These will be relocated to your previous or main photo library.
Good question! Prevention is better than cure. To avoid losing photos on Mac you must consider the following points:
💡 Consistent Backup: Make sure that all your system data files such as your photos are backed up regularly. To do this, connect your external drive, and enable Time Machine from System Preferences and it shall automatically attempt to back up all folders. It is aimed at recovering your photos in case your photos were lost mistakenly or were accidentally deleted.
💡 Cloud Storage Solutions: You may opt for cloud storage services like Google Photos, iCloud, or Dropbox where you can store copies of various images. Moreover, these services will automatically synchronize your images so that they cannot be lost in case of local data loss. Ensure there is enough space and syncing is working.
💡 Regular macOS Update: Update your macOS regularly by installing updates immediately. They often come with security patches along with other improvements that help protect data and photos from potential risks or system failures.
To sum up the discussion, it’s not pointless to say that photo recovery could become challenging without proper knowledge of the above-described recovery methods. So, make sure to follow the instructions in the exact direction. Moreover, you can use data recovery software (ONERECOVERY) which can make the whole photo recovery process just a piece of cake.
This section is for those who want to learn more about recovering photos on a Mac. Keep reading to find the information you need in the following FAQs.
Although it is usually hard to perform a permanent photo recovery on a Mac after emptying trash without having a backup. But, by using time machine backup or cloud backup you can restore photos from them. If the data is very critical it is best to go for professional data recovery services like ONERECOVERY.
You can fix your damaged photo through professional Photo restoration software conveniently. By using Al algorithms, ONERECOVERY can fix errors like pixelation, color distortion, grains, blurriness, poor lightning effects, etc. Apart from this, it allows you to recover photos that are stored on different devices like Webcam photos, smartphones, SD cards, memory sticks, or professional photography cameras.
Here are the steps to repair the corrupt photos on Mac:
Step 1. Just go to the ONERECOVERY website to find the online photo repair tool.
Step 2. Upload the damaged picture and this tool will automatically start the restoration.
Step 3. After the photo processing, click on the “Download” button to save the fixed picture to your PC.
Losing your iMessages can be very painful, especially when you need to refer to some…
“I’ve somehow deleted the Downloads folder on my Mac while trying to create space. I’m…
“I took videos of my children when I taught them how to walk and when…
Does your MacBook Air refuse to boot up? The prospect of losing all your music…
Did you lose an email on your Mac and you are trying to get it…
“In the process of creating space on my MacBook Pro, I mistakenly deleted important files…


