Does your MacBook Air refuse to boot up? The prospect of losing all your music and photos on the computer can be devastating. But in most cases, it is possible to recover data from dead MacBooks.
Since you are dealing with sensitive data, it is important to use the most relevant tool based on the cause of loss. But you need not worry; you have come to the right place to recover files from a dead MacBook. In this post, we will introduce several powerful file recovery tools for Mac and offer you efficient solutions to get back the data you need.
Methods to Recover Data from a Dead MacBook
As you explore how to recover data from a dead Mac, it’s crucial to ensure it never happens to you again. Some of the recovery methods available are given below.
| Solution | Brief Introduction |
| Use Data Recovery Software | If there is no backup and the Mac won’t boot up due to a software issue, specialized data recovery software is the best solution. |
| Restore Data from the Time Machine | Time Machine stores snapshots of your file system at regular intervals. In case of a data loss, you can simply enter the Time Machine to retrieve data from the backup. |
| Create a Disk Image to Recover Files | This method helps to preserve the current status of your hard drive. You can create a copy of the hard drive of the dead Mac. |
| Use Target Disk Mode | A built-in feature of Mac OS, This method creates a copy of the hard drive using another Mac and a USB-C. Make sure the hard disk has enough space to store a copy of the failed Mac. |
| Turn to Data Recovery Services | If your Mac is not booting due to water damage or similar causes, it’s advisable to refer the recovery to an expert data recovery service. Such recovery will require specialized tools. |
Recover Data from a Dead MacBook with Software
Did you lose a heap of important data when your Mac suddenly died? There is no reason to panic. When Mac’s built-in recovery tools fail, specialized data recovery tools like ONERECOVERY come to the rescue.
This MacBook recovery tool works seamlessly with Apple silicon processors and guarantees a success rate of 95% regardless of the macOS version. The software is used by millions of people worldwide to recover lost data due to virus attacks, hardware failures, and corrupted hard drives.
ONERECOVERY’s intuitive user interface allows users who are not tech-savvy to reap the benefits of the software. You can download the software free of charge to your MacBook.
💡 ONERECOVERY helps you to recover data from a dead MacBook with just a few clicks, and the process is easy to follow. Check out the steps below to restore files from your dead MacBook.
Step 1. Go to the TinyFrom ONERECOVERY Site to download and install the software on your MacBook.
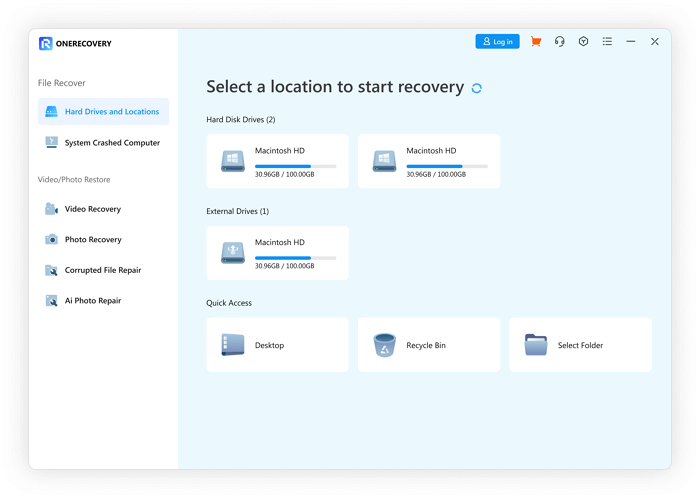
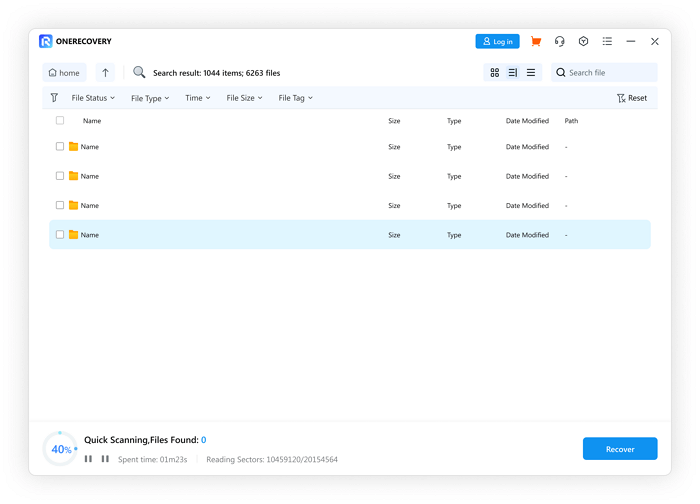
Step 2. Select the location or the drive containing your lost data. Click the source to start the scan. ONERECOVERY will deep scan the drive and show you a list of deleted files after a few minutes.
Step 3. Select the file you want from the list and click the “Recover” button. You can opt to preview the selected file before proceeding to the next step.
Step 4. The lost file will be restored to the destination you selected.
If your MacBook crashes in the process of editing an Excel document, ONERECOEVRY is the optimal choice to recover unsaved Excel files on the MacBook. Besides, this versatile also supports the recovery of many other file formats, including Word, PowerPoint, PDF, and so on.
📥 Download it to try for free.

Recover Data from a Dead Mac with a Time Machine
Time Machine is a built-in feature of Mac computers, which helps recover data from a dead MacBook. However, to benefit from this tool, you need to back up your files using Time Machine to an external drive.
Before proceeding, you will need the external drive where you backed up the Time Machine data and another working MacBook.
💡 Use the following steps to recover files with Time Machine:
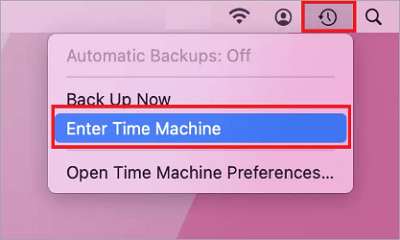
Step 1. Connect the external drive containing data to the working Mac. Click the “Time Machine” icon at the top of the screen. Select “Enter Time Machine” from the drop-down.
Step 2. The Time Machine will display your backed-up files. Using the up/down arrows, you can browse the files to find the deleted data file.
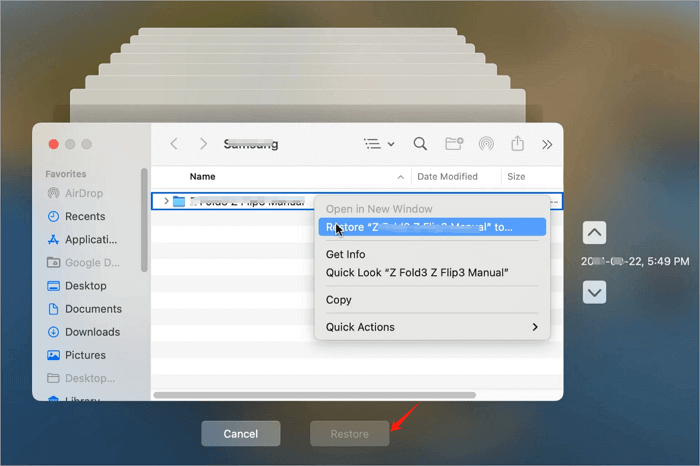
Step 3. Once you find the deleted file you were looking for, click on it to select it. Then, click the “Restore” button to recover lost data from your Mac.
Step 4. Your lost files will be restored to their original location and the Time Machine will close.
It is necessary to use Time Machine to back up data regularly. Time Machine enables you to back up your important files to external storage devices for free so that you can recover them with complete certainty.
Whether you encounter a situation where your MacBook won’t start or you suddenly can’t find the file you need, Time Machine can always help. It even allows you to recover permanently deleted files on Mac with ease.
Create a Disk Image to Recover Files from a Crashed Mac
This method will make a copy of the data on your dead Mac on an external drive so that you can also use the disk image tool to recover files from a crashed Mac. Ensure the external drive you are connecting has sufficient space to store the data on the dead Mac.
💡 To create a disk image, you need to power on the dead Mac in recovery mode. Then, follow the steps to continue:
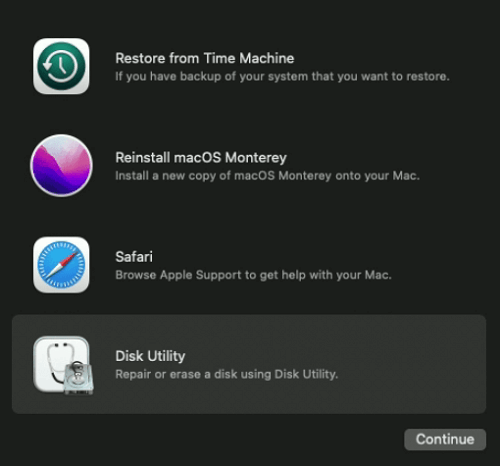
Step 1. Power on your dead Mac while pressing COMMAND+R.
Step 2. You will see the following screen. Select “Disk Utility” from the start-up options.
Step 3. Select the external drive you inserted from the list on your left. Then, click on the “Erase” icon on top of the window.
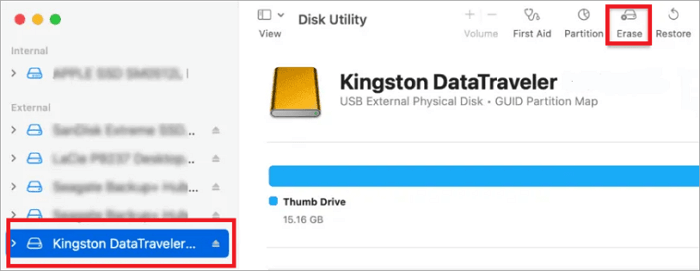
Step 4. You will be asked to select the file format and to confirm erasing.
Step 5. To create the new image disk, select “Macintosh HD” in the left sidebar and go to File > “New Image” > “Image from Macintosh HD“.
Step 6. When the backup is complete, you can eject the drive and insert it into a working Mac to recover your lost data.
In the event of data loss during the process of erasing your external storage device, ONERECOVERY is a reliable option to help you recover files from the external hard drive on your Mac.
Use Target Disk Mode to Recover Files from a Dead MacBook
Target Disk mode allows you to recover data from your dead MacBook using a working Mac. Two computers should be connected with a compatible cable—USB-C, Thunderbolt, or Firewire.
The dead Mac will act as an external drive, letting you transfer data to the working Mac.
💡 To proceed, connect the two MacBooks using the cable, and follow these steps:
Step 1. To start the dead Mac in Target disk mode, hold down the T and power buttons on your dead Mac.

Step 2. To start a connection with the dead Mac, go to “Finder” > “Locations” > “Network” in the working Mac.
Step 3. Double-click on the dead Mac’s drive. Go to “Connect As” > “Guest” and select “Connect“.
Step 4. You will now be able to see the files on the dead Mac. Drag and drop them to the working Mac.
Turn to Professional Data Recovery Services
Can you recover files from non-booting Macs on your own? If your Mac has become unresponsive due to a failed hard drive or similar cause, data recovery services have specialized tools to assist you.
However, hardware damage and failed hard drives could require a professional data recovery service. In such an instance, going at it all by yourself could cause more damage to the Mac.
While the probability of success is higher with a data recovery service, they can be expensive.
Conclusion
Your MacBook going dead in the middle of the project can be a disaster, but it is not necessarily the end of the world! With the right tools, you will recover almost all the data in your dead Mac.
Even when built-in tools for Mac fail, specialized data recovery software like ONERECOVERY can help you recover data from dead MacBooks.
However, it’s always advisable to back up your data regularly to avoid such a mishap in the first place.