“In the process of creating space on my MacBook Pro, I mistakenly deleted important files from the Trash. Please, is there any way I can get those files back?”
When files are deleted from any part of the computer, they go to Trash. But when a file is deleted from Trash, it is permanently lost. Also, when you select a file from any part of your Mac and press the Option + Command + Delete keys at the same time, the file will be permanently deleted.

While it is common belief that permanently deleted files are forever lost and cannot be restored unless you have a backup, there are some professional ways to reverse this.
As there are ways to restore permanently deleted files on Windows, today, we will teach you how to recover permanently deleted files on Mac.
Can I Recover Permanently Deleted Files from Mac?
Yes, you can recover permanently deleted files from Mac. But first and foremost, stop using your computer until the missing files are recovered. This is to prevent any action that might complicate the recovery process. At the same time, avoiding using your computer is vital to prevent your files from being overwritten, which may be difficult to recover.
There are different recovery methods for permanently deleted files, such as using Time Machine, third-party file recovery software, cloud backup, and mac file recovery tool. In the following sections, we will discuss each of them, highlighting the steps to follow to retrieve deleted files on Mac.
4 Solutions to Recover Permanently Deleted Files from Mac
Now, how can you recover deleted files on a Mac? The solutions are explained below:
Solution 1: Restore Permanently Deleted Files Mac through Time Machine
Apple has already simplified the recovery of permanently deleted files by introducing Time Machine (an in-built backup and recovery software). This in-built feature allows you to restore files from your Mac in case of an unexpected circumstance. It has various backup & recovery options, such as:
- Hourly backups for the past 24 hours.
- Daily backups for the past 1 month.
- Weekly backups for any duration longer than 1 month.
But before you can restore from Time Machine, you have to set it up. To do so, you need an external hard drive where the backed-up files will be stored. Ensure it is formatted to a Mac supported file system, such as Mac OS Extended, APFS, FAT32, exFAT, and NTFS.
 Follow these instructions to set up your Mac Time Machine:
- Connect your external hard drive into your Mac.
- Click on the Apple icon at the top left corner of your screen to open System Preferences abd click on Time Machine.
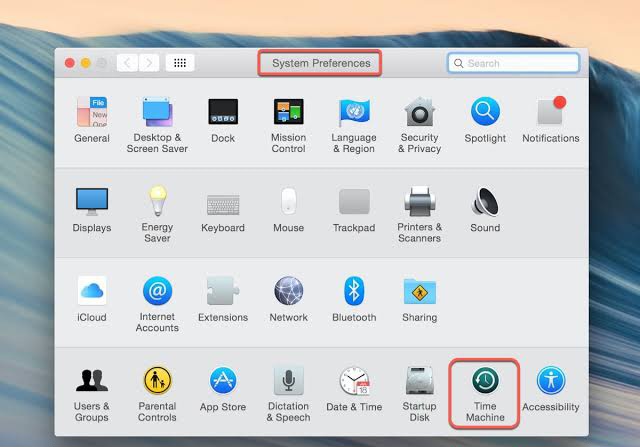
- Tap the Select Backup Disk option and choose the external hard drive you connected.
- Tick the Show Time Machine in menu bar box for easy accessibility.
After you’ve successfully set up Time Machine, you can now restore your deleted files.
Here’s how to restore permanently deleted files on Mac through Time Machine:
- Connect the external hard drive you used for your Mac backup.
- Open Time Machine from the menu bar.
- Check through the backup for the folder that contains the files you want to retrieve.
- Select the files you want to get back and click on Restore.

Solution 2: Use Mac Deleted File Recovery Software to Recover Emptied Trash on Mac
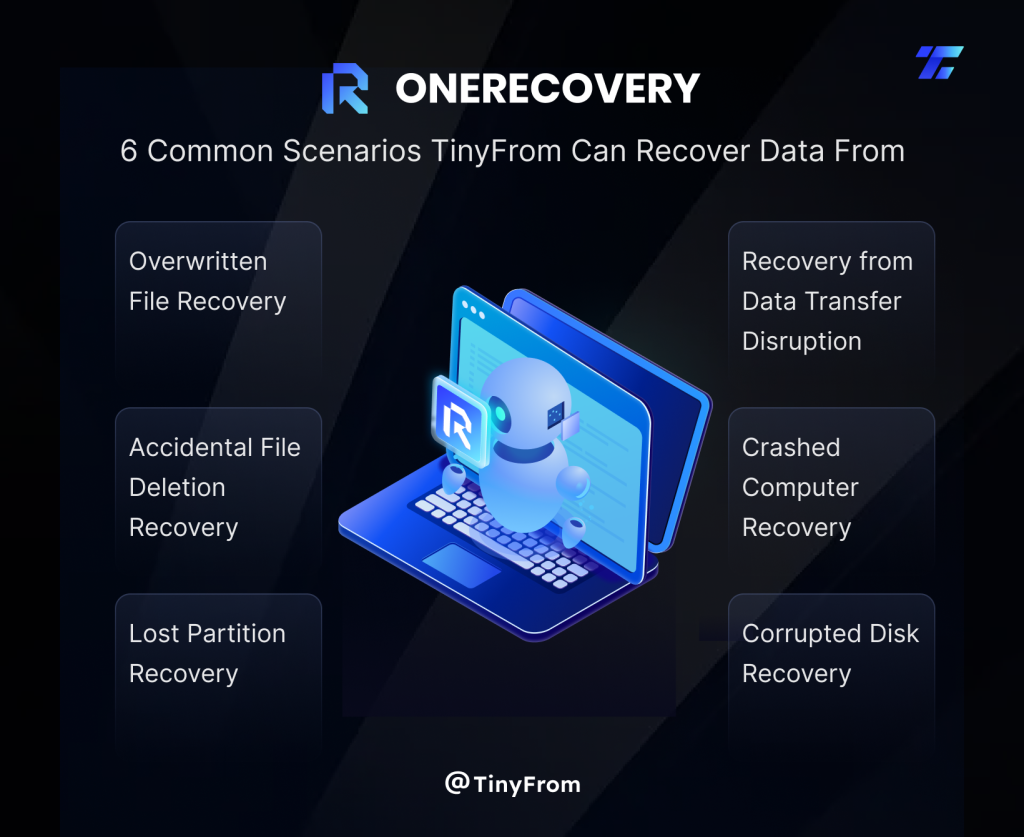
As much as Time Machine is great, it has some shortcomings. However, these limitations can be solved by professional third-party file recovery software. There are many third-party file recovery software for Mac on the market, but we recommend using TinyFrom ONERECOVERY – a reliable Mac deleted file recovery software that will provide the benefits that Time Machine won’t.
ONERECOVERY is highly revered for its user-friendly interface, which allows both computer beginners and experts to seamlessly restore lost files. It’s an all-in-one data recovery software that can recover screenshots on Mac, as well as permanently deleted files regardless of the loss scenario whether human error, virus attack, or system malfunction. This Mac deleted file recovery software can get back data from various Apple chips, macOS versions, and file systems.
On how to recover deleted files from Mac through ONERECOVERY, follow these steps:
- Download and install ONERECOVERY on your Mac.

- Launch the ONERECOVERY software. You will receive a prompt asking if you really want to open the software because it’s a third-party application. Confirm that you want to open the software and grant ONERECOVERY full access to your Mac, so that it can scan through every part to recover your permanently deleted files.
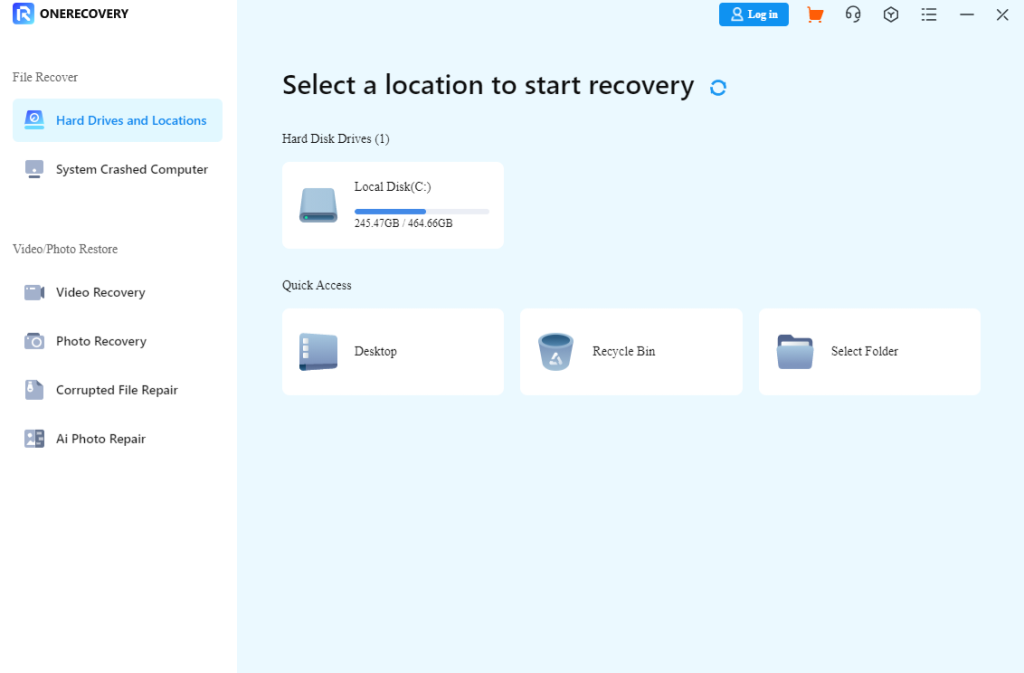
- Select the drive where the permanently deleted files were stored. If the files were deleted from Trash, click on your system drive to begin scanning. But if the files were permanently deleted from a specific drive, click on it for ONERECOVERY to start scanning.
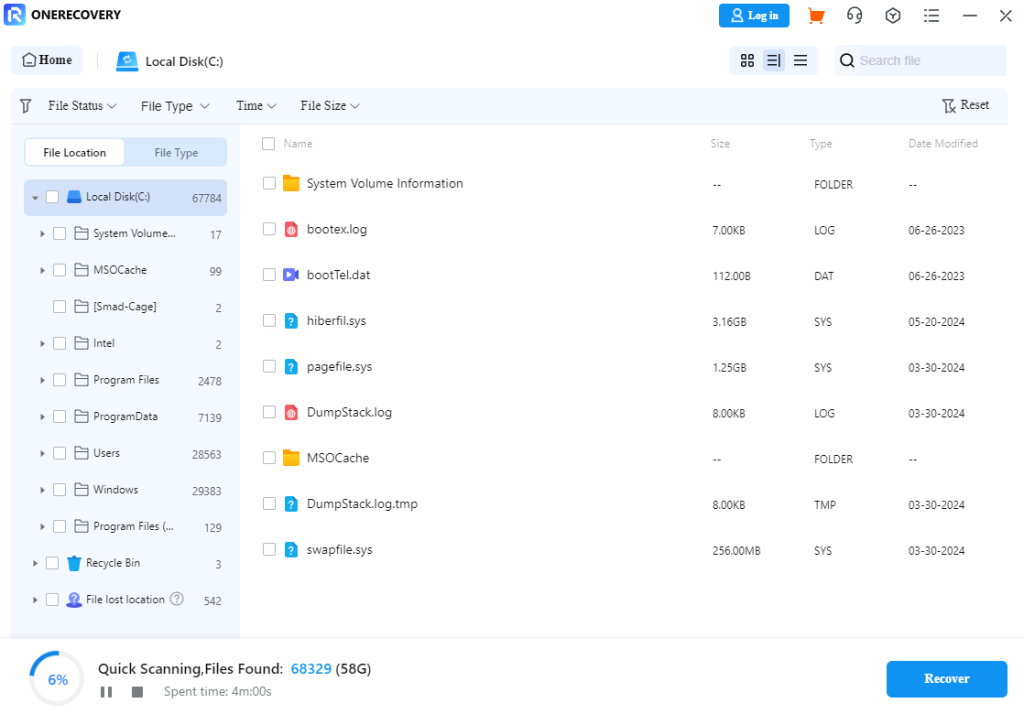
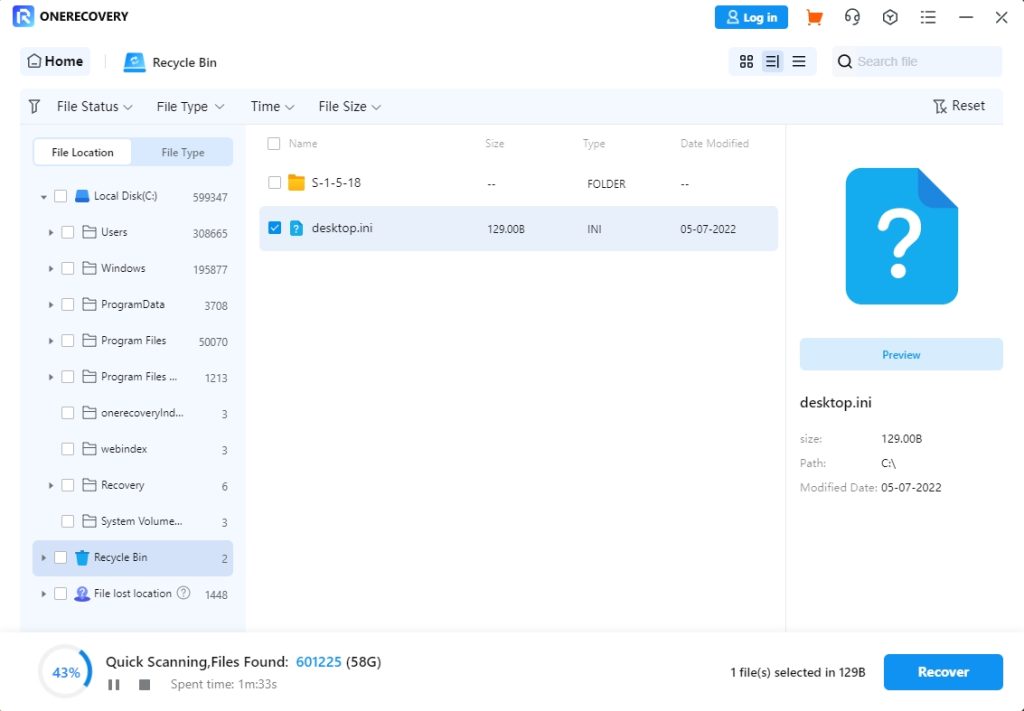
- When the scan is completed, preview the results, select the files you want to retrieve, and click on Recover.
 Benefits of Third-party File Recovery Software Compared with Time Machine
- Time Machine depends on external backup storage to keep data, third-party software doesn’t depend on external storage.
- The efficiency of Time Machine depends on the storage capacity of the external drive (Users can use 1GB,4GB,8GB,16GB,32GB,64GB, etc.). If the drive gets full, the Time Machine becomes unreliable. Third-party software, on the other hand, doesn’t run out of space to recover lost files.
- You cannot select a single file or folder for recovery on Time Machine; you must process the whole backup. Third-party software, on the other hand, allows you to restore just one particular file from your Mac.
Solution 3: Check the Cloud Backup to Restore Permanently Deleted Files on Mac
Other than the two methods discussed above, you can recover your files on Cloud services like iCloud, Dropbox, Google Drive, and OneDrive. Cloud services sync with your Mac computer, saving all changes that occur. So, in the event that you mistakenly delete some files from your Mac Trash, you can make a recovery from the cloud service.
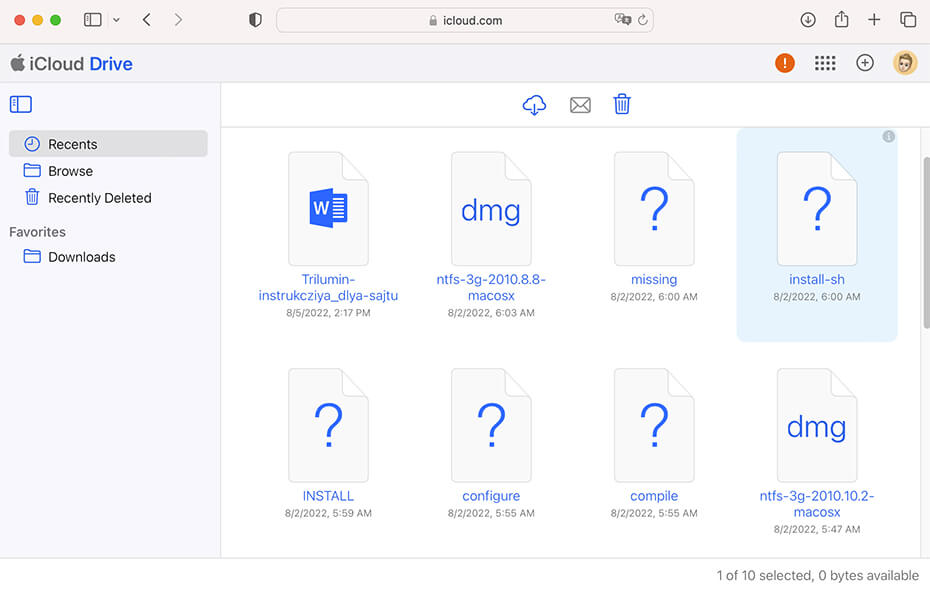
Using iCloud as a case study, this is how to undo deleted files on Mac:
- Open your Mac browser and go to icloud.com.
- Sign in to your iCloud account.
- Check through the various files available and select the ones you want to recover.
- Navigate upwards and download the files on your Mac. You can download by clicking the cloud symbol that has a downward arrow.
>>>>Learn how to recover permanently deleted photos from iCloud.
Solution 4: Recover Emptied Trash on Mac via Free Mac File Recovery Tool
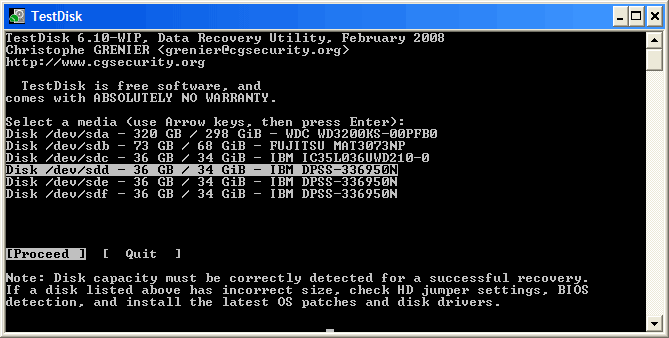
Another notable solution on how to retrieve empty trash on Mac is using a specially designed Mac file recovery tool – TestDisk.
TestDisk is a powerful, free, open-source file recovery tool that can be used to recover deleted files on many platforms, including Mac. It’s best used by experts because it doesn’t have an intuitive interface and it takes time to get familiar with.
Here’s how to recover emptied trash on Mac via this Mac file recovery tool:
- Download TestDisk from the official website and unzip the downloaded file.
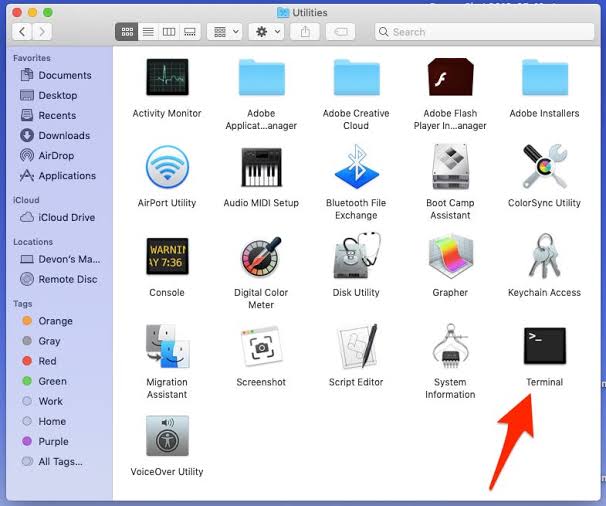
- In Terminal, type sudo./testdisk to open TestDisk.
- Select Create to start a new log file. Choose the disk where your files were permanently deleted and press Enter.
- Select Analyze and press Enter to search for partitions on the disk.
- Click on Advanced, select the partition where the files were permanently erased, and press Enter.
- Click on Undelete to begin the search for deleted files.
- Check through the list of deleted files, highlight the files you want to recover, and press C to copy.
- Select the location you want to recover the files to. Press C again to confirm the copy. It’s recommended that you recover the files to another disk to avoid overwriting the deleted data.
- When the recovery process is finished, press Q to quit TestDisk.
Conclusion
The belief that permanently deleted files are unrecoverable is a myth. With the solutions on how to recover permanently deleted files on Mac discussed above, you can easily get your lost data back. Meanwhile, it’s essential to always back up your file in case of unforeseen circumstances like this. But if you don’t have a backup, you can always rely on ONERECOVERY to restore your files.
FAQs on Mac Deleted File Recovery
Here are answers to some frequently asked questions about how to recover permanently deleted files on Mac.
- How to Use Terminal to Get Deleted Files Back on Mac?
Terminal requires entering professional commands, so it might not be the best recovery method for computer beginners.
Here’s how to use Terminal to get back deleted files on Mac:
- Open the Terminal app on your Mac.
- Type cd.Trash and press Return to go to the Trash folder.
- Input Is and hit Return. This will show all the deleted files in the Trash.
- Type mv[filename].[extension] [destination] to recover your deleted file. For instance, mvproject7.doc ~/desktop/
- Type Quit to end Terminal.
- Go to the destination (in this case, desktop) to view your recovered file.
- How to Recover Something from Trash on Mac?
Follow these steps to restore any content from Trash on Mac:
- Open the Trash Bin on Mac.
- Check and select the deleted file.
- Right-click on the selected file.
- Choose Put Back to return the deleted file to its original location on Mac.
- How to Find Deleted Documents on Mac?
The best way to find deleted documents on Mac is using TinyFrom ONERECOVERY. It’s an all-around data recovery tool that locates and restores deleted documents freely. Regardless of the loss scenario whether accidental deletion, permanent deletion, virus attack, or system error, you can depend on this tool to recover your documents.
ONERECOVERY has efficient scan modes that checks the nooks and crannies of your Mac for lost files. You can check the steps in Solution 2 to know how to use ONERECOVERY to find deleted documents on Mac.