It is plausible that you have been in the midst of important Excel work on your Mac and it vanished unexpectedly. How did that feel? Sinking, right?
However, it is deeply comforting to know that there is a way to recover unsaved Excel files from a Mac without any hassles. Whether you were working on a school project or an essential data analysis for a major office presentation that vanished, you can easily retrieve your Excel file.
This post will run you through everything you need to know about how to recover unsaved Excel files on Mac.
Recover Unsaved Excel File on Mac with AutoRecover
The AutoRecover feature is an in-built feature in the Office ecosystem to help recover unsaved documents and files if any form of data loss occurs. You can use it to return Excel files to their most recent automatically saved version. The AutoRecover option is activated by default.
Thus, if the AutoRecover option is turned on, you may easily recover the unsaved workbooks on your Mac.
1️⃣ Launch Excel in Office.
2️⃣ Next to “Open recovered workbooks?”, select Yes. Your most recent edits were preserved.
Simply follow these instructions on how to find unsaved Excel files on Mac in the AutoRecovery folder:
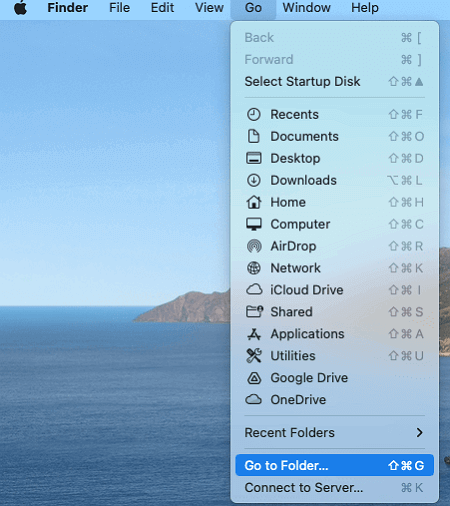
Step 1. Press Command + Shift + G to open Go to Folder in the Finder. Alternatively, you can select Go to Folder from the Go menu on the Finder menu bar.
Step 2. To access the Microsoft folder, enter the following path. Your real Mac username must be used in place of your username.
Step 3. Locate the AutoRecovery folder by searching through the Excel program folder. Next, get the desired unsaved Excel file.
This method is also available when you are going to retrieve an unsaved Word document on your Mac.
Recover Excel File Not Saved on Mac From Temporary Folder
Perhaps, you do not have the AutoRecover feature configured just yet, you can attempt to do unsaved Excel file recovery on Mac by going through the temporary folder route. By identifying Excel temp files, you can attempt to recover Excel files that were not saved on your Mac from the temporary folder.
For instance, this method can be used if the ‘Save’ button in Excel is not working and it causes any changes you have made to the Excel file to automatically disappear.
To locate Excel temp files, take the following actions:
Step 1. Click “Enter” after you have opened Terminal and type “open $TMPDIR” in the window.
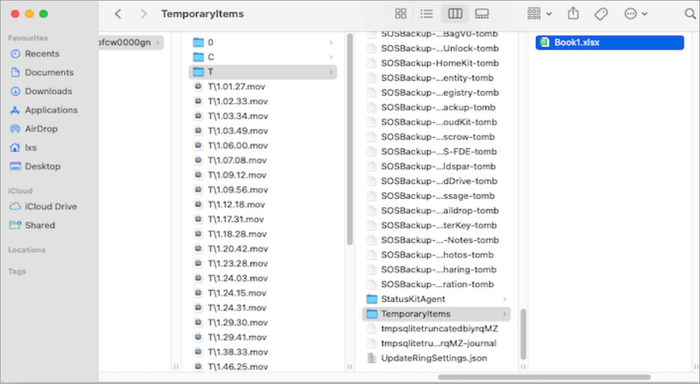
Step 2. The Temporary files folder is then opened. Look for the unsaved Excel file by selecting the “Temporaryitems” folder.
Step 3. You can choose to open, copy, and save it to a different location.
If you accidentally delete temporary files and this method doesn’t work, try this way to get them back from Mac’s Trash Bin: >> How to Recover Emptied Trash on Mac
Use Time Machine For Unsaved Excel File Recovery on Mac
The Mac tool called Time Machine allows users to back up their data to an external hard disk. You can recover unsaved Excel files on a Mac via Time Machine backups if you activate it to back up the data on your Mac.
Step 1. From the menu bar, select the Time Machine icon and then click “Enter Time Machine”.
Step 2. Navigate to “Finder” > “Documents” or any other directory on your Mac that contains the lost Excel files.
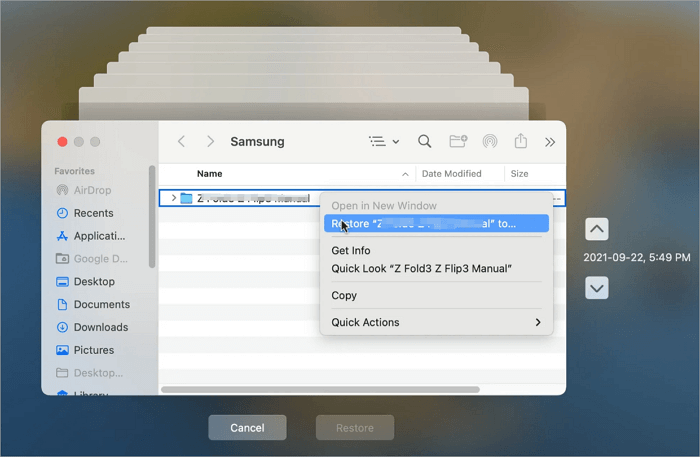
Step 3. Press the Space Bar to see a preview after choosing the version of your erased Excel file using the timeline.
Step 4. For Excel document recovery on Mac, click “Restore”.
📢 Further Reading:
Restore Previous Versions To Recover Unsaved Excel Files on Mac
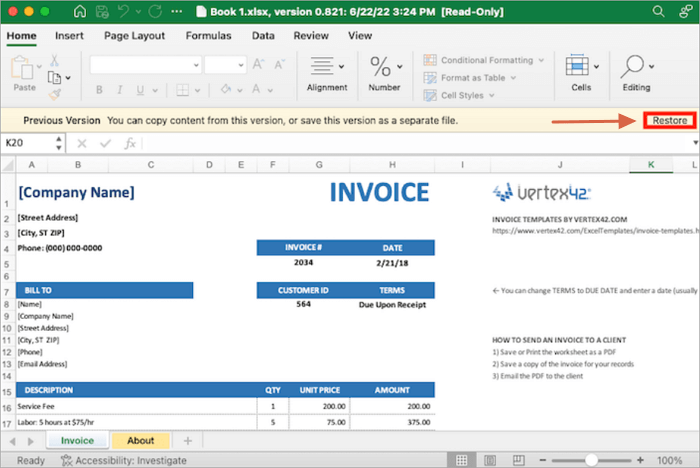
Is the unsaved Excel file still not able to be restored? To prevent having to start anew, you might want to consider restoring the most recent version of the file. Excel’s Version History function can assist you in locating and restoring an unsaved Excel file from a previous version.
Even though not all modifications made to an Excel file will be restored when you recover an unsaved Excel file Mac using this method, it will save you time and effort when editing the file again.
Step 1. Launch the Office Excel program on Mac.
Step 2. Select “File” > “Browse Version History”.
Step 3. Click “Open Version” after selecting the most recent version.
Step 4. Click “Restore”.
Bonus Tip: How To Recover Deleted Excel Documents on Mac
Although the focus of this post is to show how to recover unsaved Excel files, we are giving you a bonus tip – showing you how to recover Excel documents that may have been mistakenly deleted.
Excel backups or a specialized data recovery program are required for restoring deleted Excel files on Mac; however, AutoRecovery is not helpful in this regard, as opposed to what is the case with unsaved documents. You may quickly recover deleted Excel files by using ONERECOVERY, a powerful and efficient file recovery program for Mac.
This is a step-by-step tutorial to help you easily proceed through the procedure:
Step 1. Open this Excel recovery software on your Mac.
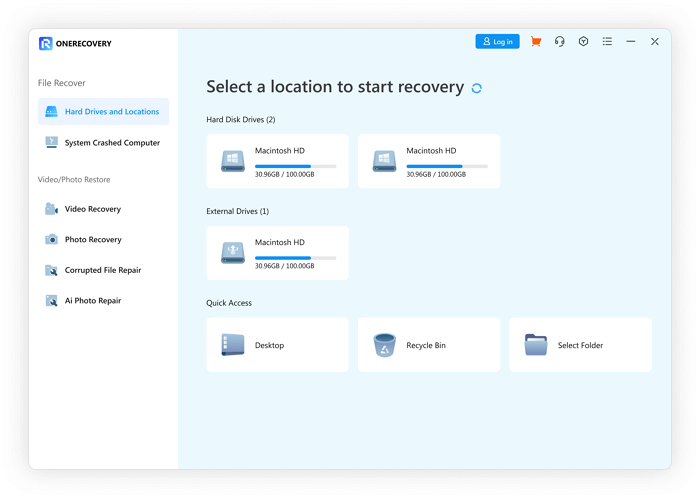
Step 2. Select the “File Recovery” mode from the app’s main interface, and then select the folder where the Excel document was saved before it was deleted.
Step 3. Start the scanning process to search for your lost Excel file.
Step 4. Preview the recoverable files in the scan result. Then, select the Excel documents you want to get back and click on the “Recover” button.
In addition to the recovery of lost or deleted Excel files, ONERECOVERY also supports PowerPoint recovery on both Windows and Mac operating systems.
📥 Give it a free test run—download it today!

Conclusion
The AutoRecover function in Microsoft Office Excel is a great option for recovering Excel files that have not been saved on a Mac. If this feature isn’t able to recover your Excel files, you will need to use a professional data recovery program, like ONERECOVERY.
This post offered you multiple solutions to help recover unsaved Excel files on Mac. If these steps are meticulously followed, you should have no issues recovering your Excel file. It is pretty straightforward.
If you are interested in more helpful file recovery tools, this post is what you need:
FAQs About Unsaved Excel File Recovery on Mac
Check out these frequently asked questions to assist in simplifying the process of using Excel for Mac to recover unsaved files. Among them are:
1. How To Delete Sheet in Excel on Mac
To remove a spreadsheet from a document, simply right-click on the spreadsheet’s name. This will bring up a menu with a list of activities that may be done with the spreadsheet.
As an illustration, suppose the user wishes to remove Sheet 3 from the document.
1️⃣ Click “Delete.”
2️⃣ You will be prompted with a notice asking you to confirm if you wish to remove the specific spreadsheet. Click OK if you are certain you want to remove the spreadsheet. Click cancel if not.
3️⃣ Afterward, click “OK”.
2. How To Download Excel Files on Mac
When saving a file in Excel on a Mac, there are certain differences between Windows and Mac. This section outlines the actions you need to do to save an Excel file on a Mac. You can follow the steps below:
1️⃣ From the menu bar, go to the “File” menu. Then, select the “Save As” option.
2️⃣ Next, give the file a name by entering it in the “Save As” dialog box.
3️⃣ Choose the preferred location using the “Where” drop-down menu.
4️⃣ You can then choose the file type under “File Format”.
5️⃣ Lastly, to save the file, click the “Save” button.