Whether you want to save photos, documents, or any other data, SD cards are often used. One primary problem many people often face is the accidental deletion of data on SD cards. If you have accidentally deleted files on your SD card, you can recover the files with the help of SD card data recovery tools.
However, one main issue that the majority of Mac users face is that many SD card data recovery tools are not compatible with Mac and iOS devices, which is why you need to find alternative recovery methods. Read on to find the best ways for SD card recovery on Mac.
Method 1. Restore SD Card on Mac with Disk Utility
If your SD card is corrupted and you are unable to access the files, it is possible to fix the issue and recover your files with the help of Disk Utility. On Mac devices, the Disk Utility is installed by default. You can easily find the Disk Utility in the Other folder in Launchpad.
Disk Utility is a system program that is commonly used for managing external and internal storage devices. For instance, you can use its First Aid feature to check if your SD card has any file system problems. Also, Disk Utility can help with basic troubleshooting if your Mac fails to recognize the SD card by verifying whether the SD card is correctly mounted.
💡 Go through the following steps to fix corrupted SD card and restore lost data through Disk Utility:
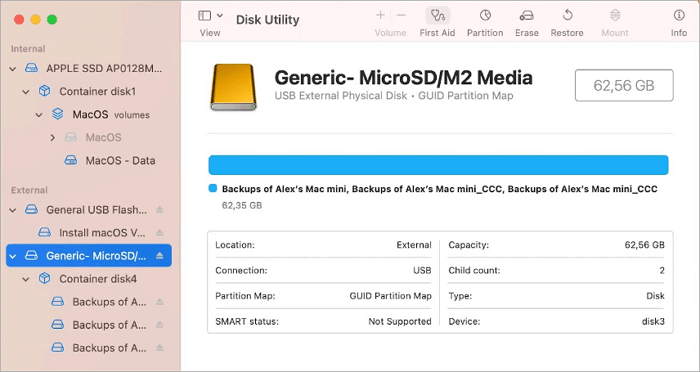
Step 1. Go to the Launchpad on your Mac. In the Other folder, choose Disk Utility.
Step 2. Now tap on the “View” option and select the “Show All Devices” option.
Step 3. Choose the SD card and tap on the “First Aid” option.
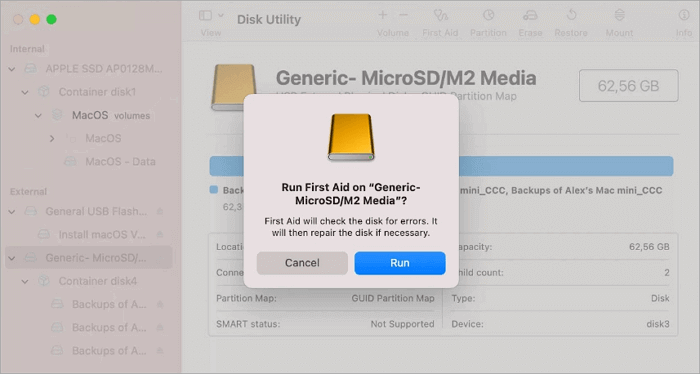
Step 4. Now tap on the “Run in the First Aid” option and abide by the instructions you see on your screen.
Step 5. Once the First Aid process is done, tap on the “Done” option.
Method 2. Use SD Card Recovery Software on Mac to Retrieve Data
ONERECOVERY is a Mac SD card recovery software that can help users restore various formats of data on SD cards, ranging from photos, documents, and videos to more than 1000 other types of files.
From miniSD cards, SD cards, SDXC cards, and SDHC cards to CF cards, this SD recovery software on Mac supports different types and brands of memory cards. Taking the SanDisk SD card recovery as an example, ONEREOCVERY can ensure a high success rate of recovery on this brand of SD cards.
Additionally, ONERECOVERY can also help you get back files from other kinds of storage devices. For instance, you can recover deleted files from USB drives, SSDs, or HDDs with simple clicks.
💡 Follow this guide to easily recover files from an SD card on Mac using a user-friendly tool with just a few simple clicks:
Step 1. Download and install ONERECOVERY software on your Mac.
Step 2. After putting the SD card into the card reader, connect the SD card to your Mac.
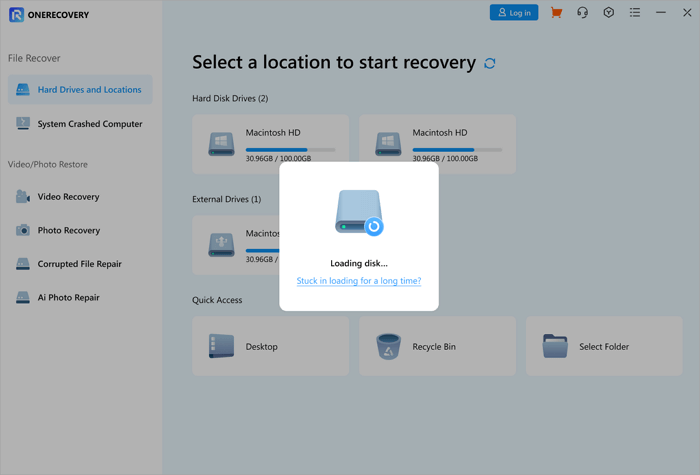
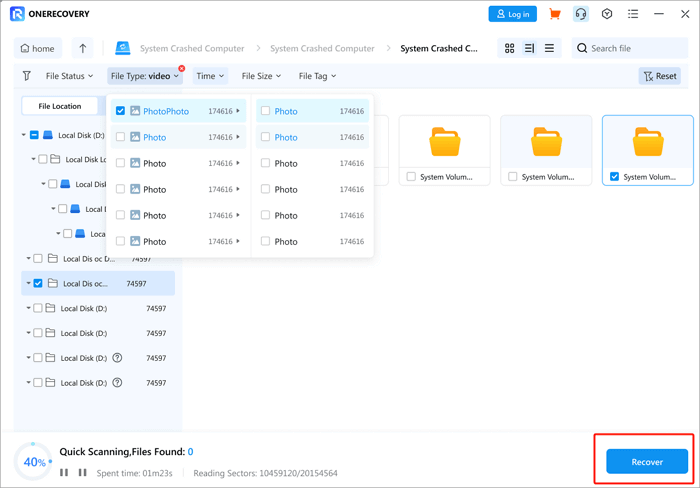
Step 3. After ONERECOVERY has loaded all recoverable disks, select your SD card, and then the scanning process will start automatically.
Step 5. After the scan, the lost files will all be displayed in the scan results. Finally, you only need to select the SD card files you want to recover and click on the “Recover” button to get them back.
Restoring the files on an SD card using data recovery software is the most convenient solution for most people. If you want to learn more about the features of many data recovery tools and the functional differences between various famous recovery software, this article is what you need:
📥 Download it and start your free trial now.

Method 3. Use Time Machine Backup for SD Data Recovery on Mac
Mac devices come with a built-in backup and recovery tool called Time Machine. This tool backs up the entire data on the SD card that is connected to your Mac. Not only that, it also backs up the files stored in the main disk, all your applications, and data on external drives. Whenever you need to get the necessary files back, you can restore them from the Time Machine in just a few steps.
You need to keep in mind that this method can only be used if you have enabled the Time Machine backup option on your Mac.
💡 You can follow these steps to use Time Machine backup for SD card data recovery on Mac:
Step 1. Connect your SD card to your Mac.
Step 2. In the menu bar, tap on the Time Machine clock icon.
Step 3. Now choose the “Enter Time Machine” option.
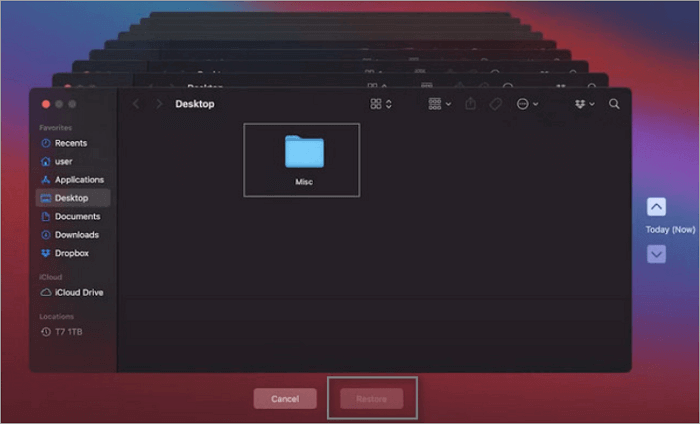
Step 4. Go to the Finder window and choose the folder that stores the deleted data.
Step 5. You can look for the files you want to recover. Or you can look at the timeline to see the older versions.
Step 6. Choose all the files you want to restore and tap on the “Restore” option.
For users who have their data backed up in iCloud, it’s easier to retrieve lost files. All you need to do is log in to your Apple account and restore the deleted data from iCloud.
Method 4. Recover Files from SD Cards on Mac Trash Folder
Another best way to restore an SD card on your Mac is by using the Mac Trash folder option. Mac has a Trash folder that automatically stores the deleted files instead of completely removing them from your device. This way, you can restore the deleted files on your Mac in case of accidental deletion.
You need to keep in mind that this method will not work if you already emptied the Trash folder on your Mac or turned on the auto-empty feature. Also, if the files on your SD card are deleted or lost when the SD card is inserted into any external devices, then this method will not work.
💡 Follow the below steps if you want to recover files from SD card on your Mac in this way:
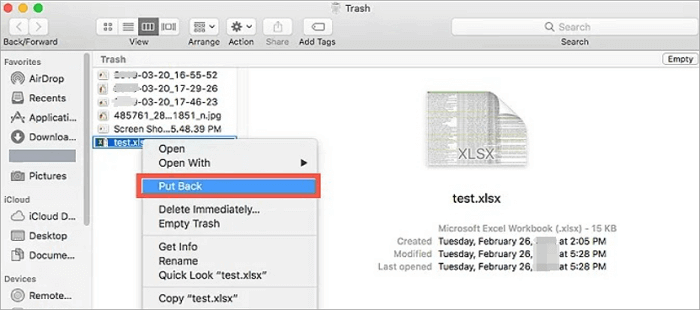
Step 1. Go to the Mac Dock and tap on the “Trash Bin” option.
Step 2. Search for the lost or deleted files from your SD card.
Step 3. Select the files you want to restore and right-click on them.
Step 4. Now tap on the “Put back” option.
If you emptied the Trash bin on Mac by chance, you have to do something else to retrieve the files that have been removed. This blog will guide you to retrieve the necessary data step by step: >> How to Recover Emptied Trash on Mac
Method 5. Undelete SD Card on Mac via Terminal
When your SD card has errors, it will not work properly, making it impossible to access the stored data. In such cases, to restore the SD card, instead of data recovery, you can opt for SD card repair. Recovering data on your SD card via Terminal is the best way as this built-in tool is free to use. After fixing the errors with the help of the Terminal application, you can effortlessly access the data on your SD card.
💡 Here’s how you can undelete the SD card on your Mac via the Terminal application:
Step 1. You can find Disk Utility in the Other folder in Launchpad. Open it.
Step 2. After highlighting the SD card, record the device identifier under the Device section.
Step 3. Go to the Other folder in Launchpad and tap on the Terminal app.
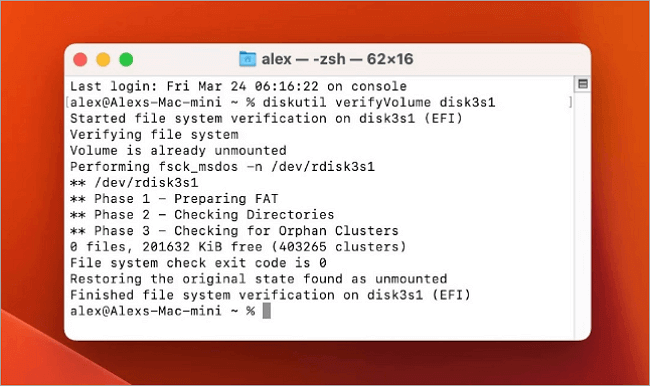
Step 4. Add the below command and click on the “Return” option.
diskutil verifyVolume disk3s1
🔔 Note: In the place of disk3s1, add the identifier of your SD card.
Step 5. The command will be executed and displays whether the SD card is corrupted.
Step 6. Enter the below command and click on enter for repairing your SD card.
diskutil repairVolume disk3s1
🔔 Note: In the place of disk3s1, add the identifier of your SD card.
Conclusion
Whether you accidentally deleted files or lost files because of the corrupted SD card, you can simply follow any of the above methods to recover files from SD card on macOS.
If you find that files were deleted on your SD card, do not use it to avoid the possibility of overwriting. Use any data recovery tool quickly to restore lost data on your Mac within a few steps. Among all the options, ONERECOVERY is SD card restore software that is worth trying.
FAQs About SD Data Recovery on Mac
A lot of knowledge is required to recover SD cards on Mac if you select a professional solution. To make it easier for you, here we present some frequently asked questions with answers.
How to find deleted files on SD cards?
There are plenty of ways to find deleted files on an SD card.
➤ First, check your Mac’s Trash. Deleted files often will be stored in the bin before they are permanently deleted.
➤ If files are gone from Trash, you can use data recovery software.
How to recover photos from formatted SD cards?
If the SD card is formatted, the data in the SD card will be inaccessible. Here’s how you can recover photos from formatted SD cards:
➤ Install SD recovery software on Mac.
➤ Deep scan the SD card for deleted photos.
➤ You can preview the lost photos and tap on the “Recover” button to restore the photos.
If you want to learn more about Mac SD card recovery, this post will give you more information: >> How to Recover Formatted SD Card on Windows/Mac
What are the steps for SanDisk card recovery on Mac?
For Mac users, it’s not a hard task to restore the SanDisk SD cards on Mac as long as you get powerful SD recovery software for macOS. Then, you can follow these steps to restore the SD card effortlessly:
Step 1. First of all, you need to connect the SanDisk SD card to your device using a card reader.
Step 2. Then, launch the program for macOS SD card recovery, such as ONERECOVERY.
Step 3. Choose the SanDisk SD card you want to recover in ONERECOVERY. Then, click on the “Recover” button to scan the files in the SD card.
Step 4. The files you can recover will be shown in the scanned result. Now, you only need to choose the files you need and get them back.
Top 5 free SD card recovery software on Mac
Although there are many optional macOS SD card recovery programs, each of them has its own tools and features. Besides, some of them are free to use while some of them are relatively expensive. If you want to try a free SD card recovery app, it’s recommended to choose from the top 5 free SD card recovery software for Mac:
1️⃣ ONERECOVERY
2️⃣ PhotoRec
3️⃣ EaseUS Data Recovery
4️⃣ TestDisk
5️⃣ Disk Drill