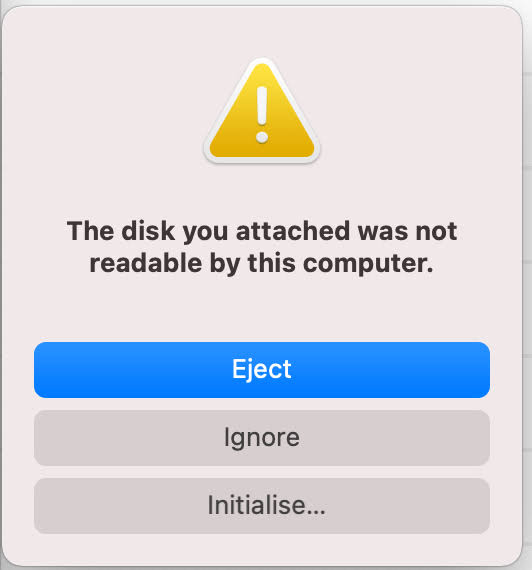
Many Mac users have been complaining about this error that pops up (the disk you attached was not readable by this computer) whenever they connect external disk drives to their computer. For some users, this error comes up whenever they connect any disk drive, and for others, this error is more frequent when they connect a specific disk drive, such as an external hard drive or USB flash drive.
If you’re experiencing this problem, you are in the right place because, in this post, we will unveil why your computer is displaying this error and how to fix it.
What May Cause “The Disk You Inserted Was Not Readable by this Computer”?
The major reasons why the disk you inserted was not readable by this computer are:
| Reasons | Explanation |
| ⚠️Virus Attack | The operation of the disk drive can be affected if the disk or the computer is under virus attack. |
| 📃Incompatible File System | The drive may be formatted with a file system that’s not compatible with macOS. And if it’s a new drive, it might not be formatted at all. So, format your drive on Mac. |
| ⚒️File Corruption | Issues with the disk’s file structure can cause your computer to be unable to read the contents of the disk. |
| ❌Disk Failure | Sudden malfunctions like power surge or improper ejection of the disk drive can cause it to become unreadable. |
| 💽Hardware Problem | Faulty hardware components like bad cable connection can prevent your computer from reading the disk. |
What to Do When Seeing “The Disk You Attached Was Not Readable by This Computer?”
Here are quick fixes you can try immediately you notice “the disk you attached was not readable by this computer error.”
- Restart your Mac. Sometimes, all your computer needs to reset and function properly is a restart.
- Check whether the disk drive is encrypted. If it is, you need to remove the encryption, so that your Mac will be able to read it.
- Verify if the disk file format is compatible with macOS. If it’s not, reformat to a macOS supported file system like FAT32, APFS, HFS+, and exFAT. If the disk drive is formatted to NTFS, it’s highly likely to be unreadable on Mac.
- Connect the disk to another PC (Windows or Mac). If it shows up, it means the issue is not with the disk drive, but rather with your Mac.
- Change the USB port and connection cables to confirm if they are faulty.
How to Fix “The Disc You Inserted Is Not Readable by this Computer?”
Here are standard solutions you can apply when you get an error saying “the disk you inserted is not readable by this computer.”
Use Mac First Aid to Check or Repair Disk Permissions
Mac comes with a native repair feature called First Aid. It’s used to diagnose and repair issues with disk drives and file systems.
If you see the problem: “disk is not readable by this computer on Mac”, First Aid can help you check and repair the disk permission, making it visible for your Mac to read.
👉Follow these steps to make your disk readable:
- Click Ignore to remove the error message: The disk you attached was not readable by your computer.
- Open Applications, select Utilities and click on Disk Utility.
- Navigate to the left side of the Disk Utility page and select the unreadable disk.
- Go to the top of the screen and click on the First Aid tab.

- Click on Run. First Aid will check for errors and repair the problems.
- Wait for the repair to finish. When you get a success message, restart your Mac, and reinsert the disk.
Verify the Disk Format and Reformat to FAT32
Another way to solve the disk you inserted was not readable by this computer error is to ensure the disk is formatted to FAT32. Your Mac won’t recognize the disk drive if it’s formatted in any file system that’s not compatible with macOS.
👉These are the steps to reformat your disk to FAT32:
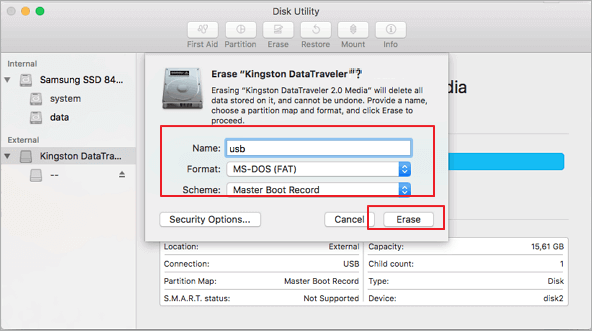
- Click Ignore to remove the error message displayed.
- Open Applications, select Utilities, and click on Disk Utility.
- Go to the left sidebar and select your unreadable disk drive.
- Navigate to the toolbar above and choose Erase.
- Change the format as MS-DOS (FAT).
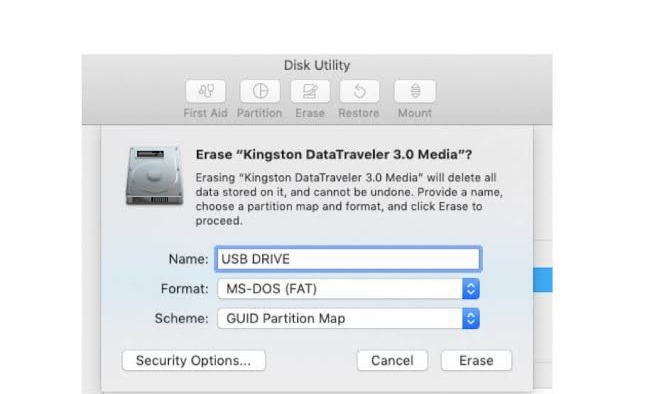
❗NOTE: Changing the disk format will erase all the data on the drive, so it’s crucial that you know how to recover files from a disk drive on Mac.
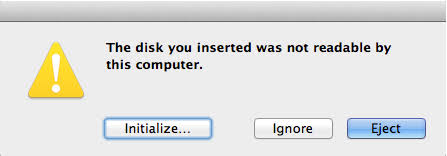
Initialize the Disk to Fix “The Disk You Inserted Was Not Readable” Error
If you’ve tried the solutions above and the issue continues, you have to Initialize the disk. Instead of clicking Ignore to remove the error message, click Initialize. This process involves repairing the disk with First Aid and reformatting it to a macOS-supported file format (FAT32).
👉Here are the steps to take:
- When the error message pops up, click on Initialize.
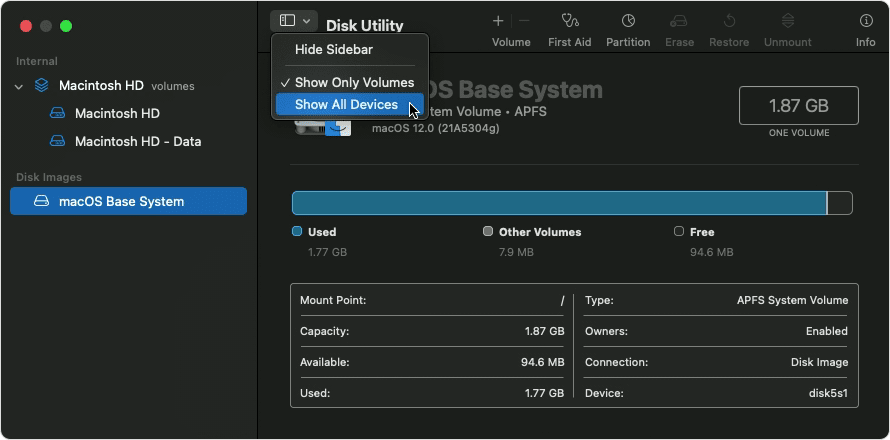
- This action will open the Disk Utility. From the menu bar, click on View, and then select Show All Devices. All the disk drives connected to the Mac will be displayed. Choose the unreadable disk you want to activate.
- Navigate to the top tool menu and click on First Aid.
- Choose Repair Disk and wait until the repair process ends.
- Then, go to the tool menu above and click on Erase.
- Name the disk, select a file format (FAT32), and choose a partition scheme. Click Erase again to change the settings.
- Now, restart your Mac and reinsert the disk for smooth operation.
Bonus Tip: Recover Disk Data after Fixing “Disk is Not Readable by this Computer” on Mac
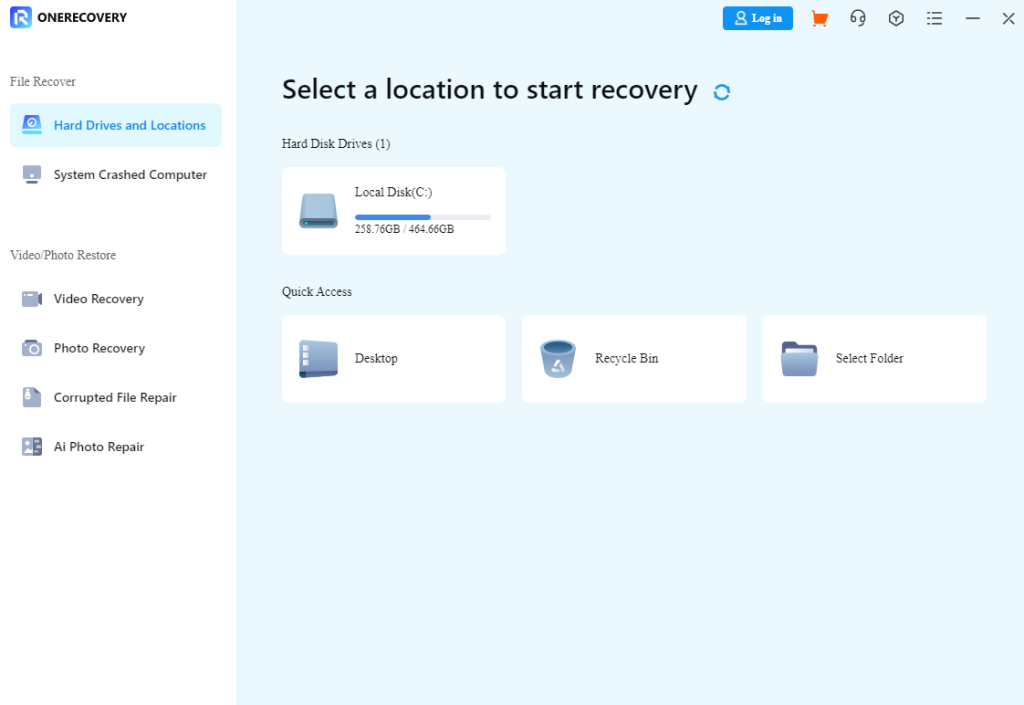
When you try fixing the issue of the disk drive not showing on your computer, you risk may lose all your data. This becomes worse if you don’t have a backup. The good news is that you can recover your data by using a professional recovery tool. We recommend that you use ONERECOVERY for Mac to enjoy speedy data recovery without compromising on your files.
ONERECOVERY for Mac is a superior recovery tool that can retrieve data from several scenarios, including accidental or intentional deletion, disk corruption, overwritten files, virus or malware attack, etc. It supports the recovery of lost files in various file systems, such as FAT12/16/32, APFS, HFS, as well as 1000+ file formats of audio, videos, images, documents, archives, and many more.
👉Follow these steps to restore your lost data with ONERECOVERY:
- Download and install ONERECOVERY on your Mac.

- Insert the disk drive to your Mac.
- Launch it and select the disk drive where your data was lost.
- Immediately, ONERECOVERY begins to scan the disk for every missing data.
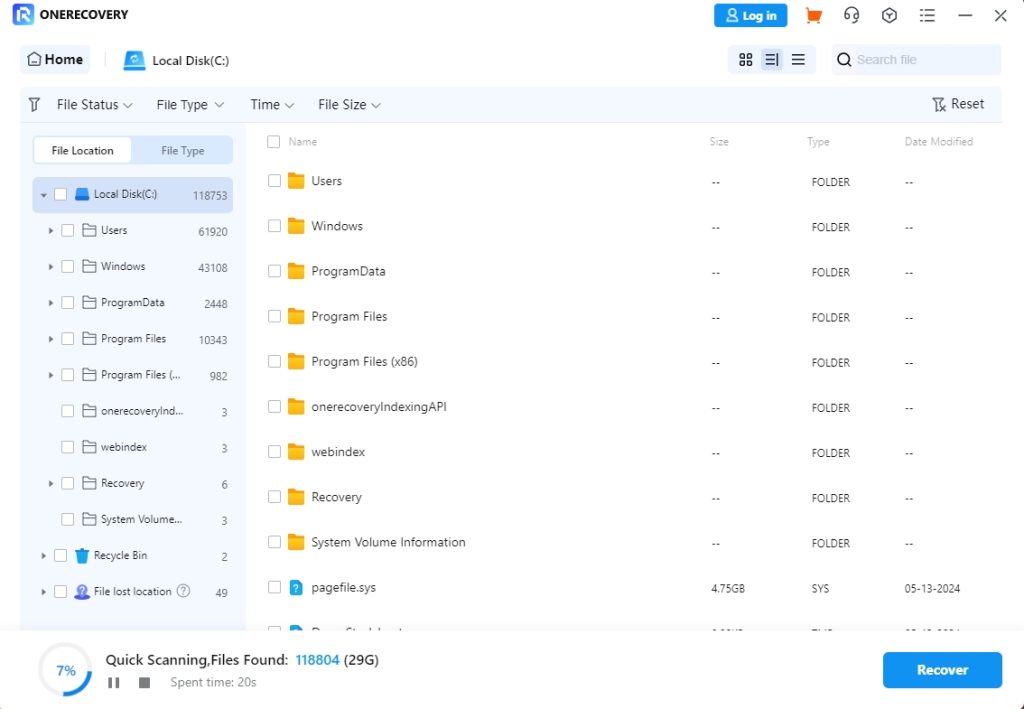
- Preview the results, select the ones you want to restore and click Recover.

Conclusion
Don’t panic when you see the prompt, “The disk you attached was not readable by this computer.” There are ways you can fix the issue by yourself.
However, you can prevent this problem from occurring by observing some friendly precautions, such as ejecting the disk drive properly, installing antivirus on your Mac, backing up important data, and using an advanced file system.
FAQs on “The Disc You Inserted is Not Readable” Error
Get related information about Mac unable to read external disk drives.
1️⃣Why is My USB Not Readable on Mac?
There are various reasons why your USB is unreadable on Mac. They include:
- Faulty cable
- Damaged USB port
- Dirty USB contacts
- Virus or malware attack
- Unsupported file system
- Improper ejection
- Data corruption
- Driver issues
- Outdated macOS
- Physical damage
2️⃣How to Fix an Unreadable SD Card on Mac?
There are simple ways to fix an SD card that’s not showing up on Mac. Some of them are:
- Display SD card in the Finder’s sidebar preferences.
- Check the SD card reader and change to a different USB port.
- Check the SD card file system.
- Update macOS to the latest version.
- Update the SD card drivers on your Mac.