Not every USB is compatible with Mac computers, especially since most computers in the world run on Windows, which use a different set of file systems. Thus, USB drives often need to be formatted to work on Mac computers.
Aside from the compatibility issue, you might need to format USB on a Mac for several purposes, such as removing data, changing the file system, and preparing for use with specific devices. How to format USB on Mac is an easy process. In this post, we will unveil the steps you need to follow to successfully format your USB drive to work on a Mac.
Learn the common types of file systems used on Mac and the major factors to consider when choosing the best option.
There are many file systems on Mac, but the most popular ones are HFS+, APFS, FAT32, exFAT, and NTFS.
| File System Formats | Explanation |
| 📂 HFS+ | The Hierarchical File System Plus (HFS+) doesn’t have a limit on the file size that can be saved on the USB. However, Windows can only read, but not write to HFS+. |
| 🗂️ APFS | The Apple File System (APFS) is popularly revered for its speed, better data organization, and secured encryption. But, it’s not recognized by Macs running on macOS versions that are older than High Sierra. |
| 📑 FAT32 | The File Allocation Table (FAT32) is also known as MS-DOS (FAT). It is the most commonly used because of its compatibility with Mac and Windows. However, it doesn’t support file sizes more than 4 GB. |
| 🗃️ exFAT | The Extended File Allocation Table (exFAT) was introduced to overcome the limitations of the FAT32 file system format. It supports larger storage space and files larger than 4 GB. |
| 🗐 NTFS | The New Technology File System (NTFS) is a file system developed by Microsoft solely for Windows computers. However, it can read data on Mac computers but cannot write to them. |
Key factors When Choosing a File System:
📌 File Size: HFS+, APFS, exFAT, and NTFS support very large files, making them suitable for most applications.
📌 Data Security: HFS+, APFS, and NTFS offer good data security with support for file permissions and encryption.
📌 Ease of Use: HFS+, APFS, FAT32, and exFAT are fully designed for macOS, making them very easy to use.
📌 Specific Use Cases:
Related Post: >> How to Recover Deleted NTFS Files
You stand a risk of losing all your data when formatting the USB drive. It’s advisable that you backup your important data to iCloud as it works seamlessly with Mac.
Here are the steps to take:
1️⃣ Connect your USB drive to your Mac.
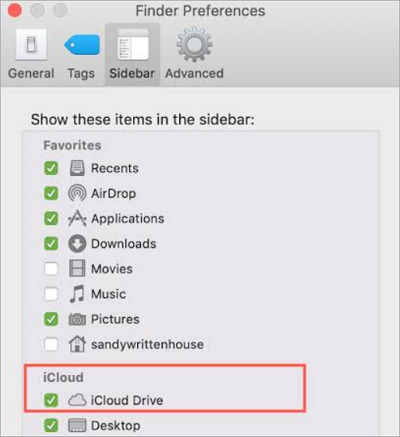
2️⃣ Go to Finder and then select the “iCloud Drive” option on the sidebar.
3️⃣ Access your USB drive through the Finder’s sidebar. Select the files or folders you want to backup.
4️⃣ Drag and drop the selected files into the iCloud Drive in the Finder’s sidebar.
5️⃣ Wait for the transfer to complete.
After formatting a USB stick on Mac and you notice that your files are completely lost, you can recover permanently deleted files from iCloud.
All Mac computers come with a helpful tool called Disk Utility. It is a versatile application that enables the management of disks and storage devices on Macs. You can use it to create partitions, erase disks, verify disks’ health, and format flash drives on Mac.
Disk Utility can also be used to recover files from an external hard drive on a Mac.
Here are the steps to format pen drive in Mac via Disk Utility:
Step 1. Connect the drive to your Mac. Then go to “Applications”, select “Utilities”, and click on “Disk Utility“.
A new screen will come up, showing all the connected storage devices on the left sidebar and various disk management options on the right.
Step 2. Go to the left sidebar, select the USB drive you want to format and navigate to the top menu bar to click on Erase.
Step 3. A small window will pop up for the drive name and format selection. Type your preferred drive name and select the file format you prefer among the options we discussed earlier.
Step 4. Then, click on Erase. The formatting process now begins. The name required depends on the size and speed of your USB drive.
Every Mac computer also comes with Terminal, which is a command line that can perform almost everything on the GUI (Graphical User Interface). It’s an unconventional way to access your computer and perform many other tasks, such as SD card recovery on Mac.
Formatting USB sticks on Mac via Terminal is not ideal for beginners because it contains command lines.
Here’s how to format USB with Mac through Terminal:
Step 1. Connect the USB drive to your Mac. Then, go to “Applications”, select “Utilities”, and click on “Terminal“.
Step 2. Type diskutil list. This will list the devices available on your computer.
Step 3. Check through the list and click the USB drive you want to format. Note the number of the USB drive is in the list of devices available on your computer.
Step 4. Type “diskutil erasedisk FILE_SYSTEM DISK_NAME DISK_IDENTIFIER”. (You need to determine your File name, and disk name, and input the USB drive number).
For example, if you want to format your USB drive to APFS, name the disk “Personal”, and the disk number is 3, you can enter this command:
Diskutil erasedisk APFS Personal disk3.
This will format the thumb drive on Mac successfully.
Knowing how to format USB on Mac is an important skill when you buy a new flash drive and looking to format it to a macOS file format or when you want to reformat USB on Mac to a compatible file system.
In this post, we’ve explained how to do this. But before using a MacOS format USB drive, make sure to back up your data to iCloud for safekeeping. If you don’t back up your data, but accidentally lose important files while formatting the USB, then you can only use some professional and powerful USB recovery tools to get back what you need.
Here are answers to frequently asked questions about how to format USB on Mac. Explore them to learn more.
There are 2 methods to format an external thumb drive on Mac. They are Disk Utility and Terminal. What you have to do is connect the external thumb drive to your Mac, click on Applications, select Utilities, and choose Disk Utility/Terminal. Then, follow the instructions outlined in the post above.
The easiest way to format a flash drive on Mac is to use Disk Utility. These are the steps involved:
FAT32 is compatible with Mac and Windows computers, so many people format their USB drives to this format.
Follow these steps to format USB to FAT32 on Mac:
Before formatting a USB to another format (ext3), you need to back up your important data. Now, you can follow these steps to change your USB format to ext3:
Insert the USB into your Mac computer.
A PST (Personal Storage Table) file is a data file format used by Microsoft Outlook…
QuickTime Player, a built-in media player for macOS, is known for its smooth, high-quality playback.…
While everybody loves taking photos and saving them on their Macs, some may not know…
"I cannot find a folder that I know exists on my Mac. How can I…
Under normal circumstances, when you insert a flash drive into a Mac, it will show…
“I turned on my Mac and saw that my entire desktop is blank. I can’t…


