For many users, formatting their USB drive is an option they don’t eventually think about, but there are numerous benefits attached. One of the many benefits of formatting your drive is to prepare your USB drive for use. Proper USB drive formatting eliminates compatibility issues that may arise when you intend to use the USB drive on devices with the FAT32 format.
If you are among the millions of Mac users searching for “FAT32 format MacBook” solutions on the web, this article offers simple instructions.
There are hundreds of file systems available for file system management on different devices and operating systems, but what is FAT32 and why is it important?
FAT32 is the format used on storage devices for file management and organization. This file system outlines the hard drive data handling technique. Launched in 1997, the FAT32 system has a maximum file size of 4 GB and supports a total volume of 2 TB.
Although it is compatible with many devices, this file system lacks a file compression feature that allows users to store and archive files. This has led to some problems with data transmission. To be more specific, transferring files can be a challenge as it has a maximum transfer speed of about 5 MB/s.
For Mac users, formatting fat32 on Mac is a common activity that ensures compatibility before data transfer. To ensure this process executes excellently, here are some MacBook format fat32 tips that can optimize the usability of your device during and after formatting.
📌 Backup your data: The process of Macbook format fat32 removes all the files you once stored. Since these deleted files are not stored on any other internal or external device, you must make a reliable backup of these files, especially if they contain important data.
📌 Ensure compatibility: The FAT32 file system has several advantages for Mac users; yet, certain limits to its use can be troublesome, and make formatting and other operations difficult. A good solution to employ, when dealing with files exceeding 4 GB is to use another compatibility filesystem like ExFAT.
The Disk Utility is a built-in feature in your Mac PC for viewing both the internal and external storage space available. You can also perform additional operations like formatting, compiling, or even creating a new file disk image.
It is easy to use, as it can be accessed and operated quickly without any third-party software. The Disk Utility option is perfect for beginners with little technical know-how. There is no need for coding or manual operation; thus, it is a perfect format-usb-to-fat32-on-mac solution for beginners. Besides formatting the USB hard drive, Disk Utility is also practical to format SD cards on macOS.
Here’s how to format Fat32 on Ma with the Disk Utility:
Step 1. Insert the USB drive to be formatted into the USB slot on your Mac.
Step 2. Navigate to the “Application” section and choose “Disk Utility.”
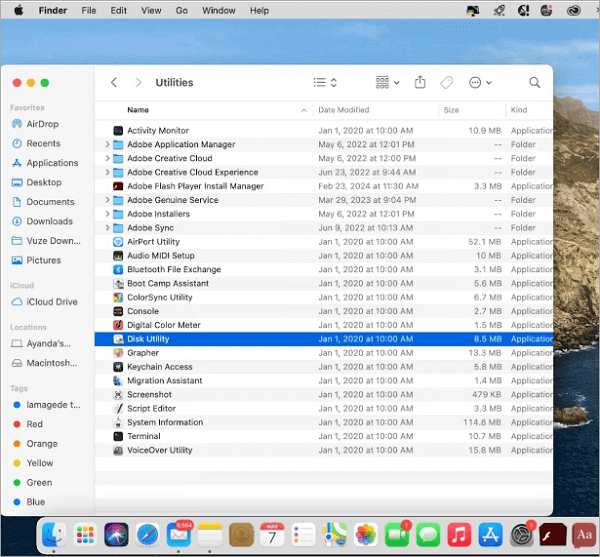
Step 3. Double-click on it to open.
Step 4. Choose the drive that you want to format, click on MS-DOT (FAT), and then click on Erase.
The terminal command is an alternative solution if you encounter issues with Disk Utility while formatting Fat32 on Mac. The terminal command is an application on the Mac PC that gives unbridled access to the device. Upon initial glance, the terminal command appears as a blank page with a blinking icon that allows you to type specific scripts that perform certain tasks.
A downside to using Terminal Command is that it requires comprehensive knowledge of the codes associated with the command-line interface and is thus ineffective for newbies. In addition, any incorrect input on the command line can lead to unintended errors.
Here’s how to format USB to FAT32 on Mac via Terminal Command:
Step 1. Connect the USB drive you want to format.
Step 2. Open the Terminal Command application by typing “Command + Space” to reveal a search bar. Then type “Terminal.app” to launch the application.
Another way to launch the Terminal command is to navigate to the Applications folder and immediately launch the Terminal Command application.
Step 3. After launching, you’ll be welcomed with a blank page. Type “diskutil list” on the blank page. This command script is designed to show your device’s internal and external storage.
Step 4. Now type in “sudo diskutil erasedisk FAT32 MBRFormat” (disk identifier code). Your disk identifier code is usually located at the top- or bottom-right corner, and an example is /dev/disk3.
✨ Related Post: >> How to Open Flash Drive on Mac
Many users fail to back up their files before formatting. If you are among the many users facing similar issues or you simply need to recover some lost files on SDD or any other storage device, data recovery software is your best bet to retrieve those lost data.
ONERECOVERY is one reliable example of a data recovery software that is capable of recovering data lost due to software crashes, accidental deletion, virus attacks, and some other scenarios.
The software has amazing built-in features that make data recovery easy and seamless. For example, this software provides users with a dual scan mode that does a deep scan or a quick scan.
Before starting the data recovery operation, you need to download and install the ONERECOVERY software. Ensure you download the Mac version of it.
Step 1. Connect the external USB drive with the lost files to your Mac PC to begin recovery.
Step 2. Locate the external USB drive that needs recovery.
Step 3. Scan the external drive to locate lost files.
Step 4. After selecting the important files, choose the new location for these restored files on your Mac.
Step 5. Finally, click on “Recover” to restore the selected files to their new location.
📥 Download now and enjoy a free trial.
✨ Besides ONERECOVERY, there are still other data recovery tools that help get back the lost files on your hard drive. The following post will introduce some of the most excellent ones among them:
There are multiple ways to format your USB to FAT32 on a Mac, depending on your technical experience. The Disk Utility approach is a common solution for users with less experience and little to no technical knowledge. For users with advanced knowledge of computer operation, the Terminal command app allows for a better-customized approach.
Overall, ensure you backup your USB drive files before formatting to prevent data loss. However, if you end up losing your data, ONERECOVERY data recovery software can help retrieve all lost data with ease.
A PST (Personal Storage Table) file is a data file format used by Microsoft Outlook…
QuickTime Player, a built-in media player for macOS, is known for its smooth, high-quality playback.…
While everybody loves taking photos and saving them on their Macs, some may not know…
"I cannot find a folder that I know exists on my Mac. How can I…
Under normal circumstances, when you insert a flash drive into a Mac, it will show…
“I turned on my Mac and saw that my entire desktop is blank. I can’t…


