Under normal circumstances, when you insert a flash drive into a Mac, it will show up on the desktop or Finder. But circumstances are not always normal with computer devices, including flash drives. You can simply insert your drive to Mac after a few minutes of ejection and find out that it’s not recognized.
If your Mac doesn’t recognize the USB flash drive, you cannot have access to the drive information, making it useless. Fortunately, there are solutions for Mac not recognizing USB. This page covers the possible causes and reliable solutions to USB not showing up on Mac.
Related Post: >> How to Fix USB Device Not Recognized on Windows
Causes and Solutions of Mac Not Recognizing USB
Here are the common causes and recommended solutions for flash drives not showing up on Mac.
| Causes | Explanation | Solutions |
| 🔌 Connection Issues | The flash drive and USB port are broken or not connected properly. | Fix 1: Check USB Ports or Reconnect Fix 2: Reset PRAM and SMC |
| ⚙️ System Configuration | An incorrect Finder setting or outdated OS and firmware can make your flash drive not show up on a Mac. | Fix 3: Adjust Finder Preferences Fix 4: Update macOS and Firmware |
| 🗃️ Incompatible File System | Mac recognizes APFS, HFS/HFS+, exFAT, FAT32, ext2, and NTFS. If your flash drive uses another file system, it won’t be detected. | Fix 5: Format the Flash Drive |
| 💾 Driver Issues | Your Mac may have an outdated driver, or the flash drive might be off if it has a physical power switch. | Fix 6: Update Drivers Fix 7: Use Terminal to Check Drive Errors |
| 💿 Disk Errors | Disk errors like file system corruption, bad sectors, or viruses, may also cause the hard drive to be unrecognized. | Fix 8: Use Disk Utility’s First Aid Tool |
How to Fix Flash Drive on Mac Not Showing Up in 8 Ways
Explore these 8 solutions to fix Mac not recognizing USB. Follow the instructions involved to successfully gain access to the drive’s data.
Fix 1: Check USB Ports or Reconnect
Firstly, restart your Mac, as this commonly addresses computer hardware glitches. If your Mac doesn’t recognize the flash drive after this, check the state of the USB port. It could be that the USB port you connected to is faulty.
💡 Follow these steps to check the USB port connection:
Step 1. Remove the flash drive and connect it to another USB port on your Mac. You might have to try all the Mac’s USB ports to be sure if the flash drive is faulty.
Step 2. If you’re connecting the flash drive through a connection accessory like a USB cable or USB-C adapter, remove the drive and plug it directly.
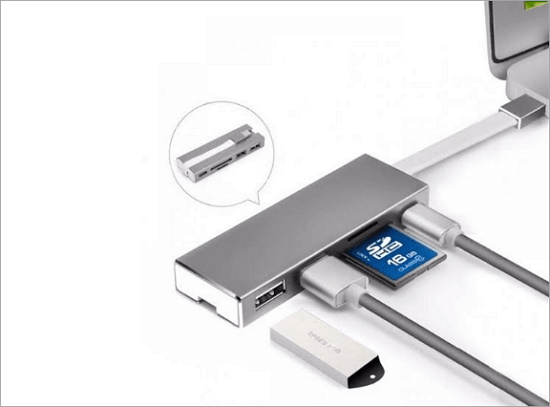
Step 3. If the problem is still the same, find another Mac or MacBook to connect the flash drive to.
Here is a more detailed tutorial that guides you through fixing this problem: >> How to Fix External Hard Drive that Keeps Disconnecting
Fix 2: Reset PRAM and SMC
If your Mac isn’t using Apple Silicon, you can fix the USB not showing up on Mac by resetting the PRAM and SMC controllers.
PRAM (Parameter RAM) saves all the settings information about your Mac, which can affect the functionality of storage devices like flash drives.
SMC (System Management Controller) also controls computer devices but has a specialty in power management. A problem with the SMC could result in the flash drive not getting enough power from your Mac.
💡 Only 3 steps are needed to reset the PRAM on your Mac. You can follow this guidance to do that:
Step 1. Shut down your Mac.
Step 2. Then, turn it on and immediately press and hold these keys: Command + Option + P + R.
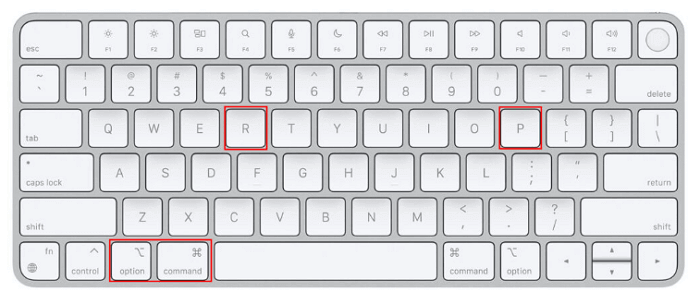
Step 3. Remove your hands from the keys when your Mac turns off and reboot.
💡 The following tutorial will guide you through resetting the SMC on your Mac:
Step 1. Shut down your Mac.
Step 2. Press and hold these keys: Power Button + Shift + Control + Option.
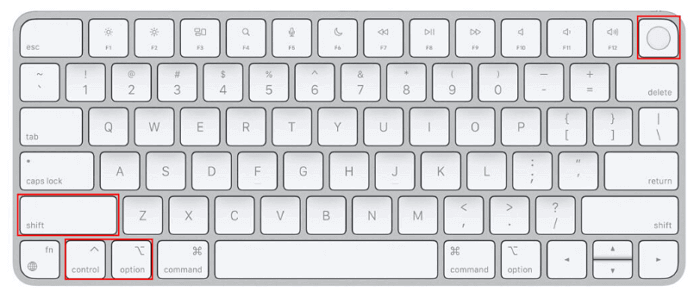
Step 3. Remove your hands from the keys and turn on your Mac.
Resetting PRAM is also an effective method of solving many other problems. For example, when you need to force shutdown on MacBook, you can force quit on Mac by resetting PRAM.
Fix 3: Adjust Finder Preferences
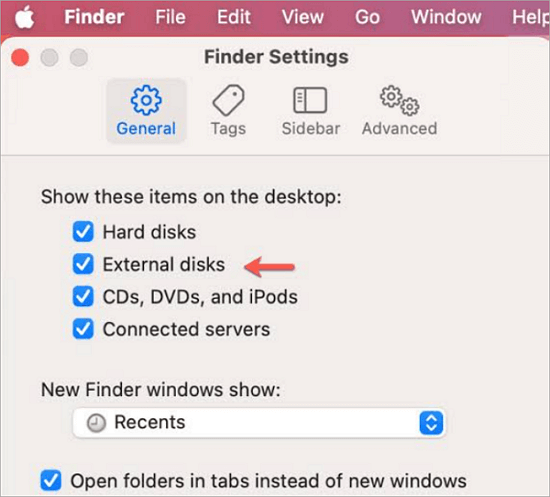
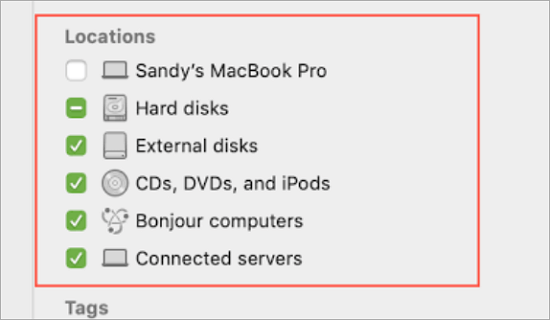
Finder controls which component shows on Mac and the location. Sometimes, your Mac recognizes your flash drive but doesn’t show it on the desktop because there is a problem with the Finder settings. Simply go to Finder to adjust the preferences, so the flash drive will show up in the desktop and Finder.
💡 Here are the steps to fix the flash drive not showing up on Mac via Finder:
Step 1. Go to the menu bar, click Finder, and select Preferences.
Step 2. Navigate to the General tab and tick the External disks box. This will make your flash drive appear on the desktop.
Step 3. Also, navigate to the Sidebar tab, scroll down to the Locations section, and tick the “External disks” box. This will make your flash drive appear in Finder.
Fix 4: Update macOS and Firmware
A flash drive on Mac not showing up can be caused by an outdated macOS and firmware, which means that they must be updated if your flash drive is to show.
Updating your Mac operating system and firmware to the latest version comes with the necessary compatibility features needed to address hardware issues like flash drives and connection to USB ports.
💡 Here’s how to fix Mac not recognizing USB through updating macOS and firmware:
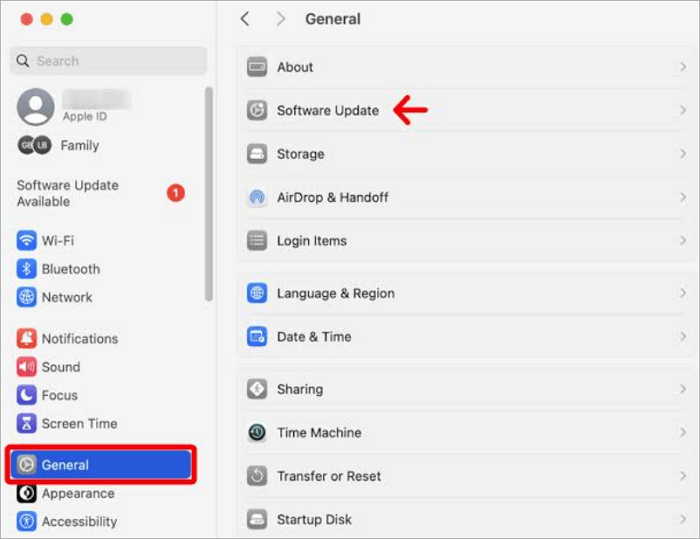
Step 1. Click the Apple logo on the top-left corner of your desktop and select System Settings.
Step 2. Go to the General option and choose Software Update.
Step 3. Navigate to the recent update and click on Update Now.
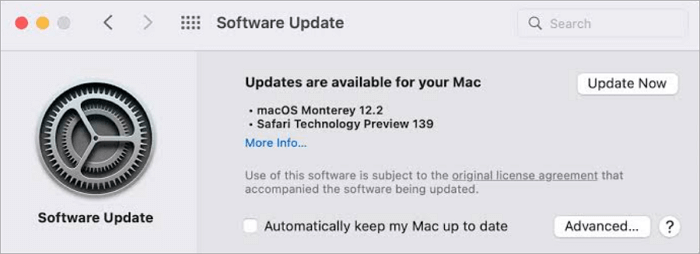
Step 4. When the update is finished, your Mac will restart, showing your flash drive.
After that, you will find the USB drive is showing on Mac. Don’t forget to open your flash drive to check if everything is OK.
Fix 5: Format the Flash Drive
Mac supports the following file systems: APFS, HFS/HFS+, exFAT, FAT32, ext2, and NTFS. If your flash drive is formatted to a file system not compatible with macOS, there will be an issue with its detection. If this is the case, you have to reformat your flash drive to a Mac-supported file system. To do this, you will need to access the Disk Utility tool.
💡 This is a breakdown of the steps involved:
Step 1. Click on Finder, go to Applications, open Utilities, and double-click Disk Utility.
Step 2. Go to the left panel and select the flash drive.
Step 3. Navigate to the top menu and click on Erase.
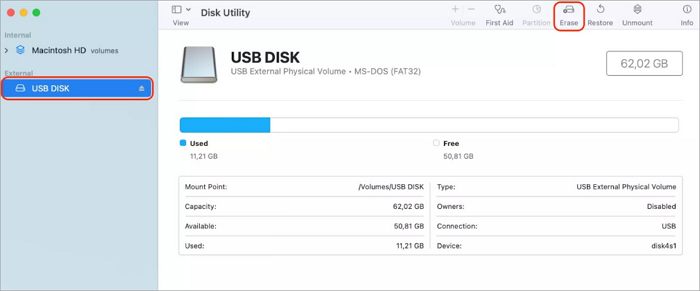
Step 4. Change the format of the drive to a Mac-supported system and click on Erase.
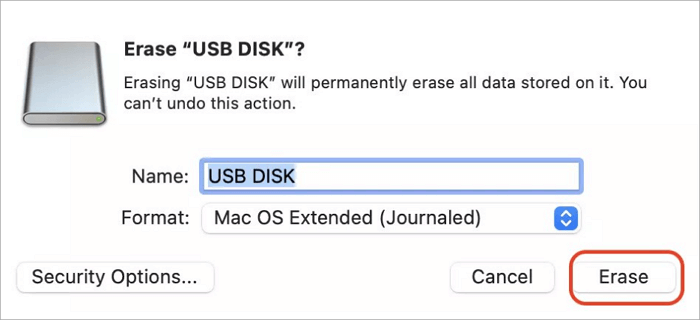
NOTE: Formatting the flash drive will delete all the data on it. Thus, it’s advisable that you backup your data to another storage. However, if you lose your data during the formatting process, you can get them back via ONERECOVERY – a professional data recovery software.
📥 See what it can do for you, free of charge.
Fix 6: Update Drivers
Just as it is possible that your macOS and firmware are outdated, it is also possible that your Mac is working on outdated drivers. This can cause the flash drive not showing up on Mac.
Drivers are part of the package that comes with macOS. Thus, to update drivers, you have to update the whole macOS. Here are the steps involved:
Step 1. Click on the Apple logo on your desktop and select System Settings > General > Software Update.
Step 2. Click on Upgrade Now to update your Mac operating system. Your drivers will be updated too.
Fix 7: Use Terminal to Check Drive Errors
Another solution for the Mac memory stick not showing up is to use Terminal to check for drive errors. Terminal is a command tool that comes with Mac computers. It allows you to check for errors in drives and attempt repair.
💡 Follow these steps to fix USB not showing up on Mac through Terminal:
Step 1. Open Terminal: Go to Finder, select Applications, and then click Utilities to find Terminal.
Step 2. Input diskutil list and press Return on your keyboard.
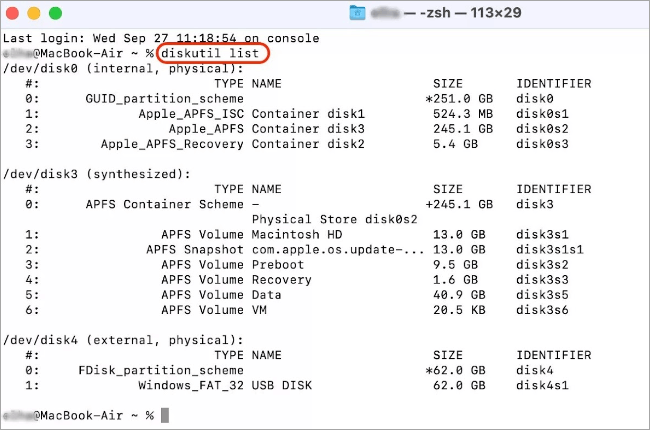
Step 3. Find the disk number of the drive. For this context, the disk number is 2. Type diskutil info disk2 and press Return on your keyboard.

Step 4. Type diskutil eject disk 2 and press Return on your keyboard.
Step 5. Type diskutil list and press Return on your keyboard. Once you notice that the flash drive is not among the list of drives displayed, exit the Terminal window.
Step 6. Open the Console to check for possible errors in the drive. Click Errors and Faults to check.
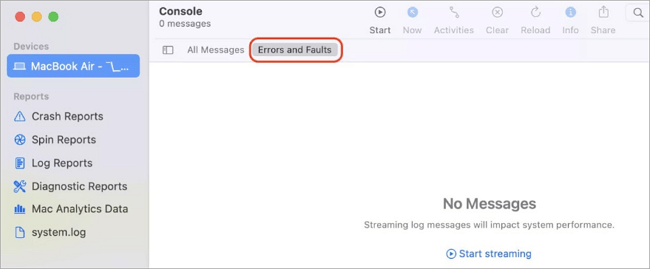
Step 7. Reconnect your flash drive to the Mac to confirm if there are still errors.
Fix 8: Use Disk Utility’s First Aid Tool
Mac computers come with Disk Utility, which has a first-aid tool that can resolve why your flash drive is not showing up on your Mac.
Follow these steps to use Disk Utility’s first aid tool to repair the USB drive not showing up on Mac:
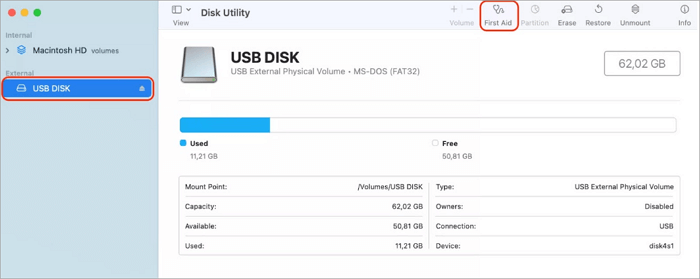
Step 1. Go to Finder > Applications > Utilities and double-click Disk Utility.
Step 2. Navigate to the left panel and select the flash drive not showing up.
Step 3. Go to the top menu and click on First Aid.
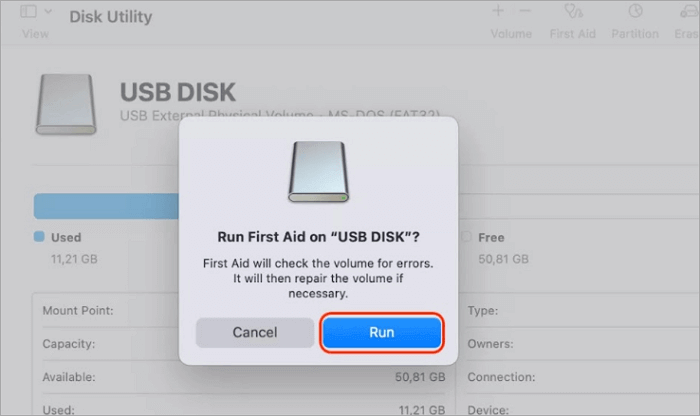
Step 4. Click Run to confirm that you want to perform an error check on the flash drive. Disk Utility will fix any error on the drive.
Step 5. Select the flash drive again, go to the top menu bar, and click on Unmount. Remove the drive and connect it back in 15 seconds.
Conclusion
We’ve identified 8 tested and trusted solutions to fix Mac not recognizing USB. These solutions can also be used to fix SD cards not showing up on Mac. By following the steps for each solution, you can resolve the issue and get access to your flash drive’s data.


