Are you facing corrupted files, sluggish performance, or compatibility issues with your camera’s SD card? You are not the only one! Many users often experience these challenges.
But here’s the good news – format micro SD card for cameras and you will solve most of these problems. It not only clears unwanted data but also optimizes your card for peak performance.
While cameras often have built-in formatting tools, formatting an SD card on a PC offers greater control and lets you choose the file system that best suits your camera’s requirements. Whether you are on Windows or Mac, this post has discussed how to format an SD card for a camera in great detail. Let’s get started!
✨ Related Post: >> How to Format a USB Drive on Windows 11/10 and Mac
Why Should You Format an SD Card for Your Camera?
Wondering why formatting is essential? Here’s what it does to SD memory card for digital cameras:
1️⃣ Eliminates Residual Files: Formatting your card will remove corrupted or unnecessary files that could impact your camera’s performance. Sometimes you can also unlock SD cards by formatting them.
2️⃣ Optimizes Storage Space: It frees up your SD card’s memory, allowing you to save new photos and videos seamlessly.
3️⃣ Ensures Compatibility: Cameras often require specific file systems, such as FAT32 or exFAT. Formatting the card aligns the card to these structures and ensures their flawless operation.
4️⃣ Maintains Longevity: Regular formatting keeps your SD card functioning at its best and reduces the risk of errors or lag over time.
Prepare for Formatting an SD Card for a Camera
Before you start the actual process, go through the preparatory steps we have provided below to avoid losing your valuable data.
➤ As we know, formatting an SD card completely erases its contents. So create a backup of all files stored on the card, and transfer your pictures, videos, or other important files to a PC, external drive, or cloud storage. Otherwise, you have to find professional tools to recover formatted SD cards.
➤ To ensure that your SD card works seamlessly with your camera, get a suitable file system. Most cameras use FAT32 for cards up to 32GB. For SD cards larger than 32GB, exFAT is the preferred format, as it supports larger files and works well with modern devices.
How to Format SD Card for Camera on Windows
If you are a Windows user, here are the three quickest ways to format your card for camera use.
Format an SD Card for Cameras via File Explorer
The Windows File Explorer is the simplest way to format any SD card. It is quick, easy to use, and good for general formatting needs. It has some drawbacks too, like it provides limited control over advanced settings and might not fix your damaged partitions.
Here are steps on how to format SD card for cameras via File Explorer on Windows:
Step 1. First of all, insert the SD card into your PC’s card reader and open the file File Explorer.
Step 2. Now locate your SD card under “This PC” or “My Computer sections and then select Format by right-clicking the SD card.
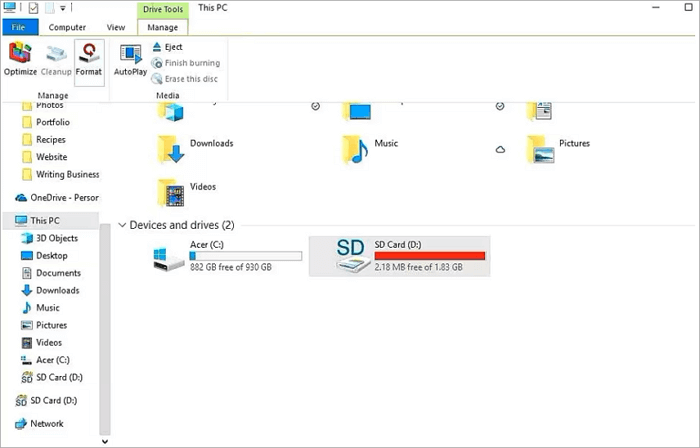
Step 3. In the Format window, choose FAT32 or exFAT as the file system, based on your camera’s requirements.
Step 4. Check mark the Quick Format if you want a faster process and then click the Start button.
Step 5. Finally, wait for the process to complete and confirm the success message.
Format Camera SD Cards with Disk Management
Disk Management is useful for users looking to fix corrupted partitions in SD card. This method is best for users who need to ensure a clean and reliable format. Though it allows for detailed disk partitioning, it may be complicated to understand for beginners.
Follow these steps on how to format camera SD cards using Disk Management on Windows:
Step 1. After you have inserted the SD card into the computer, right-click the Start button and select the Disk Management option.
Step 2. Now, find your SD card from the list of drives appearing on the screen. It will usually appear as a removable drive.
Step 3. Right-click the SD card and select the Format button.
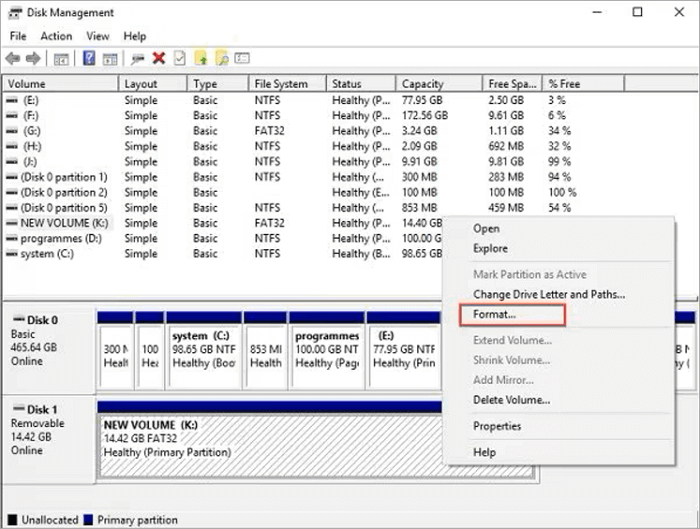
Step 4. Choose your file system, enter a volume label if desired, and then click OK.
Step 5. Now, confirm the action when prompted.
Format Micro SD Card for Camera Using CMD
Are you familiar with command-line tools? CMD is a powerful method to format SD cards. It’s particularly useful for resolving issues like corrupted file systems or unresponsive cards. As this method provides advanced control, it’s an optimal choice for professional users.
Its major disadvantage here is that it may require knowledge of command-line operations and any mistakes might lead you to unintended data loss.
Follow the steps below to format SD cards to cameras using CMD on Windows:
Step 1. Insert the SD card into your PC. Open the Command Prompt as an administrator by searching “CMD” in the Start menu and selecting Run as Administrator.
Step 2. Now, type “diskpart” and press Enter to launch the Disk Partition tool there.
Step 3. In DiskPart, type list disk to display all connected drives. Identify your SD card by its size, type select disk X (replace X with your SD card’s number), and press the Enter button again.
Step 4. Next, type clean to remove existing partitions, then create a partition by typing create partition primary.
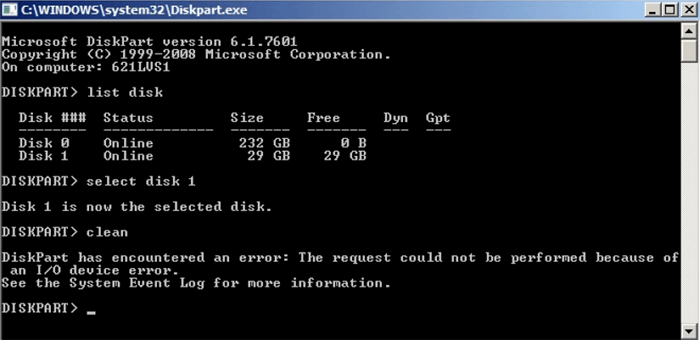
Step 5. Type format fs=fat32 or format fs=exfat depending on your camera’s requirements, then press the Enter button.
Step 6. Once the formatting is complete, type “assign” to assign a drive letter, and finally type the “exit” button.
How to Format Camera SD Cards on Mac
If you are using a Mac, there are reliable built-in tools to format your SD card too. Here’s how to use them effectively.
Format SD Card for Camera with Disk Utility
Disk Utility is the most user-friendly way to format an SD card on a Mac. Owing to its intuitive interface, this tool is suitable for beginners. Disk Utility allows you to choose from several file systems, including FAT32 and exFAT. However, it is limited in addressing any of your complex SD card issues.
Follow the steps below to format SD Cards with Disk Utility:
Step 1. Open Disk Utility by searching for it in Spotlight and look for your SD card in the left sidebar under “External.”
Step 2. After selecting your SD card from the list here, click on the Erase button at the top of the screen.
Step 3. In the pop-up window, choose a format- FAT32 for older cameras or exFAT for newer models.
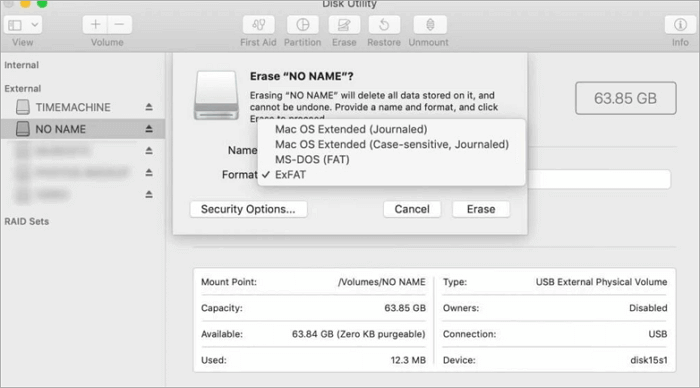
Step 4. Enter the name of your SD card here and then click on the Erase button.
Step 5. Once the process to complete, confirm the success message.
Format SD Cards for Digital Cameras via Terminal
Using Terminal provides users with more control over the formatting. Although it requires some familiarity with command-line operations and is not as user-friendly as Disk Utility, it resolves complex problems. Be aware when using it, as a single mistake could result in formatting the wrong drive.
Follow these steps to format an SD Card using Terminal on Mac:
Step 1. To begin with, insert the SD card into your Mac and open Terminal by searching for it in Spotlight.
Step 2. Type “diskutil list” here and press Enter to view all connected drives. Locate your SD card by its size and identifier (e.g., disk2).
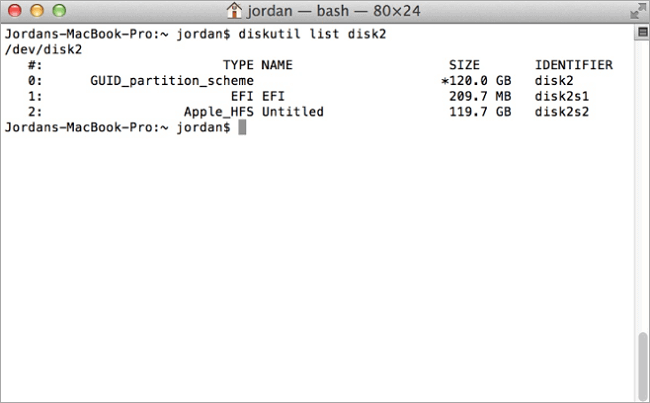
Step 3. Next, type “diskutil eraseDisk FAT32 SDCardName MBRFormat /dev/diskX” (replace diskX with your SD card’s identifier and “SDCardName” with a name of your choice).
Step 4. Press Enter and wait for the process to complete.
Step 5. At the end, confirm the success message in the Terminal.
Bonus: How to Reformat SD Cards on Cameras
Did you know that it is possible to reformat an SD card directly on your camera? It is often a more convenient option and ensures your card is formatted specifically for that camera. This method has certain limitations, such as fewer options for file system selection and the inability to fix severe file corruption.
These are general steps for reformatting SD cards for digital cameras on Mac:
Step 1. To begin with, insert the SD card into the camera and turn it on.
Step 2. Next, access the camera’s Settings or Menu.
Step 3. Look for the Format option, typically under the Setup, Storage, or Memory option.
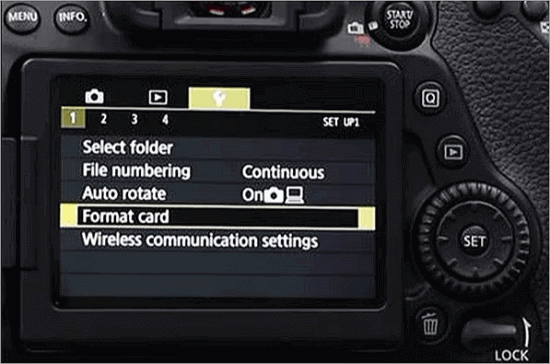
Step 4. Select the SD card and confirm the formatting process.
You will get to see slight changes in the steps for specific brands. For example, for Canon Cameras, you need to access the Settings Menu, navigate to Card Settings, and then select Format Card. And for Sony Cameras just go to Setup Menu, Memory Card Tool, and then Format button.
Conclusion
We understand that reformatting the SD card on camera formatting is a very crucial step to ensure its compatibility, optimal performance, and error-free operation.
If you struggle to format an SD card for cameras, we have discussed formatting an SD card for a Camera on Windows PC, Mac, and directly on your camera. Remember to back up your data and choose the appropriate file system, for best results.
FAQs on Formatting an SD Card for a Camera
Still have questions? We have answered common queries regarding formatting a Camera memory card below:
How to format an SD card for a Sony camera?
It is easy to format an SD card for a Sony camera. Simply, insert your card and go to access the Menu. There, navigate to the Setup button, then click Memory Card Tool, and choose the Format button. Now, select your card and confirm the formatting process as soon as possible. Make sure you back up important data before proceeding with the whole process.
How do you format a memory card for a Dash Camera?
Format your Dash Cameras’ memory card by going to the Settings menu, and then selecting the Format SD Card button. Next, follow the on-screen prompts to complete the whole procedure. Keep in mind that regular formatting prevents errors and improves the performance of your device.
How to reformat an SD card on a Canon camera?
Formatting a Canon camera SD card doesn’t have to be a struggle. Start by inserting the card into the camera and then open the Settings Menu. Now go to Card Settings. Here, select the Format Card button and click the Confirm button. Canon cameras are widely preferred because they simplify the whole procedure.


