USB partitions are undoubtedly helpful, but sometimes, these partitions become annoying. For example, some useless USB partitions may occupy your useful storage space or may cause system errors, etc. Therefore, to sort out the problem, in this article, we are going to discuss how to remove partitions from USB drives through various easy-to-follow methods.
Despite the unlimited pros of USB partitions, sometimes you may need to remove partitions from USB drives for several reasons which are discussed in the table below:
| 💭 Reasons | 📝 Descriptions |
| Maximize Usable Space | When the data stored in a particular partition is no longer usable, then it’s pointless to keep that partition. You can free up space for more useful data. |
| Simplify Drive Management | If you have created too many partitions, then it can put you in more hassle instead of ease. Then to make your drive clutter-free you may need to remove the partition. |
| Improve Compatibility | You may face the issue of data loss, system errors, etc., due to malfunctioning, viruses, or corruption of the USB drive partition. So, to avoid such issues, one may remove the USB drive partition. |
| Eliminate Hidden Partitions | Windows 10 ( and prior) recognizes only local and primary partitions, so you can’t use all of the USB drive space if you have created more than 2 partitions. Therefore to use all the space, one may have to delete the extra USB partitions. |
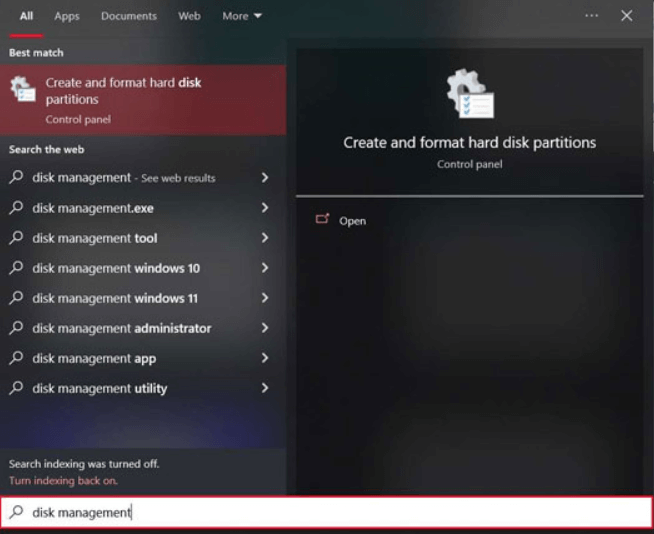
“Disk management is a tool that helps manage and control internal & external drives. Moreover, you can do formatting, reformatting, partition creation, and deletion through it.”
Removal of partitions via Disk Management is quite simple and reliable. Let’s break down the procedure of how to remove partitions on USB drives through disk management into simple steps:
Step 1. Open your PC and search Disk management in the search bar or you can right-click on the start icon to view the option of disk management.
Step 2. Now, from several options, choose your USB drive and right-click on it.
Step 3. Well! Just click on “Deleted volume” from the given list. ( In case, if you want to remove more than one partition, then you will have to repeat the above steps for each time removal). Now your USB partition will be deleted and the space will be considered as unallocated space.
Honestly speaking, sometimes, this method doesn’t work as the “delete volume’ option may be greyed out. Then you can move to the Diskpart command method ( described below).
“Diskpart is a command interpreter (text-based) that enables you to create as well as remove the partitions.”
If the disk management method didn’t work for you, it’s okay, because there’s another well-accepted method available. To be specific, you can remove the USB partition through the Diskpart command very easily and effectively.
So, let’s discuss the procedure of how to delete the partition made on a USB drive via the Diskpart command in a few mini steps:
Step 1. First, press Windows+ R to open the “Run” window and type “cmd” here> Click “OK”.
Step 2. Now you will be on the command prompt window, here you have to follow the path mentioned below:
➤ Type Diskpart and hit enter.
➤ Type list disk and hit enter.
➤ Then type select disk N and press enter. ( N is the number of your USB drive from which you have to delete the partition.)
➤ Type list partition.
➤ Type Select partition n. ( n = no. of the partition you want to delete)
➤ Type delete partition. ( to remove partition on USB flash drive)
Alright! Sometimes what happens is that an error message may appear during the process like “ Can’t delete a protected partition……”, so, in that case, you have to type “deleted partition override” in place of “delete partition”.
Well! After going through the above procedure, may you want to know about free professional software to remove the USB partition quickly without any frustration, Okay!
Paragon Partition Manager is one of the most authorized free software designed to reformat, resize, create, or delete partitions from flash drives or hard drives. The Paragon Partition Manager works very efficiently, it navigates the existing and occupied space in your drive and helps you make the right choice for partition deletion.
This partition management software is compatible with both Windows and Mac operating systems. If you need to remove partitions on Mac, Paragon Partition Manager can also help.
The process of how to delete partitions from flash drives is not a big deal, you can make the whole process successful by just following the few steps below:
Step 1. First of all, download the Paragon Partition Manager on your device.
Step 2. Then choose the “Delete partition” option> Select the partition on your drive and press “Del”. Simply confirm and apply changes.
It’s even worse if someone deletes a USB drive partition with important information and hasn’t backed up the files, especially due to an operational or technical error.
If the same case happened to you, then relax! In this section, we will introduce you to partition recovery software (ONERECOVERY), through which you can easily retrieve all of your deleted files on USB.
“ONERECOVERY is an advanced data recovery software that deeply scans your drives to navigate and recover the deleted files effectively.”
ONERECOVERY can recover 1000+ types of files like photos, videos, documents, system files, cache data, and pretty much everything else. Plus, with its enhanced AI, it not only recovers them but also repairs incomplete or corrupted files.
So, let’s discuss how to recover lost files through professional data recovery software.
Step 1. Download and Install ONERECOVERY software.
Step 2. Select your USB drive ( from which you are going to recover the files).
Step 3. Now, ONERECOVERY will utilize its innovative scanning algorithms and show you all the scanned results.
Step 4. Alright! Choose the file and select recover. That’s all!
In addition to recovering files that have been deleted by mistake from the partitions, ONERECOVERY can even help recover deleted partitions on Windows 10 and 11.
📥 Download it now and try it out for free.
In this technological world, nothing seems impossible. Whether you want to create or remove the USB partition or want to recover the USB files, all can be done with just by few steps processes described above.
Moreover, to recover any overwritten, deleted, or corrupted file, you can make use of the magical Tinyform ONERECOVERY software, which can accomplish the whole task in just a few seconds very efficiently. As this software is versatile, you can use it to retrieve data from many types of partitions, including the NTFS data recovery.
If you want to learn more about removing the partitions from USB drives, don’t miss the following FAQs.
Open your PC and click on the start icon. Here you have to type cmd and click ok. After clicking ok, you will see a command prompt window on your screen, now simply follow the path below:
Type Diskpart and hit enter.
Type list disk and hit enter.
Then type select disk N and press enter. ( N is the number of your USB drive from which you have to delete the partition.)
Okay! Now type create a primary partition> Type format fs=ntfs> Type assign> Type active> Type assign> list disk > active to active. That’s all, your USB will be reset.
Removing unallocated partitions from the USB is not that tough, let’s break the whole procedure into a few simple understandable steps;
Step 1. First, Click Windows+ R> on your keyboard, or you can right-click on the start icon and click “run”.
Step 2. Now, enter Disk Management and right-click on USB.
Step 3. Good! Now select delete volume and right-click on the device again.
Step 4. New partition volume> Follow instructions and restart the PC.
Are you facing corrupted files, sluggish performance, or compatibility issues with your camera's SD card?…
SD cards are convenient to store and transfer data. But if your SD card is…
USB drives can experience a few problems, and one of them is “USB access is…
“I removed my SD card from the camera and inserted it into my computer. It…
When it comes to storing and transferring data, our system storage is never enough and…
Pen drives, also known as USB flash drives, are necessary when you need to store…


